Introduction
Ashenvale is a questing zone that follows on from the Darkshore zone around level 20-22 with the quest Ashes in Ashenvale or you’ll be directed there from the Hero’s Call Board in Darnassus or the Exodar with the quest Hero’s Call: Ashenvale. However, neither of these quests are required, so if you’re already in or near Ashenvale, you can just jump straight in.
Make sure to train riding and buy your mount before starting the zone as it’s quite a trek back to your racial mount vendors.
If you haven’t followed the Darkshore guide and haven’t found your own way to Ashenvale, it’s not hard:
- From Stormwind, take the ship on the southern-most dock.
- From Ironforge, take the Deeprun Tram to Stormwind then the ship on the southern-most dock.
- From the Exodar, take the ship from the dock just to the south of the city.
In any case, you’ll end up in Rut’theran Village. You can pick up the Hero’s Call quest by taking the red portal up to Darnassus. Take the portal back down (don’t waste time with the Darnassus flight path). Then take the flight path from Rut’theran Village to Lor’danel. Follow the road south past the Grove of the Ancients, going left (east) around the Master’s Glaive, and take the left (south-east) fork in the road. Following the road will eventually take you to Orendil’s Retreat in the Ashenvale zone (27,22).
Except for Paladins and Shaman, your nearest trainer will be back in Lor’danel. The nearest Paladin trainer is in Darnassus; the nearest Shaman trainer is in the Exodar (take the ship from the western dock in Rut’theran Village to get to the Exodar; get the Exodar flight path so that in future you can fly straight there). Wait until we set our hearthstone in Astranaar (it won’t take long) and from then on you can fly to your trainer for new abilities and use your hearthstone to return back to Astranaar.
Color Code
- Quests
- Items
- Locations
- Enemies to kill
- NPCs
- Co-ordinates
Orendil’s Retreat/Blackfathom Camp
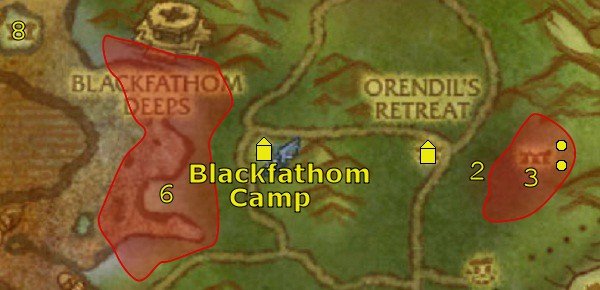
1. Turn in Ashes in Ashenvale or Hero’s Call: Ashenvale if you have one of them.
Get the following quests:
- Don’t Forget the Horde
- Bathran’s Hair
2. Go to the ghost ancient, Bathran, at 28,24 and get his quest Of Their Own Design.
3. Go to Bathran’s Haunt just to the east. There are two things we need to do generally in this area:
- Kill 10 Horde enemies. There are a few times in this zone where you’re just required to kill Horde enemies in the area – this doesn’t refer to PvP, just the orcs, goblins or undead mobs in the area.
- Collect 8 Bathran’s Hair, a type of plant.
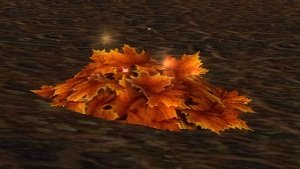
While doing the above, we need to do the quest for Bathran. Go to 32,23 and loot the Bottle of Wildfire from the table.
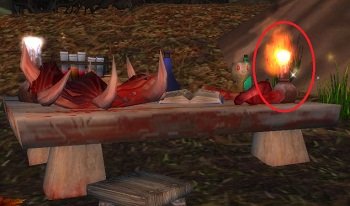
 Then go to Bathran’s Corpse at 32,21 and use the Bottle of Wildfire to burn it.
Once this is done and you’ve completed the other two tasks above, return to Bathran (28,24) and turn in Of Their Own Design.
4. Return to Orendil’s Retreat (26,22) and turn in
- Don’t Forget the Horde – get the follow-up, West to the Strand
- Bathran’s Hair – get the follow-up, Delivery for Orendil
5. Go west along the road to the Blackfathom Camp at 18,20.
![]() Get the flight path.
Get the flight path.
Turn in West to the Strand and get the follow-up, The Ancient Statuettes.
Also get the quest Naga of the Strand. If you’re level 22 and you’re doing dungeons while leveling, you can also get the available dungeon quest, Blackfathom Deeps.
6. Go to the beach just to the west. There are two things to do here:
- Kill 15 Wrathtail naga.
- Collect 10 Ancient Statuettes. These can be a bit tricky to spot as they’re small and lying down on the ground, but just look for the telltale sparkling glow.
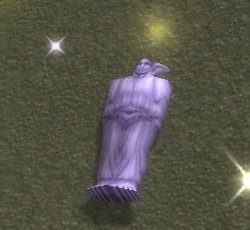
7. With both tasks accomplished, return to Blackfathom Camp (18,20) and turn in
- The Ancient Statuettes – get the quest Ruuzel
- Naga of the Strand
8. Ride north-west along the beach and then swim out to Ruuzel’s Isle at 8,14. It’s quite a long trip and you don’t want to fight every enemy between you and Ruuzel, so just ride hard, avoiding enemies and outpacing those that you aggro. You should already be doing this anyway – in general, don’t waste time fighting enemies you don’t need to kill as quests give you much more XP for your time.
Ruuzel is on the rise at 6,13. Casters beware! She has a fast attack that will often interrupt your casting; use instant cast spells or even wands to get around this. Kill her and loot the Ring of Zoram.
9. Swim and ride back to Blackfathom Camp (18,20). Avoid fighting enemies on the return journey, just like before. When you get back, turn in Ruuzel.
Maestra’s Post
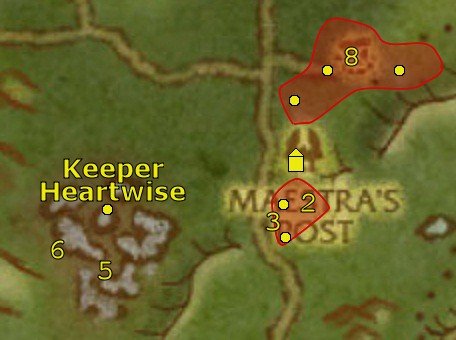
1. Follow the road south, then east, then south again to get to Maestra’s Post at 26,36.
You’ll see Sentinel Onaeya at the foot of the building there. Turn in One Shot, One Kill if you have it from the Darkshore zone. In any case, get the quest A Squad of Your Own.
Up the ramp to the building, turn in Delivery for Orendil and get the quests
- Bathed in Light
- Finding Teronis
Into the building, get the quests
- The Reason Why
- Rear Guard Duty
2. In the battle area just to the south, destroy 3 Ashenvale Wreckers and kill 10 Horde Invaders. You won’t be able to single pull them, but you have 3 able companions to assist you so it shouldn’t be a problem as long as you’re careful. You can get a new squad if necessary by talking to Sentinel Onaeya.
When done, return to Sentinel Onaeya (26,36), turn in A Squad of Your Own and get the follow-up, Respect for the Fallen.
3.  Equip the Cloak of Cenarius and then use it to become invisible.
Go south to Feero Ironhand’s corpse at 26,38 and loot Feero’s Holy Hammer.
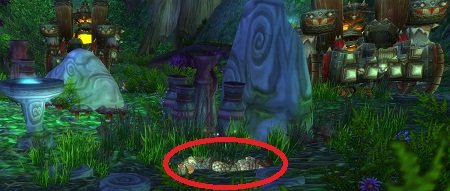
Go up the path to your left, to the tower at 26,40. Go up the stairs but be careful – at the top is a warlock and his imp who will detect you and you’ll have to fight them. You can swap in your normal cloak now as the Cloak of Cenarius won’t give you any more benefit. When you’re ready, go up and kill them.
Nearby you’ll find the corpse of Delgren the Purifier; get The Purifier’s Prayer Book from it.
4. Jump south off the tower and climb up onto the road. Ride just a bit north along the road, before cutting west into the forest, heading for Lake Falathim at 22,38.
Go to Keeper Heartwise at 20,38.
At Teronis’ Corpse, turn in Finding Teronis and get the follow-up, The Lost Gem.
From Keeper Heartwise, get the quest That Which Has Risen.
While in this area doing the next few steps, kill Tendrils from Below until one of them drops a Glowing Gem.
5. Go south to Harbinger Aphotic at 20,42 and kill it.
6. Go west to the moonbeam-lit area at 18,41.
 Use the Unbathed Concoction to create a Bathed Concoction.
7. Return to Keeper Heartwise and turn in That Which Has Risen.
By now you should have obtained a Glowing Gem. If not, keep on killing Tendrils from Below until it drops.
8. Ride north-east to the Ruins of Odil’Aran at 26,34. There are two things we need to do here:
- Kill 10 furbolgs.
- Deactivate each of the moonstones by right-clicking them. The moonstones are quite visible but, if you need co-ordinates, they can be found at: 27,33 (green), 28,31 (red), 30,31 (blue).
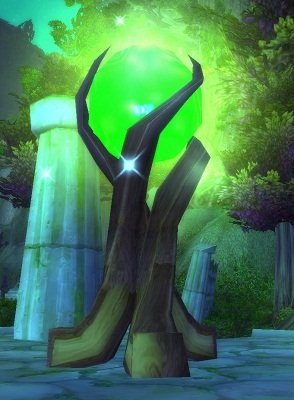
9. Return to Maestra’s Post (26,36) and turn in
- Respect for the Fallen
- Bathed in Light – get the follow-up, Orendil’s Cure
- The Lost Gem – get the follow-up, To Raene Wolfrunner
- The Reason Why
- Rear Guard Duty
Also get the quest Astranaar Bound from Sentinel Avana. Then talk to Sentinel Avana for a nightsaber ride to Astranaar.
Astranaar/Thistlefur Village
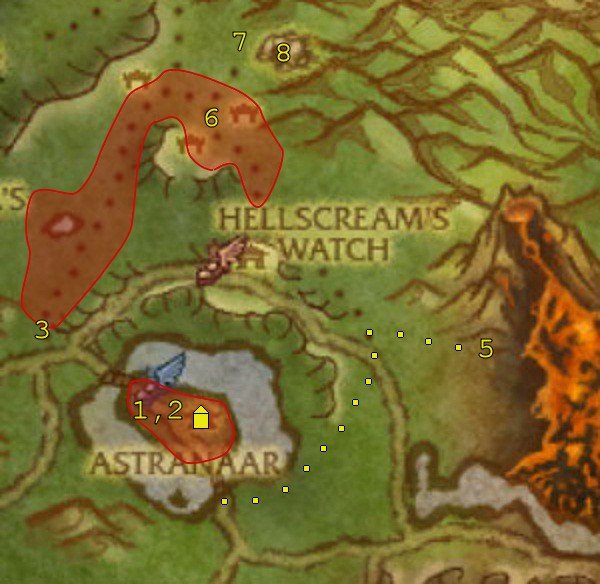
1. When you arrive in Astranaar, turn in Astranaar Bound.
![]() Get the flight path from the Hippogryph Master just to the north-west.
Get the flight path from the Hippogryph Master just to the north-west.
Get the quest Astranaar’s Burning from Sentinel Thenysil (34,49) just to the south. (Don’t get the quest, A Helping Hand, from Vidicator Palanaar just yet.)
 As you head east through the village to turn in the other quests visible on your mini-map, go to any burning fires you can see and use your Bucket of Water on them to extinguish. If you can’t extinguish a fire in one or two tries, just ignore it and move on to another one. It’s easier to target the burning surface on regular objects like buildings rather than trees.
At the inn (36,49), turn in To Raene Wolfrunner and get Culling the Furbolg Threat. Raene Wolfrunner will also have the quest Blackfathom Deeps which you only want if you’re going to do that dungeon.
 Talk to the innkeeper to set your hearthstone to Astranaar.
At Pelturas Whitemoon (37,51), turn in Orendil’s Cure then get the quest Elune’s Tear which will be available after a short while.
2. Once you’ve extinguished 15 fires, return to Sentinel Thenysil (34,49). Turn in Astranaar’s Burning and get the follow-up, Return Fire.
Get on to the nearby Astranaar Thrower (ballista).
 Your new vehicle has only one ability, Throw Glaive. Note that the attack is a trajectory attack rather than targeted, so you’ll have to rotate your view to hit the enemy fliers. Use Throw Glaive on the flying Wind Riders to kill 15 of them.
When done, leave your vehicle and return to Sentinel Thenysil (34,49). Turn in Return Fire.
3. Leave Astranaar by the west bridge. Just past the T-junction you’ll see Thistlefur Village to your right (31,45).
Kill any of the Thistlefur furbolgs until one drops a Troll Charm. Use it to get the quest Corrupting Influence?.
4. Immediately ride back to the Astranaar inn (36,49). Turn in Corrupting Influence? and get the follow-up,Worgen Wisdom.
Turn in Worgen Wisdom to the nearby worgen, Hephaestus Pilgrim, and get the follow-up from him, A Not-So-Charmed Life.
5. This time leave Astranaar by the south-east bridge. Immediately turn left, following the lake’s shore. Leave the lake’s shore by the night elf graveyard at 40,52 and head north up the path at 41,50. At the top you’ll hit a main path running north-south. Follow it north, then immediately take a branch to your right at 42,45 to get to the Remains of Iris Lake (45,46).
Right-click a Soot-Covered Elune’s Tear to get an Elune’s Tear.
6. Get back to the main path and continue following it north-west until you get to the eastern edge of Thistlefur Village (38,36).
Head north into the village and kill 15 furbolgs. (You should already have one or two from when we approached Thistlefur Village before from the south-west.)
7. When you have the 15 kills, take the path from 37,33 north-north-east up to Thistlefur Hold. At 38,30 you’ll find a friendly furbolg, Vear Darksnout. From him get the quest Too Far Gone.
8. Enter the cave of Thistlefur Hold. While in the cave look out for Troll Chests which you can open for the Troll Charms you need.
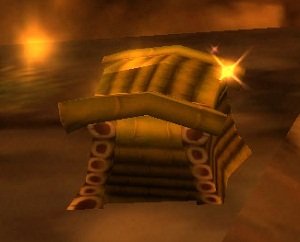
At the first fork in the tunnel, take the left branch. This will take you to an underground lake. On a rock in the lake is Dal Bloodclaw. He gets a stacking attack buff, so you’ll need to burst him down quickly. Kill him and loot Bloodclaw’s Collection.
Continue to wander around the cave, looking for Troll Chests until you have 8 Troll Charms. There are quite a few in the higher areas reached by following the right branch we passed earlier.
When you have the 8 Troll Charms, exit the cave and turn in Too Far Gone to Vear Darksnout (38,30).
9. Use your hearthstone to return to Astranaar. (If your hearthstone is on cooldown, ride back to Astranaar.)
First leave the inn; go south-east to Pelturas Whitemoon (37,51) and turn in Elune’s Tear. After a short while get the newly available quest A Trip to the Moonwell.
Return to the inn (36,49) and turn in
- Culling the Furbolg Threat – get the quest Dryad Delivery
- A Not-So-Charmed Life – get the follow-up, Go With The Flow
Go to Vinidicator Palanaar (35,49) to pick up that quest we ignored earlier, A Helping Hand. Then talk to Vinidicator Palanaar for an elekk ride to Forest Song.
Forest Song
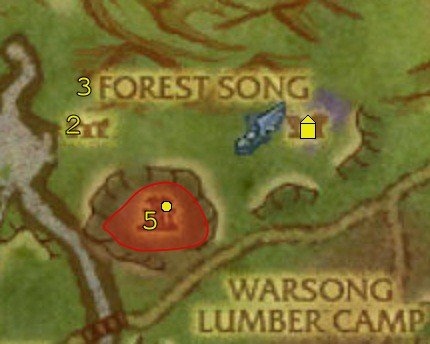
1. Turn in A Helping Hand and get the follow-up, A Shameful Waste. Get the other available quests
- Vile Satyr! Dryads in Danger!
- The Lost Chalice
![]() Get the flight path.
Get the flight path.
2. Ride south-west out of Forest Song and then turn west at 83,48 and head to Xavian at 79,46.
Go to the dying Anilia at 78,44 (question mark on your map), turn in Vile Satyr! Dryads in Danger! and get the follow-up, The Branch of Cenarius.
3. Go further north to 78,42 where you’ll find Geltharis. Kill him and loot the Branch of Cenarius.
4. Ride south then east out of Xavian and return to Forest Song to Illiyana (86,43). Turn in The Branch of Cenarius and get the follow-up, Satyr Slaying!.
Also get Stopping the Rituals from Anchorite Buurq nearby.
5. Go southwest to Satyrnaar (82,50). There are four things to do here:
- Kill any satyrs for their horns. You will need 16 Satyr Horns.
- Collect 5 Satyrnaar Fel Wood.
- Disturb 8 ritual gems by right-clicking them.
- On the larger red structure on the north edge of Satyrnaar (81,48), get the Chalice of Elune. It’s exact position may vary from that shown but will always be on that same structure.
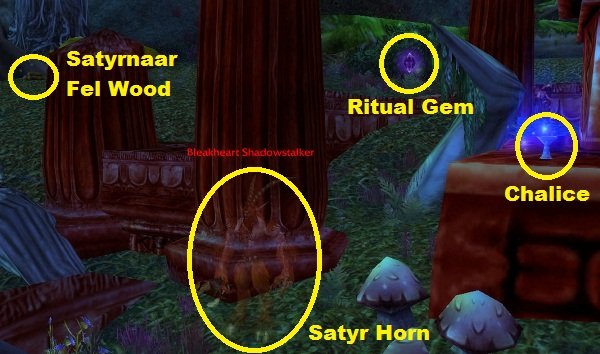
If you run out of satyrs to kill or gems to disturb, you can find more at Xavian to the north-west.
6. Once you’ve accomplished all of the tasks above, return to Forest Song (85,44) and turn in
- The Lost Chalice
- Stopping the Rituals
- Satyr Slaying!
Warsong Lumber Camp
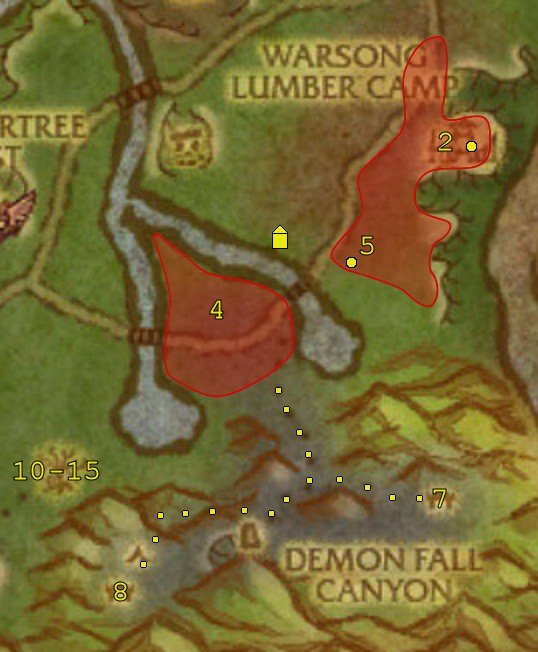
1. Leave Forest Song by heading south onto the road. Take the road west. Turn off south into the forest at 82,52, keeping the Warsong Lumber Camp to your left.
You’ll find the Warsong Lumber Camp quest givers at 83,62. Turn in A Shameful Waste and get the available quests
- Recover the Remains
- Reclaiming Felfire Hill
- Destroy the Legion
- Agents of Destruction
2. Go north-east into the Warsong Lumber Camp. There are two things we need to do in the camp:
- Kill 12 Horde enemies.
- Collect 10 Warsong Lumber.
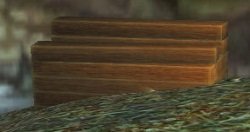
While doing the above, head for Kargathia Keep at 90,58. Kill Overseer Gorthak inside the keep.
Then finish up with the tasks above.
3. Return to the quest givers at 83,62. Turn in
- Agents of Destruction – get the follow-up, Explosives Shredding
- Recover the Remains
4. Go south across the river to Felfire Hill. Two things to do here:
- Kill demons (Roaming Felguard, Mannoroc Lasher or Searing Infernal) until one drops a Diabolical Plans. Loot it and use it to get the quest Diabolical Plans.
- Right-click the Fertile Dirt Mounds to plant seedlings. You will need to plant 8 of them.
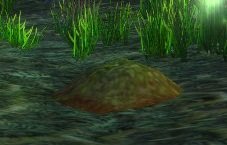
5. Follow the road east out of Felfire Hill, and over the bridge into the Warsong Lumber Camp.
Just to your right, at 86,64, you’ll find a Warsong Shredder. Mount it. The Shredder is a vehicle with 3 abilities:
 Warsong Shredder Blade – a ranged area attack. Use it on the Horde Explosives to destroy them. You can use it at range and, if you’re careful not to damage enemies, you can destroy the Horde Explosives without drawing aggro. If you do get into combat you can use this attack (along with your auto-attack), but try to avoid combat. Note that currently (4.0.3) the cooldown for this ability is longer than displayed.
 Overdrive – use to move faster for a short time. The best use for this is to outrun your enemies if you get aggro from too many at once.
 Hit it With a Wrench! – self-heal out of combat
Destroy 8 Horde Explosives. If your Shredder is destroyed, just find another one and hop in it.
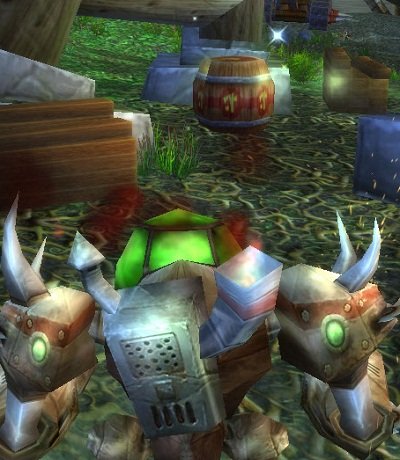
6. Once you’ve destroyed 8 Horde Explosives, stay in your Shredder and return to the quest givers at 83,62. You’ll get credit for obtaining the Warsong Shredder and automatically dismount. Turn in
- Diabolical Plans – get the follow-up, Never Again
- Explosives Shredding
- Reclaiming Felfire Hill – get the follow-up, Closue is Only Natural
7. Head south, through Felfire Hill, to the entrance to Demon Fall Canyon (84,72).
 While in Demon Fall Canyon and Demon Fall Ridge, look out for Demon Gates and use Gnarl’s Bough on them. You’ll need to close 10 Demon Gates.
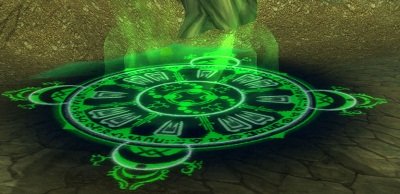
Head south into the canyon. At 84,77 take the path up to the east. When the path forks, take the left fork.
At the end of the path, you’ll find Gorgannon flanked by two Mannoroc Lashers. Kill the Mannoroc Lasher on your right first. Then kill Gorgannon and the other Mannoroc Lasher. Loot Gorgannon’s Flaming Blade.
8. Return back down to 84,77. Continue south through the canyon.
At 83,78 you’ll see stone markers with a fiery glow lighting a path up to the north-west. Follow this path up to Demon Fall Ridge.
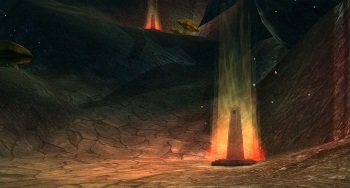
Enter the building/tunnel at 78,81.
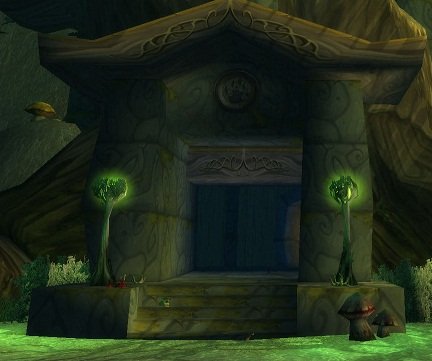
Follow the tunnel down, and cross over the bridge at the bottom to find Diathorus the Seeker. Kill him and loot Seeker’s Fel Spear.
9. Return back the way you came, out of the tunnels. Close any more Demon Gates that you still need, and by now you should easily have killed 15 demons. (If you still need more, kill them).
Once done, return to the Warsong Lumber Camp quest givers at 83,63 and turn in
- Closue is Only Natural – get the follow-up, The Shadewalker
- Never Again
- Destroy the Legion
10. Again, head south to Felfire Hill. This time follow the road west over the bridge out of Felfire Hill. Then cut south through the forest until you find the path up to the Dor’Danil Barrow Den at 74,76.
Follow that path up to Gaivan Shadewalker, a druid in cat form who patrols around the area (look for the question mark quest turn-in). Turn in The Shadewalker and get the quests
- Insane Druids
- The Forest Heart
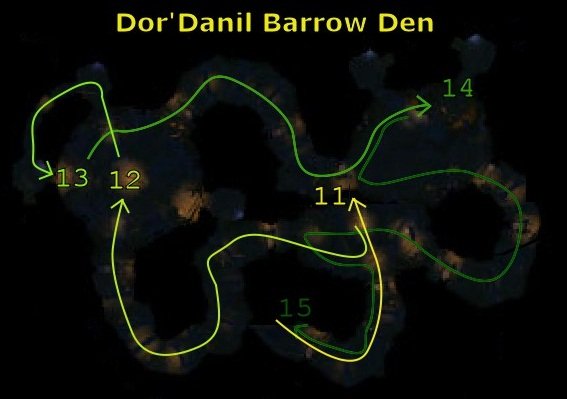
11. Head into the Barrow Den at 75,75. For the next two steps, make sure to kill any Severed Keepers and Severed Druids that you see and loot them for their Untainted Spirits – you’ll need 7 of them shortly.
Follow the tunnel down and over the bridge straight in front of you, you’ll find Taneel Darkwood. Kill him.
12. Leave the cavern by the western tunnel. Follow the tunnel until you reach the Forest Heart at 75,74.
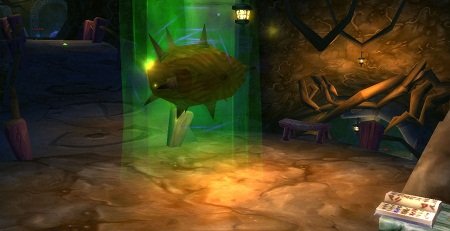
 You should have killed 7 druids by now for 7 Untainted Spirits (if not, find and kill some more druids). Use the 7 Untainted Spirits to create a Power of Nature. Right-click the Forest Heart then loot The Forest Heart.
13. Continue over the bridge and then follow the tunnel as it curves around to the left. At the end of the tunnel you’ll find Mavoris Cloudsbreak on a balcony. Kill him.
14. Jump off the balcony to the tunnel below. Follow the tunnel to the left (north-east). At 77,74, take the tunnel branch to the left under the bridge.
At 77,73, just before the tunnel ends, you’ll find Uthil Mooncall. Kill him.
15. Return under the bridge, and this time take the other branch up. Don’t take the bridge to your left, just turn right up the tunnel at 78,74.
You’ll pass under a bridge before hitting a fork at 76,74. Turn left, and then right up the tunnel at 77,75. Follow this tunnel out of the den.
Turn in Insane Druids to Gaivan Shadewalker.
16. Head north to the road, and follow the road east to the Warsong Lumber Camp quest givers (83,63). Turn in The Forest Heart.
Use your hearthstone to return to Astranaar. (If your hearthstone is on cooldown, ride back to Forest Song and take the flight path to Astranaar.)
Thunder Peak/Raynewood Tower
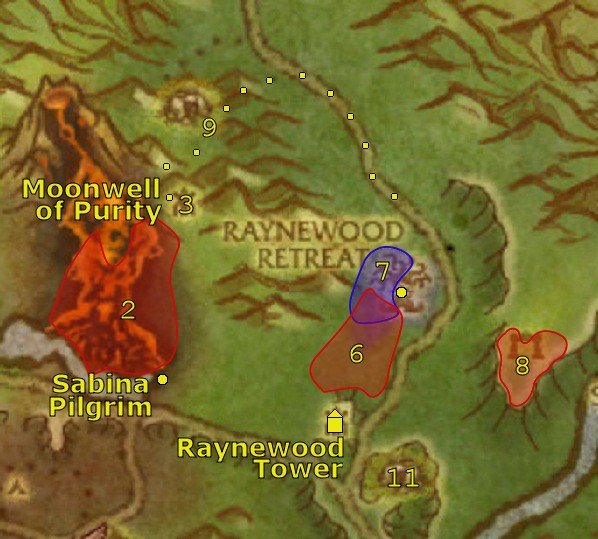
1. Take the south-east bridge out of Astranaar and follow the road east to Sabina Pilgrim at 52,56. Turn in Go With The Flow. From the elementals get the quests
- Put Out The Fire
- Hot Lava
2. Two tasks to do in the fiery area to the north-west:
- Kill 10 Lava Ragers. The Freezing Surger accompanying you will help. Don’t leave the area otherwise the Freezing Surger will despawn. If you lose it, you can return to Arctanus (52,56) for another one.
 Use the Gift of the Earth on 8 Lava Fissures.
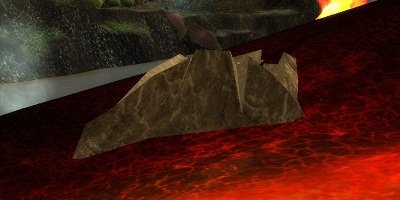
Try to end up by the north-eastern part of the fiery area by the time you’ve completed both tasks.
3. Go to the Moonwell of Purity at 53,45.
 Use the Elune’s Tear while in the moonwell. From the quest pop-up, turn in A Trip to the Moonwell and get the follow-up, He Who Would Be Forgiven.
4. Return to the elementals (52,56) and turn in
- Hot Lava
- Put Out The Fire
Get the quest Vortex. This is a vehicle-style quest where you’ll have the following 4 abilities:
 Sky Lightning – basic attack power; use it continually when you’re not using the next two abilities
 Vortex Vengeance – damage over time attack; use whenever it’s off cooldown
 Extinguish Flames – use whenever you have the Lordly Immolate dot on you
 Return to the Vortex – use only if you need to retreat and try again
Now go ahead and accept the talk option which will merge you with a Whirling Vortex to tackle Lord Magmathar. You will be taken to Lord Magmathar. Kill him.
You’ll be taken back to the elemental quest givers where you should turn in Vortex.
5. Return south to the road and continue east along it. Take the left branch (north, at 58,60) to Raynewood Tower (58,59).
Turn in
- He Who Would Be Forgiven – get the follow-up, In the Hands of the Perverse
- Dryad Delivery – get the follow-up, Search the Bole
Also get Recover the Fallen.
6. Following the path north, right click the Fallen Sister Corpses until you have 10 of them. Note that you can remain mounted while you collect them, but often there will be a still-living orc standing by the corpse that you’ll have to kill.
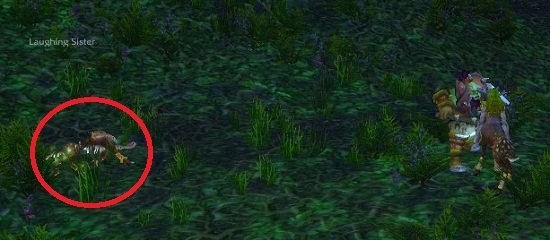
Continue on to Raynewood Retreat and enter the building there at 62,51.
Go up the ramp inside, turn in Recover the Fallen to Halannia and get the follow-up, Defend the Tree!.
7. Talk to Halannia to go into Shade form and a phased version of the area. This is another vehicle quest. You have three abilities:
 Swipe – attacks multiple enemies
 Rake – attacks a single enemy and applies a bleed dot
 Pounce – jumps to enemy for large damage and a stun; has a minimum range
The enemies you need to kill are in groups outside the building. Most groups have an elite in them. Kill the easy groups without an elite first. Against groups with an elite, use Pounce then Rake on the elite, then Swipe until the whole group is down.
When you’ve killed the 50 Warsong enemies you need, immediately leave vehicle to change phases (any enemies that still have aggro on you will phase out).
8. Head east from Raynewood Retreat, over the road, and to a path up the hill at 64,52. This will take you up to Night Run.
Kill Felmusk Satyrs, Felsworn, Rogues and Shadowstalkers (who are stealthed) until you’ve looted 5 Fallen Moonstones from them.
9. Return west back down to the road, and head north along it.
At the end of this route, you’re going to need a Wooden Key that drops from Crazed Ancients and Withered Ancients. Just kill them as you go until one drops the Wooden Key. You’ll start seeing them near the road from about 62,46.
When you reach 58,38, turn west off the road and head to the right of the big tree in front of you as shown in the picture. With a combination of riding and jumping you can get over the hill here and into the Howling Vale.
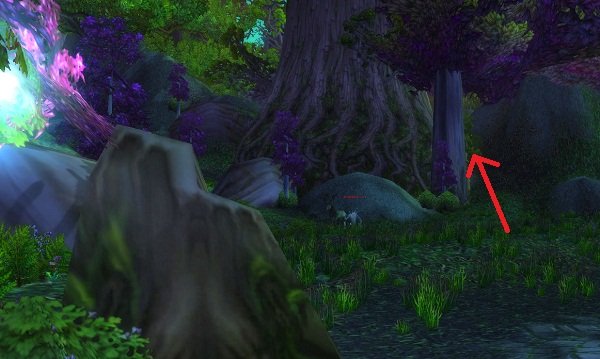
There are more Crazed Ancients and Withered Ancients here that you can kill if you still don’t have the Wooden Key.
Once you have the Wooden Key, open the Worn Chest at 54,40 and get the Iron Shaft.
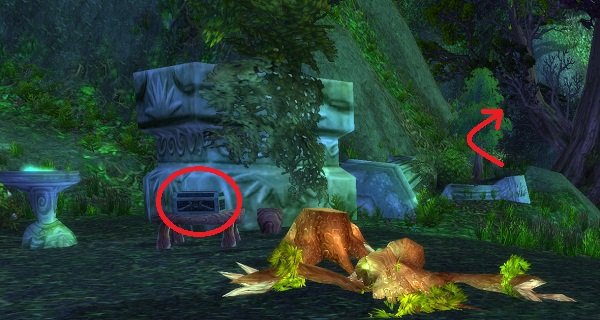
10. The quickest way out of here is south over the surrounding hills. Look for a way up behind the big tree on the south-west corner of the Howling Vale (53,41). This will take you to the Moonwell of Purity.
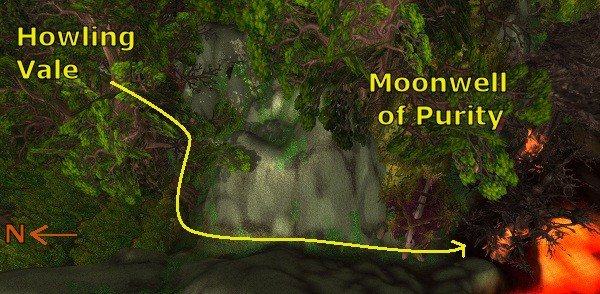
Ride back to Raynewood Tower (58,59).
Turn in
- Defend the Tree! – get the follow-up, Report from the Northern Front
- Search the Bole – get the follow-up, Playing Possum
- In the Hands of the Perverse – after a short while, get the quest All’s Well
11. Out of Raynewood Tower, follow the road south-east then south. At 60,65 there will be a path to your left down to the Shady Nook.
 In the Shady Nook is an elite, Oso Bramblescar, a druid in bear form. Whenever you get aggro from him, use the item, Shael’dryn’s Playing Possum Technique. I suggest putting it on your action bar so you can still quickly use it even after you get the item you’re after here.
Follow the path to the cave at 62,61 and loot the chest inside for the Iron Pommel.
12. Return back the way you came to Raynewood Tower (58,59).
Turn in Playing Possum and get the follow-up, Return to Raene.
Use your hearthstone to return to Astranaar. (If your hearthstone is on cooldown, ride back to Astranaar.)
House of Edune
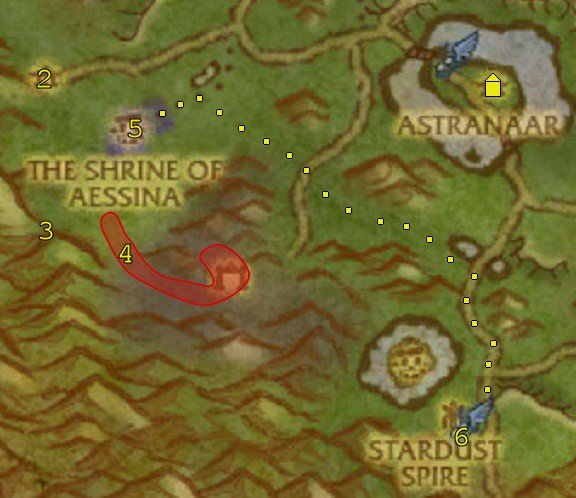
1. Turn in Return to Raene and get the follow-up, Dartol’s Rod.
At Pelturas Whitemoon just to the south-east, turn in All’s Well.
On the western side of Astranaar, get the quests
- Check in on the Edunes
- To the Spire
2. Follow the road west out of Astranaar. At 26,46 there will be two paths branching off left from the road – take the more overgrown one heading to the west, not the one heading down to the south. Follow the path to the House of Edune (17,49).
Turn in Check in on the Edunes and get the follow-up, Three Friends in the Forest.
3. Head south to Bolyun’s Camp at 17,59.
Turn in Three Friends in the Forest. Prepare yourself for an ambush, then get the follow-up, In a Bind.
Kaliva will spawn. Kill her and loot Heart of Kaliva.
Turn in In a Bind and get the quest Clear the Shrine.
4. Head east to the Fire Scar Shrine (21,58). Kill 12 demons here – any combination of Lesser Felguards and Felslayers.
5. Leave the Fire Scar Shrine out its western entrance (21,58).
Head north to the Shrine of Aessina. Don’t worry about all the demons there: unless you attack them, they’ll go straight for Big Baobob.
At Big Baobob (22,52) turn in Clear the Shrine and get the follow-up, The Last Stand.
Kill 30 Demonic Invaders. They have less health than other mobs their level, so you might be tempted to use AoE powers to kill more of them quicker. Unfortunately AoE powers tend to be weak at this level and it’s easy to aggro more than you can handle, so I recommend just killing them individually.
When you’ve killed 30, turn in The Last Stand.
6. Ride north-east away from the shrine, then cut south-east through the forest at 24,50, over the path around 28,56 and east between the hills at 30,59.
When you get to the road around 36,61, follow it south to Stardust Spire (35,71).
Stardust Spire
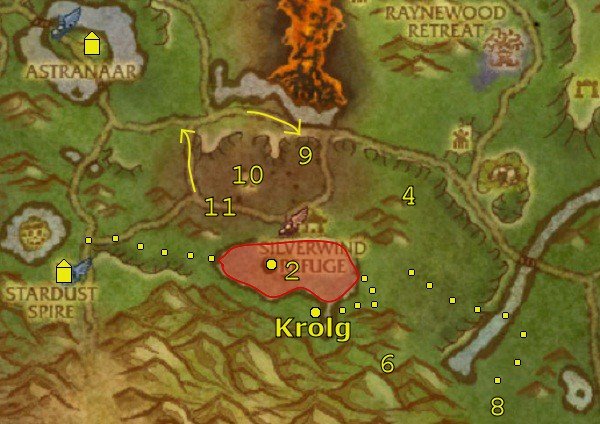
1. Turn in To the Spire and get the follow-up, Retaking Mystral Lake. Don’t get Rebels Without a Clue unless you plan to quest in Stranglethorn Vale.
From the other quest givers, get the quests
- Ze Gnomecorder
- The Goblin Braintrust
- They Took Our Gnomes
![]() Get the flight path.
Get the flight path.
2. Follow the road north from Stardust Spire, but as soon as the road branches to the east, head straight east and away from the road at 38,68, across the countryside until you reach Mystral Lake (44,69).
On your way to the island at the centre of the lake, kill Befouled Water Elementals. On the island itself, kill the water elemental, Tideress.
Now on the island and in the surrounding lake, kill the rest of the 12 Befouled Water Elementals you need. Try to end up near the eastern shore of the lake by the time you kill the last one.
3. Go to the lake’s eastern shore around 53,71. Take the torch-marked route to the south and then immediately west to the cliffs overlooking the lake.
Across a stream you’ll see the furbolg Krolg (marked by a question mark on your mini-map). Don’t kill him!
 Before you approach him, use Dartol’s Rod to turn yourself into a furbolg. Krolg will become friendly. Go to him and turn in Dartol’s Rod. Get the follow-up, King of the Foulweald.
4. Cross back over the stream before cancelling your furbolg buff and mounting up. Ride back down the path and turn north-east then north to get to Greenpaw Village (57,66).
 In the centre of Greenpaw Village is the Foulweald Totem Mound (56,63). Go to it and use the Bloodtooth Banner. This will spawn 5 waves each consisting of a single Enraged Foulweald, followed eventually by Chief Murgut. Be warned that the chief takes a long time to spawn (approximately 3 minutes after the combat has begun) so just be patient if you kill the other furbolgs quickly.
5. Return to Krolg (50,75) (following the torch-marked path from 53,72). Turn in King of the Foulweald and get the follow-up, A New Adornment.
6. Head back along the path, but this time turn south to the Blacktooth Camp (54,75). Follow the path, through a fallen tree, until you reach Ran Bloodtooth at 54,79. Kill him and loot Ran Bloodtooth’s Skull.
7. Return to Krolg (50,75). Turn in A New Adornment and get the follow-up, True Power of the Rod.
8. Return back down the path, then head out north-east until you hit a path around 56,70. Follow that path south-east past the Moonwell of Cleansing and over the bridge at the Falfarren River. The path will fork by Silverwing Outpost. Take the right path (south) and when you hit a small road follow it to the right (south).
The road will lead you to Silverwing Grove (61,83). When you get there, turn in Report from the Northern Front.
9. Use your hearthstone to return to Astranaar. (If your hearthstone is on cooldown, head north-east along the river until you hit the road, then follow the road west past Raynewood Tower until you reach Silverwind Refuge.)
Take the south-east bridge out of Astranaar and follow the road east. At 50,57 turn right (south) off the road and down into Silverwind Refuge.
You’ll see a large caged area with Captured Furbolgs inside. Kill the guard by the cage’s entrance on it’s south side.
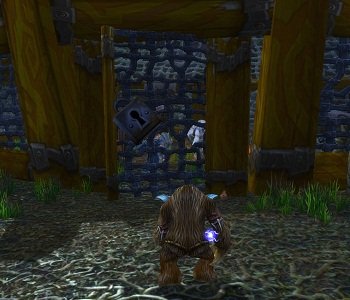
 Turn into a furbolg using Dartol’s Rod. Go inside the cage and talk to Ota Wen. Follow the conversation through to the end to complete the quest.
10. Leave the cage, cancel your furbolg buff and mount up. Use the furbolgs distracting the guards to ride past them to the west, to the Skunkworks around 47,62.
You should be able to spot a bomb atop a shredder-shaped platform (marked by an exclamation mark on your map). Head towards it. While in the area, kill Goblin Technicians and loot 8 Filthy Goblin Technology from them.
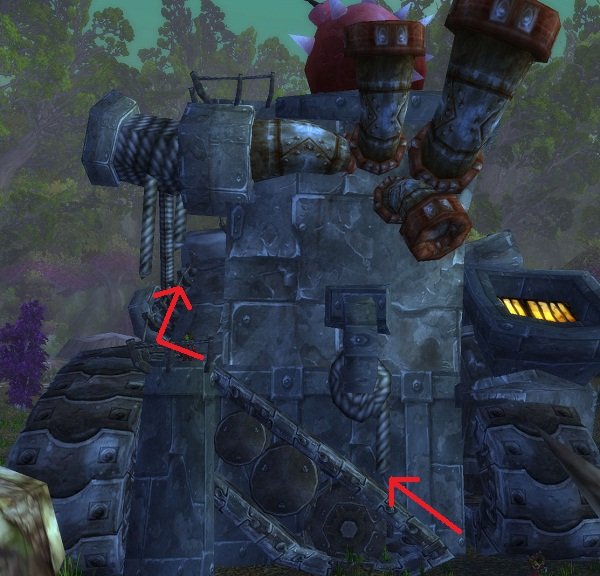
From the back, jump onto the shredder/platform’s tread and climb it. You’ll find Chief Bombgineer Sploder surveying the area from the front. Kill him and loot Sploder’s Head.
Then resume climbing to the very top, to the bomb. Get the quest from the bomb, They Set Them Up The Bomb!.
Jump down to the south. Plenty of Goblin Technicians to kill here. Get the last of the 8 Filthy Goblin Technology you need.
11. Continue south and then west and look for the kodo-drawn wagon patrolling along the road here. Approach it and Painmaster Thundrak will attack you. Kill him to free the two gnomes.
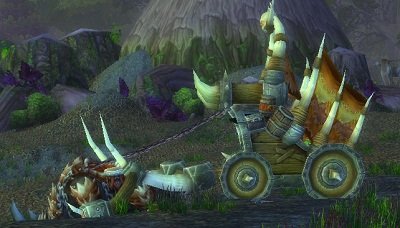
12. Take the road north out of the Skunkworks/Silverwind Refuge. You’ll soon reach the main road – follow it west back to Astranaar.
At the inn, turn in True Power of the Rod.
Take the flight path to Stardust Spire.
13. First turn in They Set Them Up The Bomb! to Huntress Jalin. Immediately look to the east; watch the bomb you saw earlier being carried off towards the Stonetalon Mountains, our next questing zone.
Turn in the last remaining quests for this zone:
- The Goblin Braintrust
- They Took Our Gnomes
- Ze Gnomecorder
- Retaking Mystral Lake
Next zone is Stonetalon Mountains where we’ll try stop that bomb!


 by Snowflake
Re-uploaded imagesFor some reason, almost all of the pictures included with this guide had been been deleted. I have re-uploaded them now making the guide usable again.
I likeI like what I am seeing here, the formatting is excellent, the presentation is clean. If you plan on doing any revisions soon I would suggest possibly trying to add a few more pictures, possibly harder to see items as a suggestion, just to avoid long lists of text. This is a minor suggestion, overwise, stellar job