 by Snowflake
Introduction:
This is a guide for players who start out as Draenei. It will guide you from level 1 to 12. If you need guides for any other level range (or race) please check out this page. Attention: Other races can’t get quests described in this guide until about level 6 (Azure Watch). The quests before that point are only available to Draenei but any other race wishing to use this guide can level to 5/6 in their own starting area then continue on with this guide from that point.
General Tips:
- Always log out in an inn
- Get bags as early as possible
- Do not waste your time searching a group for quests mentioned in this guide unless you really can’t kill something
- In general, this guide does not guide you towards class quests or tradeskills
- Spend your talent points to do the most damage
- This guide can be finished in a few hours /played, should you see that you take several hours to complete one level, you are doing something wrong
- Quests that aren’t mentioned have been left out intentionally
- This guide does not take into account PvP
Useful Addons:
Something that’s amazingly useful is the Ace2 updater. Download and install it and the program will present you with a list of addons which all use the same library (hence they consume very few ressources). From that list you can choose addons that interest you (I downloaded Fubar quest mod, Fubar location, Cartographer, Bartender and a mod to make my UI look better) and the program will install all the addons for you. Furthermore you can run the program every time before you launch WoW and choose to update all installed modules for you.
Color Code:
- Quests
- Items
- Locations
- Quest objectives to kill
- NPCs
- Locs
Level 1
Right as you appear, go west and take the quest [1] You Survived! from Megelon. Continue further southwest until you reach the crash site. Turn in [1] You Survived! at Proenitus and take the follow up. Go further west towards the exclamation mark on the minimap and take the quest [2] Volatile Mutations from Botanist Taerix.
Kill Volatile Mutations and Vale Moths around the camp until you complete the kill list of both quests. You should ding level 2 while doing so.
Level 2
Go back to the camp and turn in [2] Volatile Mutations. Get the follow up and also get [3] Botanical Legwork from the NPC close-by. Turn in the other quest and get the delivery [2] Urgent Delivery!. Go inside the building and turn it in at Zaldunn. Take the follow up. While you are in the building complete your class quest at your class trainer. Exit the building through the back entrance and get the following two quests:
- [4] Inoculation
- [4] Spare Parts
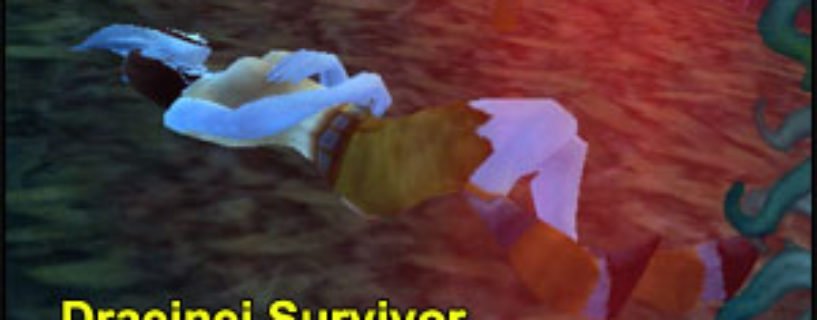
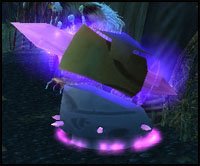
Now go west of the camp. You should soon spot a Draenei Survivor looking like this (there are several):
Search for the spell “Gift of Naaru” on your hotbar. This is your racial ability. Cast it on the Survivor.
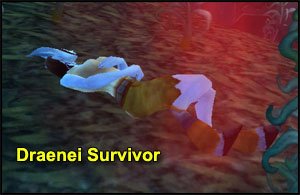
Further west at (74,48) you should reach a purple field looking like this:
Gather 3 corrupted flowers there and kill Mutated Root Lashers until you have 10 lasher samples.
You should be level 3 by the time you are done.
Level 3
Go back to the Crash Site, turn in [3] Botanical Legwork and then [2] What Must Be Done…, of which you get the follow up. Go inside the building and turn in [2] Rescue the Survivors!.
Sell junk etc.
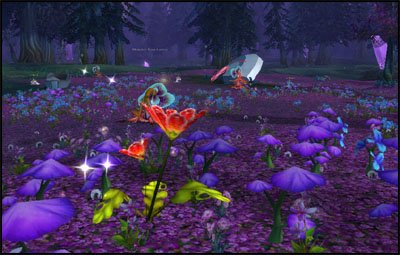
Go south until you get to a lake with a big crystal (77,59):
Swim to the crystal, right click it and get out of the lake by the eastern side. Go east until you hit Nestlewood Thicket (82,59) (a camp with owlbeasts).
Now there are aggressive owlkins (red name) and non-aggressive ones (yellow name). Target the non-aggressive ones and use the innoculating crystal from your inventory on them. You’ll need to do this 6 times in total. At the same time go deeper into the camp until you see a way up into the mountains (Nestlewood Hills). Follow it and search for shiny rockets looking like this on the way:
Loot them. You’ll need 4 in total. Some can be found in the mountains, some can be found in the valley on the other side. Once done, use your hearthstone, you should be level 4 by now.
Level 4
Go back to the Crash Site and turn in all your quests. Take the follow up: [5] The Missing Scout. Also if you have a class quest, do it now.
Once done go southwest to (72,60) where you should see Tolaan. Turn in [5] The Missing Scout and get the follow up. A little further southwest you should see plenty of Blood Elf Scouts. Kill 10 of them.
You should ding 5 while doing so, or you should be close.
Level 5
Go back to Tolaan and turn the quest in. Take the follow up. Go back to the Blood Elf camp, but this time go up the mountain until you see a little tent on the top of a slope (69,65):
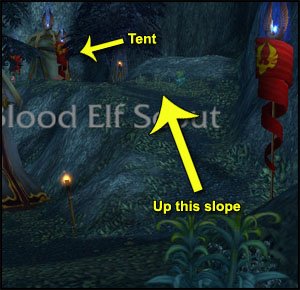
You should see Surveyor Carnessa there. Kill her and loot the Blood Elf Plans from her. Right click the plans for a quest. Go back to the Crash Site. Turn in both quests at Vindicator Aldar and take the follow up [5] The Emitter. Turn it in at Technical Zhana close-by and get the follow up.
You are now done on the newbie island and should be half way through level 5 (or level 6 if you did your class quest). Sell junk etc. and get ready for a trip to the big island!
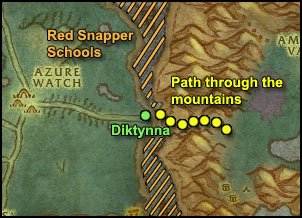
Leave the Crash Site and go west. At (69,54) you should see a path leading up into the mountains. Follow it. On your way at (64,54) you should see a sitting Draenei. Take his quest. Cross the river ahead of you and take the quest [6] Red Snapper – Very Tasty! from Diktynna. Go back to the river you just crossed and look for a school of red snapper:
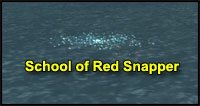
Stand close to it and use your Draeinei Fishing Net from your inventory. Sometimes you’ll just get a red snapper, sometimes an angry murloc spawns which you have to kill before you can loot a red snapper from him. Repeat this until you have 10 red snappers.
Once done go back to Diktynna and turn the quest in. Take the follow up. Follow the road west until you hit the Azure Watch village.
First, turn in [6] Find Acteon! at Acteon. Take the follow up. Then go to Technician Dyvunn and turn in [5] Travel to Azurewatch. Lastly go into the inn just behind the technician. Turn in [5] Word from Azure Watch and make the inn your home location.
You should be level 6 by now.
Level 6
Go to Achorite Fateema (the first aid trainer outside) and take her quest. You can also train first aid here. Repair (if needed) and sell junk, then follow the road south.
**From now on if you see a Blood Elf Bandit on the way, kill it for an item that gives an extra exp quest, if you don’t find him though don’t worry, the quest has no follow ups**
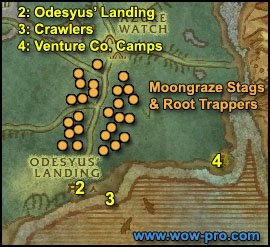
1. On your way south (on the sides of the road) you should find Moongraze Stags and Root Trappers. Kill as many of those as you find until you have 8 Root Trapper Vines and 6 Moongraze Stag Tenderloins.
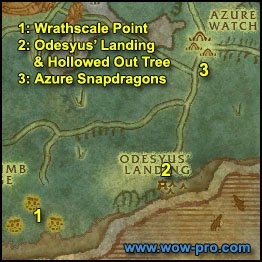
2. All the way south (46,70), you should get to Odesyus’ Landing. Take all the quests here.
3. You should see the beach right in front of you. Follow the shore east and kill crawlers there until you have 6 Skittering Crawler Meats.
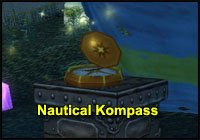
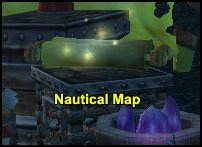
4. Go all the way east to (58,67), where you should see a Venture Co. Camp. You should find a Nautical Map and a Nautical Compass in the camps (they are shimmering, you can’t miss them). Clear the goblins around them and loot the items:
You should be level 7 by now or close.
Level 7
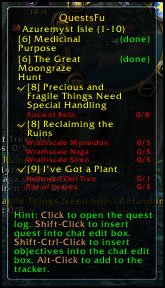
Go back to Odesyus’ Landing. Turn in both quests and take all available quests. Your quest log should look like this:
Go back to Azure Watch and kill the last Stags/Root Trappers you might still need. Turn in all quests and get all follow ups/available quests.
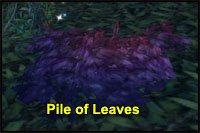
**From now on: On your way loot the following things on sight:
Pile of Leaves:
Azure Snapdragon Bulb:
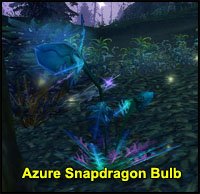
until you have five of each.**
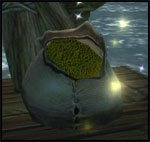
1. Go to southwest to (35,75). You’ll see some ruins with naga there (Wrathscale Point). Kill naga here and loot relics until you have [8] Reclaiming the Ruins and [8] Precious and Fragile Things Need Special Handling completed. Relics look like this:

While killing nagas you’ll probably loot a Rune Covered Tablet from one of them. Right click it to get a quest.
2. When you are done, go to Odesyus’ Landing and right before it (the forest side) you should see a Hollowed Out Tree:
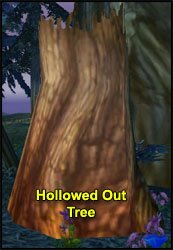
Loot one. Also make sure to loot as many piles of leaves you still need, we are about to turn the quest in.
At the Landing turn your quests in. (Turning in the Naga Tablet quest will trigger a little script, wait for it to finish). This should make you ding level 8. Take all quests available.
Level 8
3. Go north through the forest, back to Azuremyst Watch. Just before Azuremyst Watch you should find a lot of Azure Snapdragons. Loot as many as you still need then go back to Azuremyst Watch.
Turn in your quests and get all quests available. Your quest log should look like this:
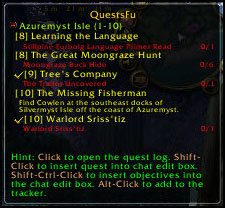
Search your inventory for a manual. Right click and use it. Turn in [8] Learning the Language at the Totem of Akida. Take the follow up.
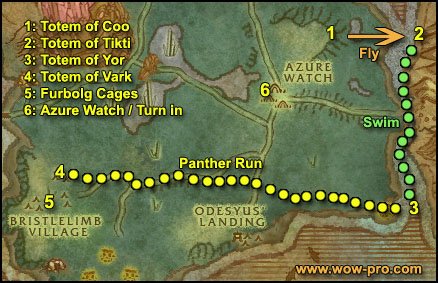
1. Stillpine Ancestor Akida will spawn, follow him. You should see a totem soon (Totem of Coo). Turn in your quest and get the follow up.
2. Another furbolg will spawn and walk with you to the cliff. He’ll cast a buff on you which will enable you to fly. Jump down from the cliff facing the direction of the furbolg. Continue straight and walk over the big river. At (64,39) you should find another totem (Totem of Tikti). Turn in your quest and get the follow up.
3. The furbolg that spawns will cast an underwater breathing buff that increases your swimspeed aswell. With it, swim all the way south to (63,67) until you see a question mark. (Totem of Yor) Turn in your quest and get the follow up.
4. The furbolg that spawns will first swim out of the water really slowly. Then he’ll cast a runspeed buff on you. After you got the buff don’t wait for the NPC, just run to (28,62) with it, where you’ll see the last totem (Totem of Vark). Turn in your quest and get the follow up.
5. You should be at a furbolg village now with cages:
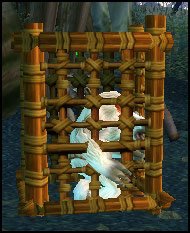
You need to kill Bristlelimb Furbolgs to get keys in order to open those cages. You need to open 10 cages in total. Also kill any Moongraze Buck and Infected Nightstalker Runt until you have 6 Moongraze Buck Hides and 1 Faintly Glowing Crystal, which you right click for a quest.
6. When you are done, hearthstone back. Turn in [10] The Prophecy of Akida at Arugoo of the Stillpine and take the follow up. Turn in the other two quests and get the Nightstalker follow up. You should be level 9 by now.
Level 9
Go north of the town and look left and right of the road for Infected Nightstalker Runts, you’ll need to kill 8 of them.
Once you are done go to (55,46) and look for a Draenei Youngling. Be sure your racial spell “Gift of Naaru” is up and pull an aggressive mob near the Draenei Youngling, as soon as he engages the mob, target the Draenei and heal it with your racial ability. After the combat, the NPC will have a quest up for you. Take it.
Note: As far as I know the Draenei Youngling almost always spawns there but he can be in other locations. If you don’t find him there don’t bother searching for it, it’s just an extra quest.
Go back to Azure Watch and turn in both quests.
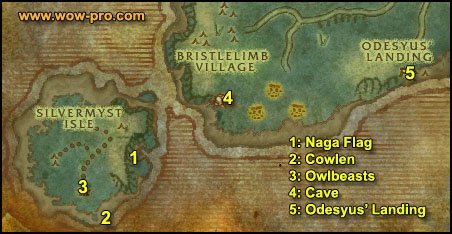
1. Once done run/swim to the southwestern island to approx. (18,84). You should see a flag there. Stand next to it and use your Tree Disguise Kit. Wait for the script to be finished (a goblin and a gnome will meet). Then go to (14,75) where you should see Magwin, a nigh elf female NPC. Get full mana etc. and accept her escort quest. Escort and protect her, she will run from the northernmost point of the island right to the next quest NPC we need (Cowlen). The quest is also turned in there.
2. At (16,93) the escort will be over and you should find Cowlen, a night elf, sitting on a pier. Turn in [10] The Missing Fisherman and take the follow up.
3. Behind you should be a village full of owlbeasts. Kill them until one drops the Remain of Cowlen’s Family then go back to Cowlen and turn the quest in.
4. Swim back to the main island to (27,77) where you should see a cave. Enter it and go to the middle where you should see a hole in the ground.
5. Jump down and look past the pillars, you should see Warlord Sriss. Kill him then fight your way out of the cave and run to Odesyus’ Landing. Turn in both quests there. Take the follow up [9] Show Gnomercy, you should be level 10 by now or close.
Level 10
Go down to the beach and look for the gnome NPC you observed earlier at the meeting. Be full health before you talk to him and follow his dialogue, because he’ll turn aggressive and attack you. Kill and loot him then go back to Odesyus’ Landing and turn the quest in. Take the follow up. If your hearthstone is up use it, if not, run back to Azure Watch.
Train, turn in [9] Deliver from the Devil… and get the quest [11] Coming of Age. Now take your time to do your class quest if you have one.
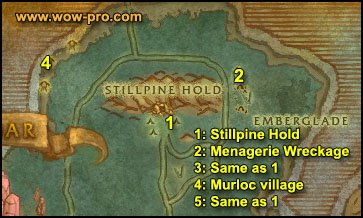
1. Once you are done, go north to Stillpine Hold (46,20). Go to Highchief Stillpine and turn in. Then get the two quests:
- [10] Beasts of the Apocalypse!
- [10] Murlocs… Why Here? Why Now?
2. Go northeast to the Menagerie Wreckage (52,17), where you should see a lot of ravagers. Kill them until you have 8 Ravager Hides. When you are done, go back to Stillpine Hold and turn in [10] Beasts of the Apocalypse!, take the follow up.
3. Go to Highchief Stillpine and take the two quests (one from him one from another furbolg close-by):
- [10] Search Stillpine Hold
- [11] Chieftain Oomooroo
4. Sell junk etc. then go northwest to approximately (35,13). You should see a murloc village. Kill murlocs here until:
- You find 5 Stillpine Grain (They can be looted all around the murloc huts, but also drop from murlocs):
- You find Murgurgula. Kill and loot him. You should get an item called “Gurf’s Dignity“. Right click it for a quest
5. When you are done go back to Stillpine Hold and turn in both quests. This should make you ding 11 or you should be close or you should be nicely into 11 already (depending on the state of your class quest).
Level 11
Go inside the cave in the middle of Stillpine Hold. First go to the upper level and clear to a bridge leading to the left where you should see a big white owlbeast (Chieftain Oomooroo). Kill it, then finish killing as many owlbeasts as you still need and head out of the cave. Turn in [11] Chieftain Oomooroo.
Get the quest [12] The Kurken is Lurkin’ and go back into the cave. This time stay on the lower level and go all the way north, soon you should see a big glowing beast called Kurken.
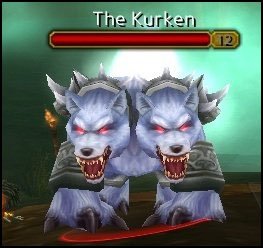
Kill it and go to the red crystal with the question mark. Turn in [10] Search Stillpine Hold (ATTENTION: be full health when you do this, as two crazed owlbeasts will spawn upon completing the quest). Kill them and clear your way towards the exit.
Turn in both quests in Stillpine Hold. Take the follow up [10] The Kurken’s Hide and turn it in at Moordo. Take the quest [11] Warn Your People from High Chief Stillpine. Use your hearthstone or run back to Azure Watch.
Turn in [11] Warn Your People.
If you did your level 10 class quest you should be level 12 by now.
Level 12
If you are going to follow Sven’s guide, you can start with it right away. If not, you can proceed with the next paragraph to clear the quest log.
Follow the road northwest to Exodar. At (81,52) you should find Torallius the Pack Handler. Turn in [11] Coming of Age.
– Snowflake
Copyright at www.wow-pro.com.
Bristlelimb Furbolg CagesHey, Snowflake! Fantastic guide! Where you said “You need to open 10 cages in total” it was actually eight, although you could open as many as you want, while you’re still on the quest. I got about 15 keys because the Furbolgs had spawned near all the cages. /played time while following your guide was 4 hours and 42 minutes! 😀
Magetime
How can I make sure thatHow can I make sure that what I have is the latest?
I downloaded my addons on May 10th so that’s just 2 days ago, I believe that the main page points to the latest, but my question still stands.
Try to download an updatedTry to download an updated verison of the guide – It could be added, beside that it’s a nice idea 😉
Cowlen wrong coordsI use the addon, downloaded the version available on may 10th, and The missing fisherman points to wrong coords, somewhere in exodar.
You should add the escort quest, A cry for help in the add-on. I would first turn in the Missing Fisherman, get the follow-up and then go to the escort quest, start it, and complete two quests at the same ending point. Of course, this is not how I did it, just realized it later 🙂
replenishing the crystalsreplenishing the crystals and Bandit! can also be added in this, although the details for replenish are in the guide, the quest itself isnt on this page. Thr program has it though.
Two questsNice lay-out, just like Jame’s, it reads like a train!
But there could be two more quests in this guide: The prophecy of Velen and a Cry for help.
You get The prophecy of Velen when you finish An Aternative Alternative, by collecting those Dragonbulbs. With this quest, you need to go to Odesyus landing, it is just a turn-in quest, but gives some xp. I’d suggest that you finish An Alternative Alternative and The Great Moongraze hunt at the same time before you go to Odesyus landing. And while at it, slay an infected nightstalker runt for the crystal. And after you’ve turned those quests in, go to Odesyus landing and do the further quests in your order.
A cry for help is an easy escort quest that starts north on the beach of Silvermyst Isle. It is soloable, for she doesn’t attack more than mob at a time. And she will walk to her father, he is the turn-in for The lost Fisherman.
I hope it helps and I hope I didn’t read over those quests, that would be silly 😛
That’s nice, but not veryThat’s nice, but not very useful. If you can do it better, leave a comment and say exactly HOW you can improve this guide.
Nice guidePretty nice guide 😀 But i gotta say that you could do it better I go from 1 – 13 in 4h30m 😉 But okay I’m a freak in that place 😛
There IS a guide for NightThere IS a guide for Night Elves 😛
Sure, it’s maybe not as nice as Snowflake’s, but it will get the job done.
Check this list, you’ll easily find any guide for any race there:
https://www.wow-pro.com/1-80_leveling_guides
RequestHi Snowflake 🙂
It would totaly Awesome if you would create a Night Elf Guide 😉 since i find them hard to level, and there is no other guides for Night Elves
Hope you will make one 😉
Main: Studmuffin,Stormreaver
Death-Knights are OP But i still Love Blizz for giving them to us 😉
There are many addons whichThere are many addons which display coordinates. You just need to install one.
I can recommend [url=http://wow.curse.com/downloads/details/4947/]Cartographer[/url], not only does it give coordinates, but it also enhances your maps and removes the fog of war on them, making it easier to find your way around in zones.
TO INSTALL: Put the Cartographer folder, Cartographer_Herbalism, and Cartographer_Mining into World of WarcraftInterfaceAddOns
Good Guide,just…This is a great guide Snowflake!I just noticed that at level 9 map you should add where the female night elf quest giver is. I leveled with 4-5 hours played time to 12, thank you!
co-ordinatesi understand that the numbers in the brackets are co-ordinates ( (81,52) for example) but what do you use as a reference as to where that is? is there a map with the grid references on it or something?
We can’t find a fix for thisWe can’t find a fix for this problem, so here is what you can do:
Just select the guide you want to print, then choose ‘print selection’.
Printer Friendly issueWhy, when I choose printer friendly does it pull all of the guides into one sheet? It happens w/ this guide, AND the blood elf 1 – 12 guide. At home w/ Sea-monkey and at the library w/ IE.
Excellent guideThis is an excellent guide with excellent and informive pictures. *both thumbs up*
Indeed Fixed, thank you!Indeed 😛 Fixed, thank you!
Great guide Snowflake!
GotGreat guide Snowflake!
Got a draenei hunter to level 12 in /played 4 hours 16 minutes!
One mistake I found was a simple typo
Turn in both quests in Stillpine Hold. Take the follow up [10] The Kurken’s Hide and turn it in at Moordo. Take the quest [11] Warn Your People from High Cief Stillpine. Use your hearthstone or run back to Azure Watch.
I believe it is supposed to say High Chief 🙂
Best wishes,
Joey 🙂
Dunno how helpful this isDunno how helpful this is but as a night elf I had no problem getting the early quests except for the one requiring the use of Gift of the Naaru so if this is the same for gnomes/dwarves/humans shouldn’t be a problem to start in this area. I did find that once at Azure I could not take the quests from Anchorite Fateema (the first aid trainer) but I am level 10 and have had no other issues. Just thought I’d let you know. Great guide btw!
Thanks, I corrected thatThanks, I corrected that 🙂
-Snowflake
WoW-Pro Admin
Thanks so much Sven, IThanks so much Sven, I didn’t know about that escort quest. I hope I added it correctly.
I also corrected the Coming of Age issue 🙂
-Snowflake
WoW-Pro Admin
Just one thing aboutJust one thing about Silvermyst Isle theres an extra quest on the north coast from a Night Elf behind a log.
http://wow.allakhazam.com/db/quest.html?wquest=9528
Its Cowlens daughter and basically you just escort her back to Cowlen, killing about 4-5 owlbeasts along the way.
Great worklooks great, although I have two hints you might want to consider. 🙂
Dunno if you left it out on purpose, but I usually do the escort quest of Magwin from like (14,75) before what you do at the beginning of level 9.
She’ll walk all the way to Cowlen, where you turn in her escort and the fisherman, then get his family’s remains and then head for the naga meeting and the other naga stuff.
It’s a 2-man group quest but I easily soloed it with all classes I tried. At least you might want to mention it.
Second hint is that I usually do [11] Coming of Age and get the followup before heading to Stillpine Hold.
This way I can go to Bloodmyst directly after the Kurken quests, and do Warn Your People on my Kessel Run.
Just saves me a little time while reducing traveling, I think.
Apart from those, this looks really neat 🙂
gonna link it when I update my Bloodmyst Guide later today
Nice workTried this guide out today and things went seamlessly. I did come across another spawn location for the Draenei Youngling than the one given here. I found her at (42, 57) while killing Moongraze Stags and Root Trappers. Great job! Nothing else I can really add here.
Just had a quick readJust had a quick read though, and looks very good.
When I was leveling my Draenei Hunter, I must of missed a lot of quests because I only reached level 10.
A guide I think most would like to see now. Thanks.
Baíley – Ahn’Qiraj EU
Think i may be the firstThink i may be the first person to use this other than your team. o/
Great work, really helpful to get faster leveling, personally i don’t see anything wrong with it i.e. spelling mistakes.
I want to thank you for these guides anyway 🙂