
 by Maw
Table of Content
Introduction
Following this guide will take your Alliance character from level 12-20 in a very low amount of time.
I will in some cases mention to sell, repair and restock, but not always. Be aware of this yourself, and try to empty your bag and repair when you are in town. However, I mention when it’s best to learn new skills.
Colour Codes
Quests: blue
Collected or looted items: red
Usable items: green
 Back to the top
Getting Started
To be able to use this guide, you’ll have to have some things completed already. If you have leveled a Human character, or atleast have followed my 1-12 Human Leveling Guide, you don’t have to worry about this.
Do the following things:

1) Talk to Marshal Dughan
- Accept “Report to Gryan Stoutmantle”
Talk to Smith Argus
- Accept “Elmore’s Task”
Follow the level 10-12 section of my Human Leveling guide.
Level 12-15

1) Talk to Mountaineer Cobbleflint
- Accept “In Defense of the King’s Lands”
2) Talk to Captain Rugelfuss
- Accept “The Trogg Threat”
3) Kill 10 Stonesplinter Troggs and 10 Stonesplinter Scouts, and get 8 Trogg Stone Tooth.
Hint: Use the Explosive Rockets when you have to fight two of them at once.
4) Talk to Mountaineer Cobbleflint
- Turn in “In Defense of the King’s Lands”
5) Talk to Mountaineer Gravelgaw
- Accept “In Defense of the King’s Lands”
6) Talk to Captain Rugelfuss
- Turn in “The Trogg Threat”
-Use Hearthstone–
 Sell, repair and restock

1) Talk to Thor
- Buy a flight to Stormwind
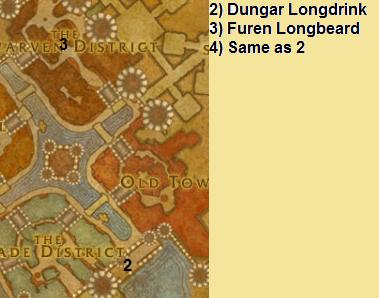
2) Talk to Dungar Longdrink
- Turn in “Dungar Longdrink”
- Accept “Return to Lewis”
3) Talk to Furen Longbeard
- Turn in “Stormpike’s Order”
-Learn new skills-
4) Talk to Dungar Longdrink
- Buy a flight to Sentinel Hill
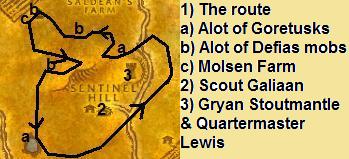
1) Follow this route until you have the kills and items listed below:
- 3 Stringy Vulture Meat
- 3 Goretusk Snout
- 8 Goretusk Liver
- Kill 15 Defias Trappers
- Kill 15 Defias Smugglers
- 15 Red Leather Bandanas
a. There is alot of Goretusks in this area
b. There is alot of Defias mobs in this area
c. When you are at The Molsen Farm, pick up any Handful of Oats you see.
2) Talk to Scout Galiaan
- Turn in “Red Leather Bandanas”
3) Talk to Gryan Stoutmantle
- Turn in “The People’s Militia”
- Accept “The People’s Militia”
Talk to Quartermaster Lewis
- Turn in “Return to Lewis”
Sell, repair and restock
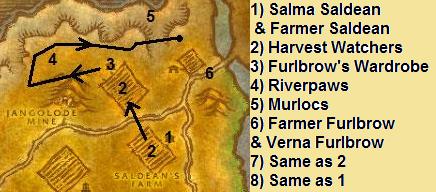
1) Pick up any Handful of Oats you see at this location.
Talk to Salma Saldean
- Turn in “Goretusk Liver Pie”
-You should now be level 14, or very close-
2) Kill every Harvest Watcher on this field.
Look for Handful of Oats along the edge of the field.
Make sure you get the required 8 Handful of Oats now
3) Inside the house, click Furlbrow’s Wardrobe and get Furlbrow’s Pocket Watch.
4) Kill Riverpaw mobs following this path, and get 8 Gnoll Paws.
5) Kill Murlocs and get 3 Murloc Eyes
6) Talk to Farmer Furlbrow
- Turn in “The Forgotten Heirloom”
Talk to Verna Furlbrow
- Turn in “Poor Old Blanchy”
7) Kill the Harvest Watchers you have left for “The Killing Fields”
Make sure you have the items listed below, and save these for later use:
- 5 Flask of Oil
- 3 Okra
- 5 Hops
8 ) Talk to Farmer Saldean
- Turn in “The Killing Fields”
Talk to Salma Saldean
- Turn in “Westfall Stew”
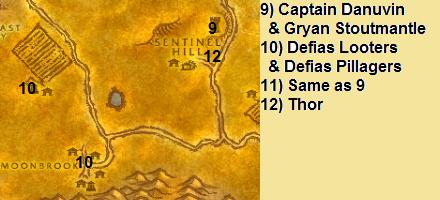
9) Talk to Captain Danuvin
- Turn in “Patrolling Westfall”
Talk to Gryan Stoutmantle
- a
- Accept “The Defias Brotherhood”
Sell, repair and restock
10) Kill 15 Defias Looters and 15 Defias Pillagers.
Grind until you’re 5 bars above level 15
-Use Hearthstone–
11) Talk to Gryan Stoutmantle
- Turn in “The People’s Militia”
- Accept “The People’s Militia”
12) Talk to Thor
- Buy a flight to Stormwind
-Learn new skills-
13) Go to the Valley of Heroes in Stormwind, and exit the city
Level 15-16
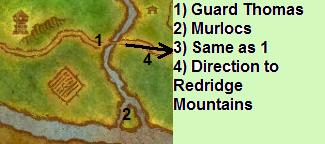
1) Talk to Guard Thomas
- Accept “Bounty on Murlocs”
2) Kill Murlocs and get 8 Torn Murloc Fin
3) Talk to Guard Thomas
- Turn in “Bounty on Murlocs”
4) Run into Redridge Mountains
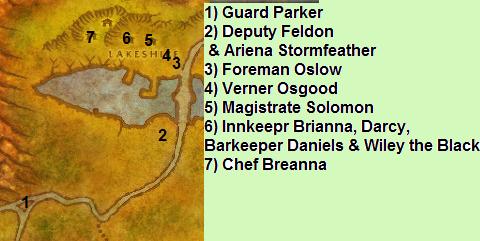
1) Talk to Guard Parker
- Accept “Encroaching Gnolls”
2) Talk to Deputy Feldon
- Turn in “Encroaching Gnolls”
- Accept “Assessing the Threat”
Talk to Ariena Stormfeather
- Get the Lakeshire flight path
3) Talk to Foreman Oslow
- Accept “The Lost Tools”
4) Talk to Verner Osgood
- Accept “The Price of Shoes”
5) Talk to Magistrate Solomon
- Accept “Messenger to Stormwind”
6) Talk to Innkeeper Brianna
- Make this inn your home.
Talk to Darcy
- Accept “A Free Lunch”
Talk to Barkeeper Daniels
- Accept “Dry Times”
Talk to Wiley the Black
- Turn in “The Defias Brotherhood”
- Accept “The Defias Brotherhood”
7) Talk to Chef Breanna
- Accept “Redridge Goulash”
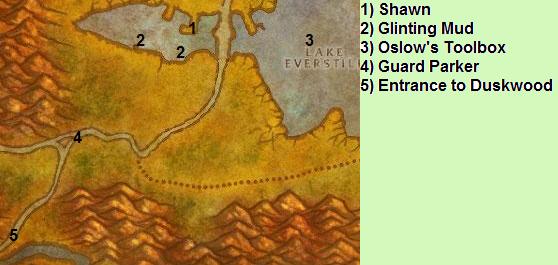
1) Talk to Shawn
- Accept “Hilary’s Necklace”
2) Click Glinting Mud, and get Hilary’s Necklace.
3) Click Oslow’s Toolbox, and loot it.
There are level 18-20 Murlocs in this area, but these can easily be avoided.
4) Talk to Guard Parker
- Turn in “A Free Lunch”
- Accept “Visit the Herbalist”
5) Run into Duskwood
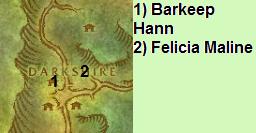
1) Talk to Barkeep Hann
- Buy a Bottle of Moonshine
2) Talk to Felicia Maline
- Get the Darkshire flight path
- Buy a flight to Sentinel Hill

3) Talk to Gryan Stoutmantle
- Turn in “The Defias Brotherhood”
- Accept “The Defias Brotherhood”
4) Talk to Thor
- Buy a flight to Stormwind
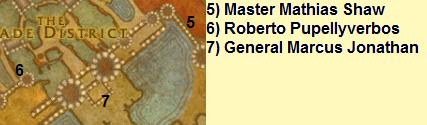
5) Talk to Master Mathias Shaw
- Turn in “The Defias Brotherhood”
- Accept “The Defias Brotherhood”
6) Talk to Roberto Pupellyverbos
- Buy a Cask of Merlot
7) Ralk to General Marcus Jonathan
- Turn in “Messenger to Stormwind”
- Accept “Messenger to Stormwind”

8 ) Talk to Smith Argus
- Turn in “The Price of Shoes”
- Accept “Return to Verner”
9) Talk to Barkeep Dobbins
- Buy a Skin of Sweet Rum
-Use Hearthstone–
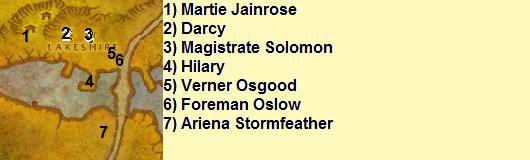
1) Talk to Martie Jainrose
- Turn in “Visit the Herbalist”
- Accept “Delivering Daffodils”
2) Talk to Darcy
- Turn in “Delivering Daffodils”
3) Talk to Magistrate Solomon
- Turn in “Messenger to Stormwind”
- Accept “Messenger to Westfall”
4) Talk to Hilary
- Turn in “Hilary’s Necklace”
5) Talk to Verner Osgood
- Turn in “Return to Verner”
- Accept “Underbelly Scales”
- Accept “A Baying of Gnolls”
6) Talk to Foreman Oslow
- Turn in “The Lost Tools”
- Accept “The Everstill Bridge”
7) Talk to Ariena Stormfeather
- Fly to Ironforge
-Learn new skills-
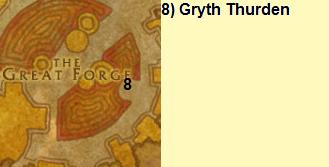
8 ) Talk to Gryth Thurden
- Buy a flight to Loch Modan
Level 16-18
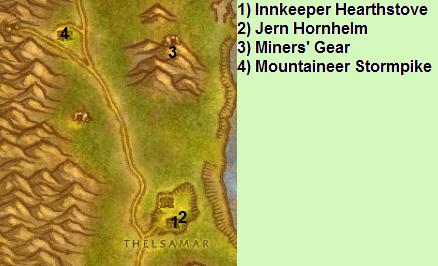
1) Talk to Innkeeper Hearthstove
- Make this inn your home
2) Talk to Jern Hornhelm
- Accept “Ironband’s Excavation”
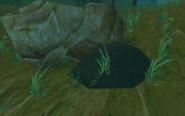
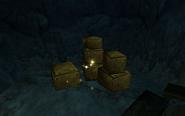
3) Enter this mine.
Get 4 Miners’ Gear
4) Talk to Mountaineer Stormpike
- Turn in “Filthy Paws”
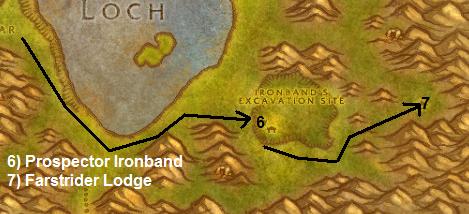
6) Talk to Prospector Ironband
- Accept “Excavation Progress Report”
7) Run to Farstrider Lodge
 Sell, repair and restock
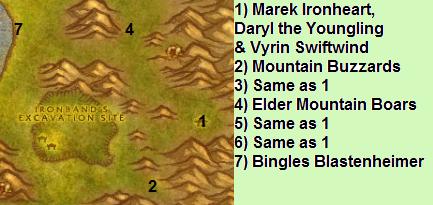
1) Talk to Marek Ironheart
- Accept “Crocolisk Hunting”
Talk to Daryl the Youngling
- Accept “A Hunter’s Boast”
2) Kill 6 Mountain Buzzards
This quest has a timer on 15 minutes
3) Talk to Daryl the Youngling
- Turn in “A Hunter’s Boast”
- Accept “A Hunter’s Challenge”
4) Kill 5 Elder Mountain Boars
This quest has a 12 minute timer
5) Talk to Daryl the Youngling
- Turn in “A Hunter’s Challenge”
6) Talk to Vyrin Swiftwind
- Accept “Vyrin’s Revenge”
7) Talk to Bingles Blastenheimer
- Accept “Bingles’ Missing Supplies”
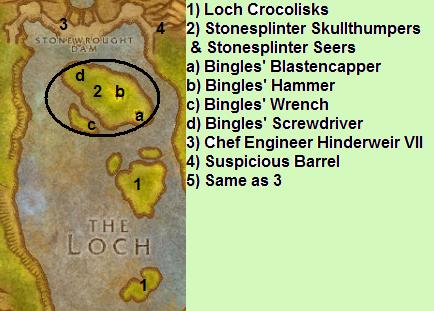
1) Kill Loch Crocolisks, get 5 Crocolisk Meat and 6 Crocolisk Skin
2) Kill 10 Stonesplinter Skullthumpers and 10 Stonesplinter Seers while picking up the items listed below:
- a) Bingles’ Blastencapper
- b) Bingles’ Hammer
- c) Bingles’ Wrench
- d) Bingles’ Screwdriver
3) Talk to Chef Engineer Hinderweir VII
- Accept “A Dark Threat Looms”
4) Talk to Suspicious Barrel
- Turn in “A Dark Threat Looms”
- Accept “A Dark Threat Looms”
5) Talk to Chef Engineer Hinderweir VII
- Turn in “A Dark Threat Looms”
-Use Hearthstone–

Sell, repair and restock
1) Talk to Jern Hornhelm
- Turn in “Excavation Progress Report”
- Accept “Report to Ironforge”
2) Talk to Thorgrum Borrelson
- Buy a flight to Ironforge

3) Talk to Prospector Stormpike
- Turn in “Report to Ironforge”
- Accept “Powder to Ironband”
4) Talk to Gryth Thurden
- Buy a flight to Loch Modan
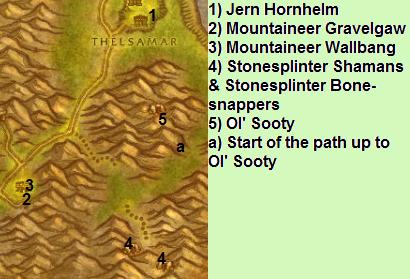
1) Talk to Jern Hornhelm
- Turn in “Powder to Ironband”
- Accept “Resupplying the Excavation”
2) Talk to Mountaineer Gravelgaw
- Turn in “In Defense of the King’s Lands”
3) Talk to Mountaineer Wallbang
- Accept “In Defense of the King’s Lands”
4) Kill 10 Stonesplinter Shamans and 10 Stonesplinter Bonesnappers in this cave.
5) Kill Ol’ Sooty
a) The path up to him starts here

1) Protect Huldar and Miran form the ambush, then Talk to Huldar
- Turn in “Resupplying the Excavation”
- Accept “After the Ambush”
Talk to Miran
- Turn in “After the Ambush”
- Accept “Protecting the Shipment”
Escort Miran
2) Talk to Prospector Ironband
- Turn in “Protecting the Shipment”
3) Talk to Magmar Felhew
- Turn in “Ironband’s Excavation”
- Accept “Gathering Idols”
4) Kill Stonesplinters and get 8 Carved Stone Idol
5) Talk to Magmar Felhew
- Turn in “Gathering Idols”
6) Run to Farstrider Lodge
Sell, repair and restock.
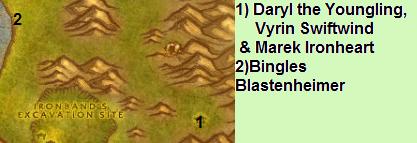
1) Talk to Daryl the Youngling
- Turn in “Vyrin’s Revenge”
- Accept “Vyrin’s Revenge”
Talk to Vyrin Swiftwind
- Turn in “Vyrin’s Revenge”
Talk to Marek Ironheart
- Turn in “Crocolisk Hunting”
2) Talk to Bingles Blastenheimer
- Turn in “Bingles’ Missing Supplies”
-Use Hearthstone–
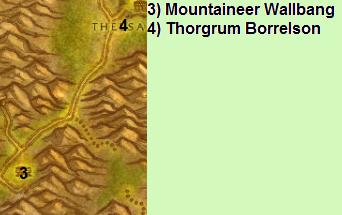
3) Talk to Mountaineer Wallbang
- Turn in “In Defense of the King’s Lands”
4) Talk to Thorgrum Borrelson
- Fly to Ironforge
-Learn new skills-
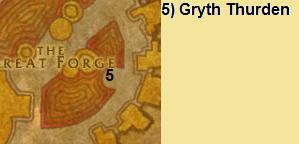
5) Talk to Gryth Thurden
- Buy a flight to Westfall
Level 18-20

1) Talk to Gryan Stoutmantle
- Turn in “The Defias Brotherhood”
- Turn in “Messenger to Westfall”
- Accept “Messenger to Westfall”
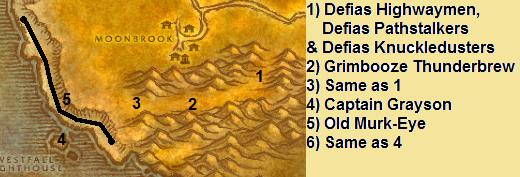
1) Kill Defias Highwaymen, Defias Pathstalkers and Defias Knuckledusters on your way to step 2.
2) Talk to Grimbooze Thunderbrew
- Accept “Thunderbrew Lager”
- Turn in “Thunderbrew Lager”
You now have all the reagents for the quest “Dry Times”
3) Kill the remaining Defias Highwaymen (15), Defias Pathstalkers (5) and Defias Knuckledusters (5) you need to complete “The People’s Militia”.
4) Talk to Captain Grayson
- Accept “Keeper of the Flame”
- Turn in “Keeper of the Flame”
- Accept “The Coastal Menace”
5) Kill Old Murk-Eye.
He wanders up and down the coast, and is a large, black Murloc
6) Talk to Captain Grayson
- Turn in “The Coastal Menace”
-Die on purpose, and then resurrect at the Spirit Healer-

7) Talk to Gryan Stoutmantle
- Turn in “The People’s Militia”
8 ) Talk to Thor
- Buy a flight to Redridge Mountains
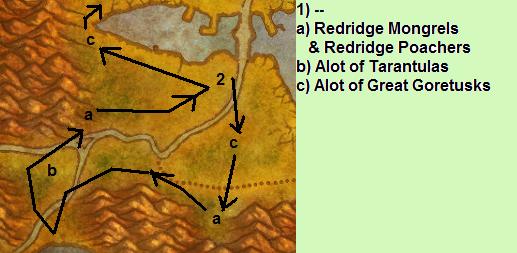
1) Follow this route and get the items and kills listed below:
a) Kill 10 Redridge Mongrels & 6 Redridge Poachers
b) 5 Crisp Spider Meat. Kill Taratulas (you don’t have to get all of these now, but atleast 3/5).
c) 5 Great Goretusk Snout. Kill Great Goretusks.
2) Talk to Deputy Feldon
- Turn in “Assessing the Threat”

1) Talk to Barkeep Daniels
- Turn in “Dry Times”
Talk to Innkeeper Brianna
- Make this inn your home
2) Talk to Magistrate Solomon
- Turn in “Messenger to Westfall”
Sell, repair and restock
3) Talk to Marshal Harris
- Accept “Blackrock Menace”
4) Kill Greater Tarantulas and Dire Condors until you have 5 Crisp Spider Meat and 5 Tough Condor Meat.
In order to be able to continue on Boston’s Leveling Guide 20-30, I’ll have to put a little grinding in here. I don’t like doing this myself, but sadly, all the Redridge Mountain quests I use to do at level 19, Boston does at level 20. So therefore, you’ll have to grind this last part. This is actually faster than going to another region and doing quests there.
Just get the grinding routine going, and the grinding will be over in no time! 😛
Grind until you are one bar away from dinging, then use Hearthstone.
5) Talk to Chef Breanna
- Turn in “Redridge Goulash”
6) Talk to Dockmaster Baren
- Accept “Selling Fish”
- Accept “Murloc Poachers”
Congratulations on level 20! 🙂
You can now continue leveling to level 30, using Boston’s 20-30 Alliance Leveling Guide.
Loving the guideThis is the first time i have used a guide i created a character specifically for it as i had a druid i got to 57 then created a DK and am at 72 but its taking forever.
I love the layout but get a little confused when flying somewhere else after collecting quests. This makes sense a bit later on so i dont mind.
I did a bit of extra grinding in the starting area so im now lvl 19 and still in the 16-18 section hehe
just wanted to say thanks for taking the time to post these guides it seems to be a god send, bring on lvl 80 🙂
————————————-
WoW is for life not just an expansion!
Fiora LongearsThe quest Fiora Longears (Wetlands 22-23) is not longer obtainable.
Thus this quest needs to be removed from the guide.
There is indeed a number ofThere is indeed a number of things I could to to improve this guide even further. However, I am too busy with school these days to spend too much time on WoW-pro. And the little time I do have to spare for WoW, I would much rather like to enjoy playing the game itself, not explaining others how to 😛
But, yes, you are right about the crisps and snouts, and I noticed it myself too, but when I wrote the guide it felt more right to keep things simple. Carrying loads of stuff in your bag at low-levels can be frustrating for those not having a main, or a good economy.
You should start using theYou should start using the guide at level 12, minimum, after doing the pre-part i mention in the introduction.
If you do this, you should have no issues following this guide.
As for the “you should now be level 16” remark, I think the headings make it pretty obvious what level you should be at times. When the headline says, for example, 16-18, then obviously you should be level 16 when starting the chapter and 18 at the end of it.
However, if you already have leveled to level 15 not using a guide, I would actually recommend you to start over from level 1 using a guide all the way. This is so stress-removing you won’t even believe it! Then, your “guesswork”-problem should be non-existent.
Hope this solved some of your questions and problems 😉
This may have been saidThis may have been said already, but you can get the Crisp Spider Meat for the quest “Redridge Goulash” in Loch Modan by killing the spiders north-west of Farstrider Lodge. This can save time in the XP circuit.
The same with the Great Goretusk Snout- you can get them in Westfall, saving lots of time.
Thanks for making this Guide Maw, this is SO MUCH better than grinding quests in Loch Modan/Westfall all day long 😛
Not good enough.I started this guide at level 15 on my night elf druid.
I am now level 17, and finished the guide up to the end of “16-18”
so surely, i should be level 18 by now? I am still 5 bars until 18, and you ask me to do a part that requires me to be 18? it doesnt make sence.
I have not skipped any quests, i have not skipped over any mobs, nor bought quest items of the AH,yet im not getting the right amount of exp. i cant follow this guide now because it doesnt all add up in the end, atleast for me.
And one more thing… in future, when writing guides, can you put things like “You should now be level 16” in there? everything on where im meant to be is guesswork.
there is really no realthere is really no real answer to this but you could check out
https://www.wow-pro.com/jame_rogue_guide
hope this helps you
Having TroubleI am by no means skilled at World of Warcraft, but I am seriously dying a lot at the first Westfall section on my rogue. I am at the place where you have to kill Defias Looters and Pillagers, but almost every-time I get a kill, I get killed and have to retrieve my corpse. How would I go about not dying so much?
I’ll look into these thingsI’ll look into these things when I bother, thanks for the feedback! 🙂
Great GuideExcellent guide, along with the 1-12 one. Sure there are a few parts with lots and lots of running, but like others said, it’s necessary in order to get the flight paths. And I like how you actually have quests along the way, so it’s not even just a long pointless run.
Normally I just try to grind out quests in Loch Modan/Westfall/Redridge on my own, without using a guide. The problem is you run out of quests way too fast this way, ending up with only orange or red quests in your log, which means you have to jump back and forth between the 3 zones, wasting a lot of time. This guide basically does the same thing, but in a very efficient way.
One suggestion I have is to include the quest “[15] Humble Beginnings” from Baros Alexston in Cathedral Square, Stormwind. You end up killing mobs right at his house anyway (Defias Looters and Pillagers), and even return to Stormwind the very next step.
Edit: One more thing: On the part of Westfall right after turning in the quest “Coastal Menace”, you should NOT kill yourself. They added a graveyard southwest of Deadmines, so you’ll rez pretty much right where you died, instead of right next to Sentinel Hill.
Nice jobbig time saver- thanks
*Sophia*
While I agree that it couldWhile I agree that it could certainly be said more politely, especially that first post, there is something to be said for this feedback. This user was confused by the flight path steps – you can take from this useful feedback that those steps might benefit from additional explanation.
To blythe – please try to be more constructive in your criticism in the future. Your second post here was a much better example. Using phrases like “this bites” doesn’t help the author at all and could just make them feel bad.
You’re too negative.You’re too negative.
Hmm, I got pretty goodHmm, I got pretty good results from this section and I felt that the circuits made sense and were efficient.
Maybe we should add a note about the flight path gathering thing, because it’s true that it does slow the guide down quite a bit, but it’s necessary.
that may be a fair point
I get the flight path strategy, but in those cases it would make sense to write a little more explanation… saying “this may feel like a lot of needless running around but you’ll need this flight path later.” Way too few explanatory notes in this guide.
The reason Jame’s is the gold standard is that you’re never left guessing, everything is clear and connected so you always trust what you’re doing. There’s nothing worse than following a guide and getting that sinking feeling like “oh, no… this doesn’t feel right.” A little more explanation can go a long way.
Personally haven’t playedPersonally haven’t played this section so I don’t know for sure, but from what I understand you get a lot of flight paths in this section that will save you time later. Jame seemed to get pretty good XP rates with it.
This one bites Very inefficient paths… way more running around and running/flying back and forth than necessary. Not enough connecting quests, not enough efficiency. You’re better off just staying in one zone and grinding out every quest, then moving to the next zone as the quests lead you. No time saved with this one.
just a little thingIn your lvl 18-20 section in Redridge Mountains , you need
“5 Great Goretusk Snout”. there are a few Great Goretusks
in Westfall that could be looted while there to save a little time. Thought I would mention this as I had 3 when I
moved on to the 15-16 section of the guide, but sold them before I found out I needed them for another quest.
Not that important realy, but It was rather annoying at the time 🙂
For some strange reason theFor some strange reason the “cooking” quests have a bad drop rate. The funny thing is that you may need the Boar Intestines for the Westfall Stew quest. Only 1 Boar on 5 has an intestine, it seems! That’s the annoying thing about those kind of quests. I personally hate those as well, and I also think that are useful for those who have cooking as a profession. I never level cooking as a profession, I just train apprentice to “unlock” some future quests, but you may consider this:
You have said that you can still grind when you lack some xp. Instead of grinding on other mobs, just do the cooking quests. Bad xp make those quest a kind of grinding session, with the difference that at the end you have another good xp from completeing the quest and maybe some items to sell to the vendor. I see in this way. After following Jame’s guide for a while, I’ve learnt that optimizing is the keyword for leveling fast. And grinding on some quest-useful mobs is optimized grinding. Sorry for typos by the way 🙂
-Benhir
this may be an outrageousthis may be an outrageous idea, but i skipped the grinding and went right into boston’s guide no problem.. there were a few quests i couldnt pick up for the first hour or so but i got it done fine.
Well, the mobs you kill forWell, the mobs you kill for those quests are in the way of other quest objectives, anyway, why not kill them and get extra xp, cash, rep and a quest completed.
Quests count for achievements too.
In GeneralNot begrudging James or anyone else for that matter but I know I can hit 10/20/30 without the “cooking” quests….after my first two characters, I just skipped quests like Westfall Stew the drop was awful for me and frankly, I can grind what I miss to make the difference. The XP is nice but unless you’re training cooking, I feel like inevitably it’s not a quest worth actually doing. Anyway, these guides are great, I use them as supplements for the most part, I do things completely out of order but after leveling 8 characters to 30, you kind of know the quickest way that works for you eh.
Bad suggestion. This willBad suggestion. This will make players that doesn’t really need to do this grinding go through it anyway. Having one grinding part at the end makes it much more optional, and for those who need it.
Heehee, that’s almost anHeehee, that’s almost an understatement, following Zygor’s guide I was grinding way, way too much. I’d often end a level in the guide 20-40% of the next level and be forced to make up the difference. And by often, I mean every single level. And at least when the guides here have us grind they generally give locations that are good and convenient for grinding, it’s not like “turn in this quest in Stormwind at level 50, and then grind to level 51. In Stormwind.”
Ahem. *gets off her soapbox*
Yep, sometimes it’s betterYep, sometimes it’s better to grind 10 minutes rather than to run around 30 minutes to complete a couple of quests and get less xp in the end.
Recommendation: Spread theRecommendation: Spread the grinding out.
Grind on some Harvest Watchers, Defias Knuckledusters, Redridge poachers, etc. to boost the overall XP you’ve earned coming into the home stretch.
Reply to both Jame andReply to both Jame and Benhir:
The grinding at the end has a standpoint of using this guide with no rested and getting drops really slow. Most players do level 1-20 over a few days rate, and will get some rested. If you are halfway to level 20 when the grinding part comes, you’ll ding within 40 minutes to an hour, depending on how good you are at grinding. But for most players, the grinding will be just a few bars, or nothing at all. So this grinding is put in here in case someone comes to this level in a day or two, have gotten very unlucky on quest drops, and have used no rested.
I’d just like to add that it’s not abnormal to have some grinding in questing guides. Some of the best guides out there (even the costly ones), includes grinding. Following Zygor’s guide will make you grind alot, following Joana’s guide will also make you grind alot, and following Jame’s guides will make you grind some 😛
Again: 95% questing, 5% grinding.
Yes the grinding at the endYes the grinding at the end is very little, and it takes less than 1 hour, I’m pretty sure. However, I used this guide with a dwarf warrior and I had to grind just 10% of the experience. Low drop rates combined with rested xp!
I’m not even sure ifI’m not even sure if grinding will be necessary.
See, last night I tried your 1-12 guide with Jahwo’s addon and I was almost level 13 at the end, and I didn’t do any extra grinding.
Maybe I was a little unlucky with some quest drops, but still, it just shows that no grinding at all might be necessary for some players. So it’s ok.
I hate the grinding part atI hate the grinding part at the end aswell, but sadly, the quests I use to do at level 19, Boston does at 20. Grinding here is the best option. If you were to pick up the scraps from Westfall and Loch Modan, it would have gone slower. Or within the times you have accepted the quests in Darkshore, you would have dinged if you grinded. It’s a boring part to do, and it shouldn’t even be there in the first place. But since Boston chooses to do all of the quests at level 20, you’ll just have to adapt to that. Sorry – can’t help it.
Quest – grind rate:
90-95% questing – 5-10% grinding.
Hope you enjoy the rest 95% of the guide 😛
Thumbs up!Very good work! Alliance players have now a good alternativ at Boston’s 1-20 guides! 😉 Despite the grinding at the end, I loved all the rest. I think you should add an alternative Darkshore quest circuit, such as the 12-20 Draenei’s guide, there is a little circuit in Darkshore to provide extra xp. And with the SW Harbor, travelling has never been so easy!
Great
Still no way I’llGreat 🙂
Still no way I’ll level an alliance character though ! }:)
Bang up job, once again.Bang up job, once again.