 by Jame
NOTE: Following this guide will get you the Quest Achievement for Howling Fjord: I’ve Toured the Fjord. In fact, 100% of the quests of Howling Fjord are included in the guide, or at least mentioned as optional.
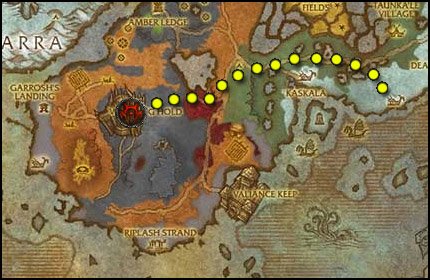
Journey from Howling Fjord to Borean Tundra
![]()
All the guides on wow-pro are FREE, there is no trick, they are just free and will remain free.
Enjoy and please contribute or Leave a tip!
70-80 WotLK Classic Leveling Guides
Alliance
- Jame’s Alliance Leveling Guide – Borean Tundra (70-72)
- Jame’s Alliance Leveling Guide – Howling Fjord (72-74)
- Jame’s Alliance Leveling Guide – Dragonblight (74-75)
- Jame’s Alliance Leveling Guide – Grizzly Hills (75-77)
Horde
- Jame’s Horde Leveling Guide – Howling Fjord (70-72)
- Jame’s Horde Leveling Guide – Borean Tundra (72-74)
- Jame’s Horde Leveling Guide – Dragonblight (74-75)
- Jame’s Horde Leveling Guide – Grizzly Hills (75-77)
1-70 Leveling Guides for World of Warcraft Classic
For guides covering levels from 1-70, please check this link:
1-70 Wow Classic Leveling Guides
Support my work
Question– Your guides really helped me out and I want to return the favor, what can I do to help?
Answer– Here’s how you can contribute:
1. Most important and easiest way to help: Spread the word. Tell people about my guide. Your friends, guildmates, boards you visit. Tell them that they are FREE and that they make you level much faster than other guides or questhelper.
2. When you try my guides, if you find any mistakes, leave a comment.
3. Post useful comments here. When people ask for advices and you know the answer, go for it and help them out, so I won’t have to do it myself 😛
4. And then of course, you can write a guide about an area of the game where you’re good. Direct message me on Twitter if you want to become an editor on Wow-pro!
5. You can also translate guides into other languages, if you are fluent in another language. Check our Guides in Other Languages section to see what has already been translated.
6. Leave a tip to the author of these guides : Donate!
Introduction
This guide is made for FAST leveling through the use of Optimized Quest Circuits. With this guide, questing will be very efficient and you’ll not waste any second running around and trying to figure out in which order to do your quests. Follow each instruction carefully and you will see for yourself. The quest choices and order to do them are optimal so that you run as few as possible while doing the most possible, turning several quests at the same time. It will be like grinding, because you’ll be killing stuff almost non-stop, besides you’ll also be completing a bunch of quests at the same time!
NOTE: Following this guide will get you the Quest Achievement for Howling Fjord: I’ve Toured the Fjord. In fact, 100% of the quests of Howling Fjord are included in the guide, or at least mentioned as optional.
Everything described in this guide can be done solo (beside when I say otherwise). You can, of course, follow this guide while duoing, grouping, it’s not a problem, it works too.
DISCLAIMER: This guide does NOT take into account tradeskills, class specific quests or PvP. It’s 100% focused on getting the most experience possible in the shortest possible time while doing a lot of quests and enjoying as much content as possible. Any race/class combination can do this guide. Any complaints about PvP, tradeskills, or class specific issues will be ignored.
Basic rules
- Spend your talent points so that you kill things as fast as possible. (e.g: Priest should specialize in Shadow Talents, Warriors in Arms/Fury, etc.
- Don’t waste your time trying to find groups for questing, you can solo everything that is described in this guide unless I say otherwise. Only group with someone when it’s not gonna be a waste of time (e.g: meeting the person at the other end of the zone to show him the way to where your quest is, that is a waste of time)
- Try to always log out in an inn or in one of the major cities when you take a break.
Useful Addons
To get the most out of my guide, you should get an addon which displays coordinates, because I use them to describe locations in my guide (x,y). You can use any addon you like, but here’s a very simple one I use.
Recommended
- DMiniCoords – A simple box which displays coordinates, left-click it to move it where you like.
Optional
Below is a list of other addons I use, this is 100% optional though, it’s mostly for people who are curious to know which addons I use:
- Bartender4 – A great action bar addon.
- X-Perl UnitFrames – Very nice, highly customizable unit frames.
- Quartz – The best casting bar addon out there, imo.
- Scrolling Combat Text – I just don’t like the default UI Floating Combat Text.
Side Note: In case you don’t know how to install add-ons, simply download an addon from one of the links above and unzip it. Then drag the unziped folder in your Addon folder (full path is c:\Program Files\World of Warcraft\Interface\Addons). Then, restart World of Warcraft and it should be working.
If it isn’t working, you might need to log out to your character selection screen and click on “Addons” in the lower-left corner. Tick the box that says “Load out of date Addons”. Re-launch WoW.
Shopping List:
Bags – Try to at least have 18-slot bags. We’ll go on long circuits far from any vendor, so bag space is necessary. If you can’t afford 18-slot bags, go for 16-slot ones, they are much cheaper.
Color Code:
- Quests
- Items
- Locations
- Quest objectives to kill
- NPCs
- Locs
The Guide:
Go to Howling Fjord. Simply take the zeppelin from the Undercity, there’s a new zeppelin tower right next to the old one. It will fly you to Vengeance Landing.
 Get the new flight path.
Gather all quests:
- [71] The New Plague
- [71] Let Them Eat Crow
- [71] War is Hell
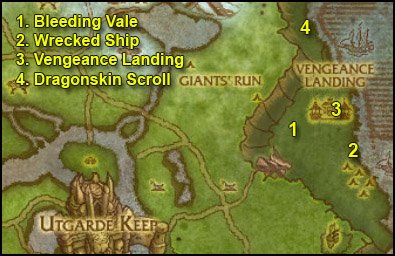
1. Go southwest to the Bleeding Vale (75,33). There you will find two things we need:
 Forsaken Corpses / Alliance Corpses, target them and right-click the Burning Torch.
 Right-click the Plaguehound Cage from your inventory. This will summon a Plaguehound acting as your pet.
 Use the Sic’em! ability from your hound to fetch Fjord Crows (there are tons of them flying around here). And then help him kill the crow.
Stay in this area until you’ve burned 10 Fallen Combatant and looted 5 Crow Meat.
 Right-click the Crow Meat 5 times.
2. Go southeast to the wrecked ship at (81,35).
Look for Intact Plague Containers.
They can be found on the ship’s deck and also inside the ship’s cargo. Loot 10 of them.
3. Ride back to Vengeance Landing. Turn in
- [71] The New Plague, get [71] Spiking the Mix
- [71] War is Hell, get [71] Reports from the Field
- [71] Let Them Eat Crow, get [71] Sniff Out the Enemy
4. Follow the coast northwards while killing Giant Tidecrawlers on your way, they drop the Giant Toxin Glands we need.
Keep going north until you see a yellow “?” on your minimap, labelled “Dragonskin Scroll” (77,20). Go inside the cave, right-click the scroll, turn in [71] Sniff Out the Enemy and get [71] The Dragonskin Map.
Now go back towards Vengeance Landing while killing Giant Tidecrawlers until you have 3 Giant Toxin Glands.
At Vengeance Landing, turn in:
- [71] Spiking the Mix, get [71] Test at Sea
- [71] The Dragonskin Map, get [71] The Offensive Begins
 Put the Plague Vials on an action bar. We’ll use them during the bombing mission we’re about to do. It’s quite an easy bombing mission really, so I don’t need to explain much. The bat will fly you way south to a fleet of alliance ships, you simply have to bomb the NPCs on those ships with your Plague Vials.
Go talk to the flight master called Bat Handler Camille, dismount, then click on the text. Complete the bombing mission.
Turn in [71] Test at Sea, get [71] New Agamand.
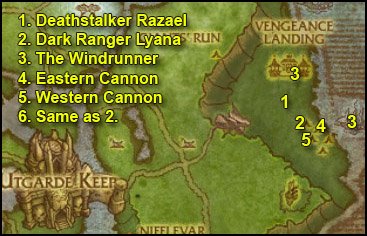
1. Ride south/southwest to Deathstalker Razael (78,35). Talk to him and click on the text.
2. Go about 200 yards southeast to Dark Ranger Lyana (79,37). She’s the only Blood Elf among those NPCs and wears glowing red daggers, easy to spot. She runs off sometimes to fight the alliance forces, but she’ll be back soon.
Talk to her and click on the text.
3. Ride back to Vengeance Landing, turn in [71] Reports from the Field, get [71] The Windrunner Fleet.
Go talk to Bat Handler Camille again, click on the text, this will fly you to the Windrunner. Turn in [71] The Windrunner Fleet at Captain Harker, get [71] Ambushed!.
Kill 15 North Fleet Marines.
Go back to Captain Harker, turn in [71] Ambushed! and get [71] Guide Our Sights.
4. Swim west to the Derelict Strand, go to the eastern cannon (80,38 ).
 Right-click the Cannonneer’s Smoke Flare from your inventory while being close to the cannon.
5. Go southwest along the barricades and you’ll find the western cannon (79,40). Use the flare.
6. Go north to Dark Ranger Lyana, turn in [71] Guide Our Sights, get [71] Landing the Killing Blow.
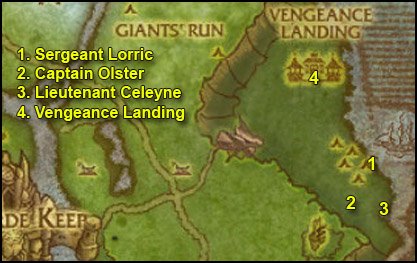
1. Go southeast across the barricades, follow the coast until you find Sergeant Lorric (82,41), he stands in between two cannons. If he’s not there, it means someone killed him recently, so just kill stuff in the area while waiting for him to respawn.
2. Face southwest and you should see a hill. Go there and kill Captain Olster (81,43).
3. Go straight east from here you should find Lieutenant Celeyne (83,43). Kill her.
At the same spot you should find Apothecary Hanes, get his quest [71] Trail of Fire and escort him.
This will take you back to Dark Ranger Lyana. Turn in [71] Landing the Killing Blow, get [71] Report to Anselm.
4. Ride back to Vengeance Landing, turn in:
- [71] Report to Anselm, (cool script happens), get the follow up [71] A Score to Settle
- [71] Trail of Fire
Sell junk, repair, re-stock food/drink.
Optional – Instance: Utgarde Keep
Now you can start looking for a group for the Utgarde Keep instance.
You already have the quest [71] A Score to Settle.
There are two other quests:
- [71] Disarmament
- [71] Ingvar Must Die
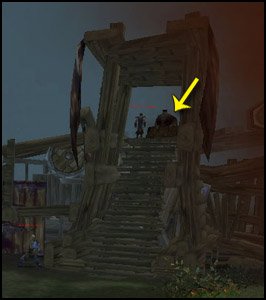
They are both given by Dark Ranger Marrah. She stands inside the instance portal, on the first set of stairs leading up.
It’s a very quick instance for level 71-73 players, I recommend it.
If you don’t feel like it or if you don’t find a group, you can abandon the above 3 quests. They can easily be picked up in the future anyway, if you change your mind.
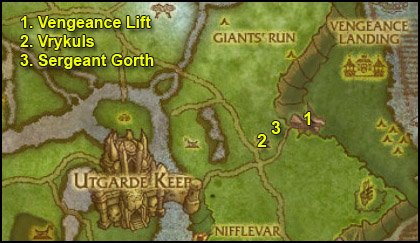
1. Ride southwest to Vengeance Lift (73,35). Take the lift and then ride southwest to the Horde Encampment at (71,39).
Turn in [71] The Offensive Begins at Sergeant Gorth, get [71] A Lesson in Fear.
Also get [71] Help for Camp Winterhoof.
2. Go kill Winterskorn Defenders southwest of the blockades (69,39) and keep killing them until their bosses spawn:
- Oric the Baeful (spawns in the house in rubbles on the northern side of this area)
- Ulf the Bloodletter (spawns right in the middle of the camp)
- Gunnar Thorvardsson (spawns next to the tower)
Only kill in this area or it won’t trigger the bosses.
 Whenever you kill one of the bosses, right-click the Forsaken Banner next to their corpse.
==Note== You can actually plant the banner in their corpses even if someone else did the killing.
3. Go back to Sergeant Gorth, turn in [71] A Lesson in Fear, get the two follow ups:
- [71] Baleheim Bodycount
- [71] Baleheim Must Burn!
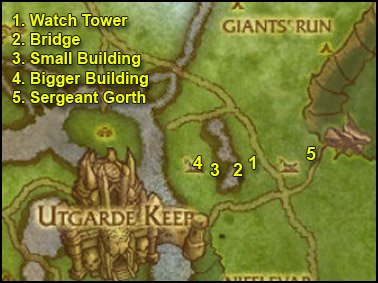
1. Ride straight west to Baleheim and go to the watchtower at (67,40).
Right-click Gorth’s Torch.
==Note== Kill every Vrykul on your way (Winterskorn Spearman, Skald, etc).
2. Go behind the tower and go west to the bridge (66,40). Use Gorth’s Torch.
3. A little further west past the bridge you should see a small building (65,41). Use Gorth’s Torch.
4. Just a few steps northwest of this dwelling you should find a bigger building (64,40). Use Gorth’s Torch. Be careful not to aggro Bjorn Halgurdsson, the elite mob on a drake which stands next to this building.
Now just kill Vrykuls in this town until you have 16 kills.
5. Go back to Sergeant Gorth, turn in:
- [71] Baleheim Bodycount
- [71] Baleheim Must Burn!
Get the follow up [71] The Ambush.
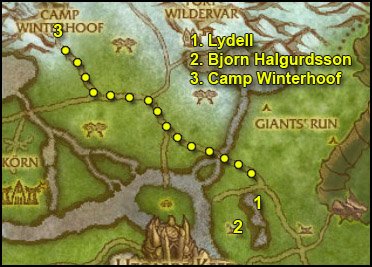
1. Ride west/northwest to Lydell (66,37). Turn in [71] The Ambush, get [71] Adding Injury to Insult.
2. Read this whole step before you do anything.
Clear the way southwest to Bjorn Halgurdsson (64,39).
 Target him, right-click the Vrykul Insult and run back to Lydell.
Let Lydell tank, do nothing at the start of the fight. If you got any abilities to lower or reset your threat, use them. This should be easy.
If you’re sucessful, turn in [71] Adding Injury to Insult.
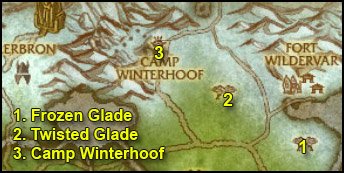
3. Follow the road northwest to Camp Winterhoof (49,12).
Turn in [71] Help for Camp Winterhoof and get all the available quests:
- [71] Hasty Preparations
- [71] Making the Horn
- [71] Suppressing the Elements
Get the new flight path.
==Note== From now on, look for Spotted Hippogryph Down while going through the next steps.

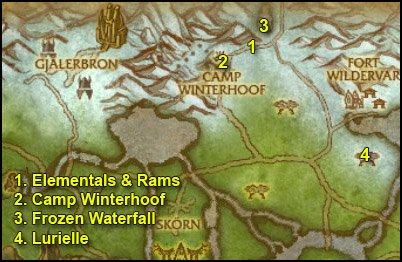
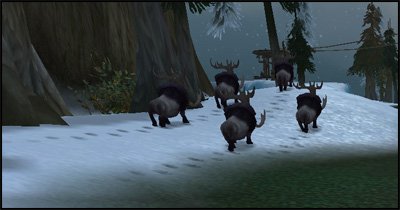
1. Go to the snowy hills northeast of Camp Winterhoof, kill the following two things:
- Frosthorn Rams until you’ve looted 6 Undamaged Ram Horns.
- 8 Iceshard Elementals
2. Go back to Camp Winterhoof, turn in:
- [71] Suppressing the Elements
- [71] Making the Horn, get [71] Mimicking Nature’s Call
A bunch of new quests should be available now, get them all:
- [71] The Frozen Glade
- [71] Keeping Watch on the Interlopers
- [71] The Book of Runes
- [72] March of the Giants
3. Go northeast to the frozen waterfall in the same area where we just killed rams and elementals (52,4).
 Right-click the Carved Horn from your inventory.
Kill Frostgore.
4. Ride southeast to the Frozen Glade where you’ll find Lurielle (62,23). Turn in [71] The Frozen Glade, get [71] Spirits of the Ice.
Kill 15 Ice Elementals and loot 15 Icy Cores. They can be found all around the Frozen Glade.
Go back to Lurielle, turn in [71] Spirits of the Ice, get:
- [71] The Fallen Sisters
- [71] Wild Vines.
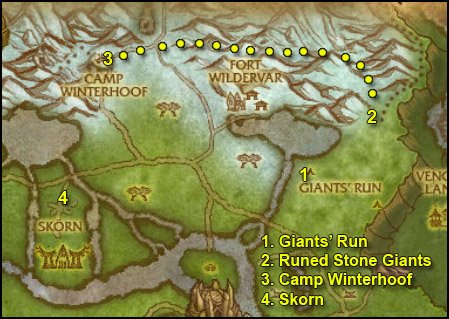
1. Ride east to the other side of the river, until you reach Giant’s Run (67,24).
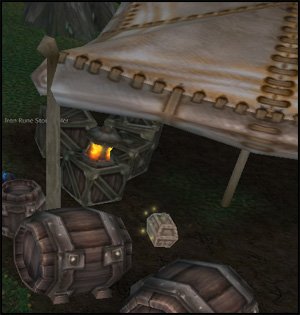
Kill Every Iron Rune Stonecaller / Binder on your way, they drop the Book of Runes Chapters we need. Keep killing them until you’ve got Chapter 1, 2 & 3.
 Then right-click one of the chapters to combine them together, you’ll get the Book of Runes.
2. Now let’s find Runed Stone Giants. They spawn at various stone circles in Giant’s Run.
Then they take a walk towards the snowy hills to the north, and they despawn there. It’s easiest to wait for them at the line where the snow starts (72,16).
They’re elite and hit really hard, but can be kited and stunned. Melee classes will probably have troubles to solo them, so they should try to find a group. You really must try hard to finish that quest, because it has several follow ups.
 Whenever you kill a Runed Stone Giant, loot it, target its corpse and right-click the Runeseeking Pick.
Once you have 4 Runed Stone Giant Corpse Analyzed, move on to the next step.
3. Ride back to Camp Winterhoof, turn in:
- [71] Mimicking Nature’s Call
- [71] The Book of Runes, get [71] Mastering the Runes
- [72] March of the Giants, get [72] The Lodestone
Get [71] Skorn Must Fall! from Chieftain Ashtotem.
4. Ride southwest to Skorn (44,26).
 Once you’re in Skorn, right-click the Winterhoof Emblem from your inventory.
A Winterhoof Brave will spawn. Turn in [71] Skorn Must Fall! and get the 3 quests he has:
- [71] Towers of Certain Doom
- [71] Gruesome, But Necessary
- [71] Burn Skorn, Burn!
Go inside Skorn, kill things on your way.
 Whenever you kill a Vrykul, loot it and then use The Brave’s Machete on their corpse.
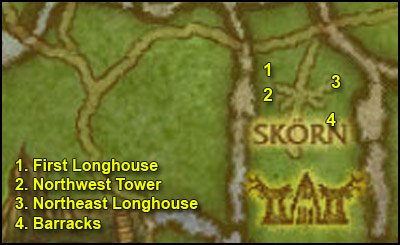
1. Go a little southwest to the first longhouse on your right (44,28 ).
 Go inside the longhouse and right-click the Brave’s Torch.
2. Just south of this you should see a tower, don’t get too close to it or the mages up there will shoot you. You just need to be 90 yards close.
 Use the Brave’s Flare.
If you’re close enough, you should get the following quest update: “Northwest Tower Targeted“.
3. Go east to the opposite end of the village, where you’ll find the Northeast Longhouse (46,28 ). Go inside and use the Torch.
4. Go a little south and you’ll find the Barracks (46,30). Go inside and use the Torch.
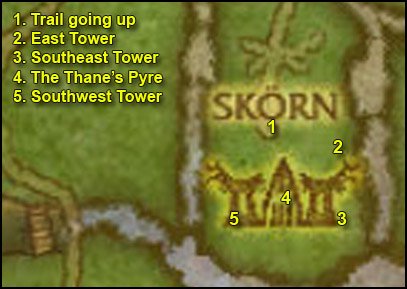
1. Go southwest and follow the trail going up. At the intersection go southeast.
2. A little further east you’ll find the East Tower (46,33). Use the Flare.
3. Go a little further south and you’ll find the Southeast Tower (47,36) Use the Flare.
4. Keep following the trail further south and then take a right turn, you’ll soon find The Thane’s Pyre (45,35).

At this point, you should have found a Vrykul Scroll of Ascension from one of the Vrykuls you killed. If not, kill some more Vrykul until it drops.
 Right-click the Vrykull Scroll of Ascension and get the quest [72] Stop the Ascension!
Stand next to the pyre, right-click the Vrykull Scroll of Ascension and kill Halfdan the ice-Hearted.
5. Go southwest, take a right turn and you’ll find the Southwestern Tower (43,36). Use the Brave’s Flare.
Now clear the way out while finishing [71] Gruesome, But Necessary.
Once you’re back at Skorn’s entrance, use your Winterhoof Emblem to summon the Brave (not needed if he’s still with you).
Turn in:
- [71] Towers of Certain Doom
- [71] Gruesome, But Necessary
- [71] Burn Skorn, Burn!
Get the follow up [72] The Conqueror of Skorn!.
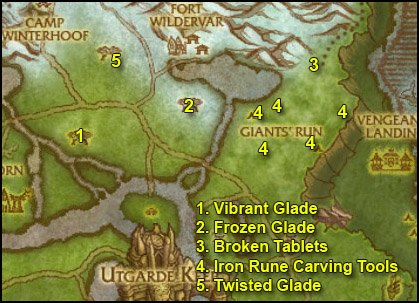
1. Go east to the Vibrant Glade (51,26). We have 2 objectives to complete here:
- Kill 8 Scarlet Ivy
 Beat down a Chill Nymph below 30% health then use Lurielle’s Pendant. Repeat 7 times.
2. Ride east/northeast back to the Frozen Glade (62,23). Turn in:
- [71] The Fallen Sisters
- [71] Wild Vines
Get the two follow ups:
- [71] Spawn of the Twisted Glade
- [71] Seeds of the Blacksouled Keepers
3. Ride east and then northeast back to the spot where we fought Runed Stone Giants. A few steps south of the snow line you should see a Broken Tablet (72,17).
 Right-click the Rune Sample from your inventory while being close to the tablet.
Watch the script and you should get a quest complete message.
4. Go south back to Giant’s Run and look for Iron Rune Carving Tools.
They spawn randomly under one of the 5 canopies in Giant’s Run (68,23), (69,23), (73,25), (71,29), (67,29). You might have to check them all.
5. Ride west/northwest to the Twisted Glade (55,19). Two objectives here as well:
- Kill 10 Thornvine Creepers
 Kill 8 Spores and use the Enchanted Ice Core on their corpse
1. Go back to the Frozen Glade (62,23). Turn in:
- [71] Spawn of the Twisted Glade
- [71] Seeds of the Blacksouled Keepers
Get the follow up [71] Keeper Witherleaf.
2. Ride back to the Twisted Glade (yes, again). This time we’re looking for a blue/green’ish centaur called Keeper Witherleaf.
Kill him.
3. Go back to Camp Winterhoof, turn in:
- [71] Mastering the Runes, get [71] The Rune of Command
- [72] The Lodestone, get [72] Demolishing Megalith
- [72] Stop the Ascension!
- [72] The Conqueror of Skorn!
New quests should be available, get them all:
- [71] Dealing With Gjalerbron
- [71] Of Keys and Cage
- [71] Find Sage Mistwalker
Sell junk, repair and re-stock food/drink.
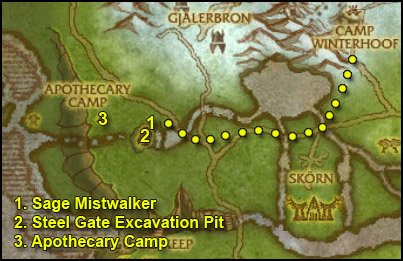
1. Go southwest until you hit the road and then follow it west until Steel Gate (31,24). Turn in [71] Find Sage Mistwalker, get [71] The Artifacts of Steel Gate.
Also get [72] Rivenwood Captives from Longrunner Skycloud.
2. Go down to the excavation pit and gather 10 Steel Gate Artifacts.
When you’re done, go back to Sage Mistwalker, turn in [71] The Artifacts of Steel Gate, get [71] The Cleansing.
3. Ride west to Apothecary Camp (26,24). Turn in [71] Keeping Watch on the Interlopers, get all the available quests from here:
- [71] What’s in That Brew?
- [71] Brains! Brains! Brains!
- [71] And You Thought Murlocs Smelled Bad!
Get the new flight path.
Fly back to Camp Winterhoof.
1. Ride back to to the Frozen Glade and turn in [71] Keeper Witherleaf.
==Note== Now is your last chance to finish [71] Hasty Preparations.
2. Ride east to (72,25). There you should find Binder Murdis.
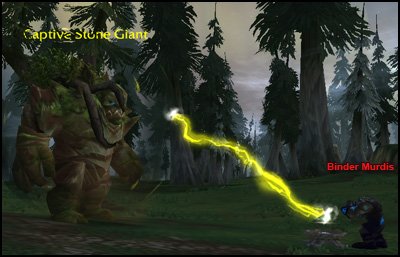
Kill him.
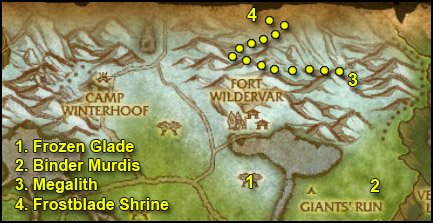
Move a little northwest and you should find a Stone Giant (71,23). It looks just like a Runed Stoned Giant, besides it’s non-aggressive.
Now we’re going to solo [72] Demolishing Megalith, a 3-player quest. To do that, we’re going to use that Stone Giant as a pet. Read the end of this step AND step 3. to find out how:
 Thanks to the Rune of Command we have from the other quest, we’ll make this stone giant our pet for 5 minutes.
3. After that, mount up, ride north towards the snowy hills while carefully avoiding any aggro. Go all the way up and at (70,12) you should see a snowy path going northwest (as shown on the map). Take this snowy path and you should find Megalith.
Then, let Megalith hit you once and let your stone giant pet tank for you. Give him time to build some aggro, wait till he’s down to 60% HP or so before you start attacking. With the help of the pet, any class should be able to solo megalith.
==Note== If you fail, you can go get a new stone giant pet and try again, every 5 minutes.
Good luck.
4. From there, go west through the mountains, staying as close as possible to the northern side of the mountain. If you do it properly, you should end up on a small frozen path at (60,8 ).
Take the small frozen path going up into the mountains. Follow this path all the way to the top (I warn you it’s long). There you’ll find the Frostblade Shrine.
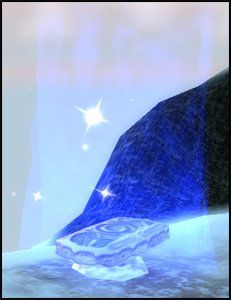
Right-click it and defeat Your Inner Turmoil.
Mount up. You have a 3 minute levitation buff now, so aim for Camp Winterhoof (Hold your mouse right-click, press “M” to open your map, and then simply aim for Camp Winterhoof on the map by moving your mouse). Once you’re pointed towards Camp Winterhoof, just “fly” there.
In Camp Winterhoof, turn in:
- [72] Demolishing Megalith
- [71] The Rune of Command
- [71] Hasty Preparations
Fly to Apothecary Camp.
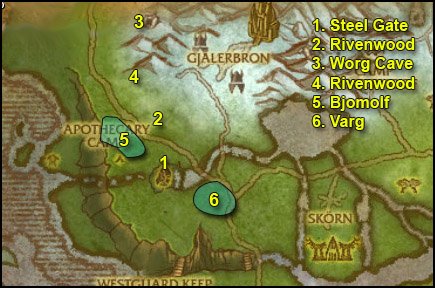
1. Ride to Steel Gate, turn in [71] The Cleansing, get [71] In Worg’s Clothing.
2. Ride north/northwest until you enter Rivenwood (30,21). While going through Rivenwood, look for Riven Widow Cocoons and destroy them, this will sometimes free a Winterhoof Longrunner. Don’t finish this quest now though, we’ll go through this forest several times.
Keep going north while you do this, until you get out of the woods.
3. Once you’re out of the woods, mount up and ride north to a cave at (30,6).
 Right-click the Worg Disguise from your inventory.
Go inside the cave, turn in [71] In Worg’s Clothing, get [71] Brother Betrayers.
4. Get out of the cave, mount up and ride back to Rivenwood. Open cocoons on your way, go southwest until you hit the road.
5. Go to the woods on the other side of the road southwest (27,21). Put on the Worg Disguise and look for a Bjomolf. He’s easy to find, he’s the only agressive worg here while you have the disguise on. He’s also bigger and has a different color. Kill him.
6. Ride east until you hit the road, follow the road south and cross the river, you’ll end up in some woods (34,29). Put on the Worg Disguise and find Varg, kill him.
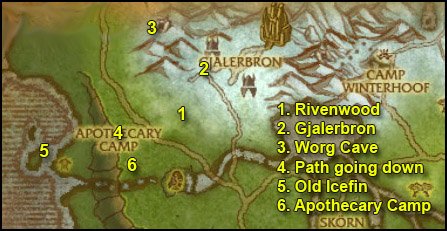
1. Go back to Rivenwood, open cocoons until you finish [72] Rivenwood Captives.
2. Go north until you get out of the woods, go to Gjalerbron (35,15). Kill every Vrykul you see on your way and loot their keys. Open cages with those keys.

If you’re lucky you might also get a Large Gjalerbron Cage Key, which you can use on the Large Gjalerbron Cage on the upper platform at (36,12). You can free up to 5 prisoners at once with this cage.
==Warning== A Sepulchral Overseer patrols this area, avoid him. It’s immune to cc and kinda hurts.
Stay here until you finish both quests and find the Gjalerbron Attack Plans.
 Right-click them to start the quest [72] Gjalerbron Attack Plans.
3. Ride northwest and then north to the cave at (30,6). Put on the Worg Disguise, go inside the cave, turn in [71] Brother Betrayers, get [71] Eyes of the Eagle.
4. Ride southwest to (26,20), where you should see a narrow path going down towards the coast. Go down.
5. ==Note== Kill every murloc/necrotech/shade on your way until one drops a Scourge Device.
 Right-click it to get the quest [71] It’s a Scourge Device.
Go west/southwest towards the isle at (20,22). There you should find Old Icefin. Get his quest [71] Trident of the Son.
6. Go back to that narrow path, get back on top of the bluffs and ride south to Apothecary Camp. Turn in [71] It’s a Scourge Device, get [71] Bring Down Those Shields.
Fly to Camp Winterhoof.
Turn in:
- [72] Gjalerbron Attack Plans, get [72] The Frost Wyrm and its Master
- [71] Of Keys and Cage, get [71] The Walking Dead
- [71] Dealing With Gjalerbron, get [71] Necro Overlord Mezhen
Also get [71] Sleeping Giants from Ahota Whitefrost.
Sell junk, repair and re-stock food/drink.
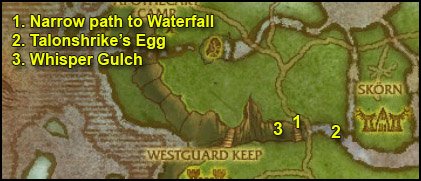
1. Ride southwest to the bridge west of Skorn (39,36). There you should see a narrow path going down towards the waterfall east of the bridge.
2. Take this path down and ride to the waterfall, you should find Talonshrike’s Egg there (41,38 ).
Right-click the egg, Talonshrike will swoop down on you and attack you. Kill him and loot the Eyes of the Eagle.
3. Mount up, get back on the narrow path we took to get down here, keep riding west and you should see another narrow path on the other side of the bridge, which will take you to Whisper Gulch (38,36)
In Whisper Gulch, there’s two things we need to do:
- Find Dwarven Kegs and loot them.
 Kill Deranged Explorers, loot them, target their corpse and use Grick’s Bonesaw on them.
Explore Whisper Gulch until you finish [71] What’s in That Brew? and [71] Brains! Brains! Brains!.
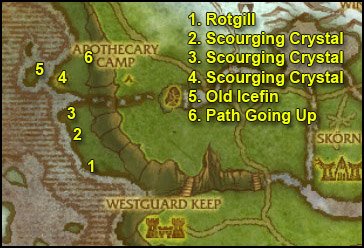
1. Jump down in the water, swim west until you can get back on land. Then ride northwest until the wrecked ship at (23,35). From there go north along the coast and look for Rotgill. He patrols in between the wrecked ship and the murloc camp north at (22,32).
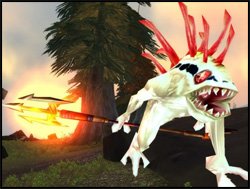
Kill Rotgill and loot Rotgill’s Trident.
2. Follow the coast northwards and you should find a camp with a Scourging Crystal at (23,32).
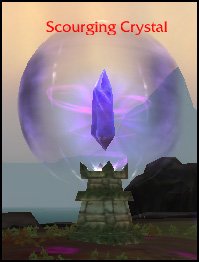
Cleary the way to the Scouring Crystal.
Get close to it and use the Scourging Crystal Controller.
This will destroy the shield protecting the crystal, destroy it.
==Note== Pet classes, make sure you destroy the crystal yourself. If your pet does it, you won’t get the credit.
3. Go northwest to the next Scourging Crystal (22,29), destroy it.
4. Further northwest across the water you’ll find another Scourging Crystal (21,24), destroy it.
5. Go west/northwest to Old Icefin, turn in [71] Trident of the Son.
Go back on the coast and kill stuff until you finish [71] And You Thought Murlocs Smelled Bad!.
6. Go east to the narrow path taking you up the bluffs (24,22).
Ride back to Apothecary Camp.
Turn in:
- [71] Brains! Brains! Brains!
- [71] And You Thought Murlocs Smelled Bad!
- [71] Bring Down Those Shields
- [71] What’s in That Brew?
1. Ride northeast to the cave at (30,6). Put on the Worg Disguise, go inside the cave, turn in [71] Eyes of the Eagle, get [71] Alpha Worg.
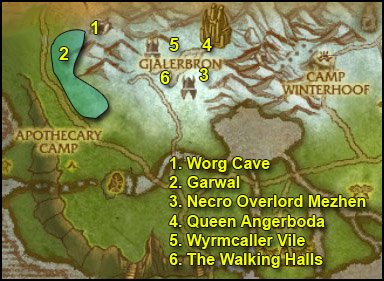
2. Go southwest and look for Garwal while being in the Worg Disguise. He patrols between (27,8 ) and (26,12) and (28,17). As shown on the map.
Kill him.
3. Go to Gjalerbron. Go up to the higher plateau and go northeast until you reach another higher plateau. Take a right turn and go up the slope, you’ll end up on the rear right platform (38,12).
==Note== Kill Deathless Watchers and Putrid Wights on sight from now on.
Kill the 5 Necrolords guarding Necro Overlord Mezhen, they can be pulled solo. Then kill Necro Overlord Mezhen and loot Mezhen’s Writings.
 Right-click them to start the quest [72] The Slumbering King.
4. Go to the big gate north of here. Enter the building and you should see a bunch of Necrolords trying to awake King Ymiron. Don’t worry, they can’t attack you. Clear the way around that platform and access it from the backdoor. There you should see Queen Angerboda. Kill her. You’ll see a little script involving Arthas.
5. Get out of this building and go west to the rear-west platform (37,8.).
==Warning== We’re about to attempt to solo an elite frost wyrm. It should be doable for every class with normal gear, provided you use everything you got.
Clear the platform and kill Wyrmcaller Vile last, loot the Wyrmcaller’s Horn.
 Right-click it and eat/drink quickly while the frost wyrm flies to you.
Glacion is immune to all forms of CC, you can’t even interrupt his spells. He hits for about 1000 on cloth and sometimes casts a frost breath which does about 800 damage. If you use all your cooldowns and a pot you should be fine. It might not even been needed depending on your class/gear.
If you can’t solo this one, try to find a friend. If all fails, just abandon the quest and come back to do it later or at level 80. It has no follow up, so no big deal.
In any case, before you go to the next step, you must have killed 10 Deathless Watchers and 2 Putrid Wights. You know where to find them, on the side platforms. There are two other side platforms southwest of the two we just visited, should you run short on Deathless Watchers.
6. Go back to the entrance of Gjalerbron. This time go inside the building right at the entrance. This will take you down to The Walking Halls (35,13).
Go down, turn either left or right. You should have several Awakening Rods already, at least 5. If you have less than 5, you’ll have to kill a few more Necrolords, and there are plenty in these halls.
 Use the Awakening Rod on a Dormant Vrykul.
Once you’ve awakened 5 Dormant Vrykuls and slain 4 Fearsome Horrors, get out of Gjalerbron.
1. Ride to Steel Gate (31,24). Turn in:
- [71] Alpha Worg
- [72] Rivenwood Captives
You should be level 71 by now.
Level 71
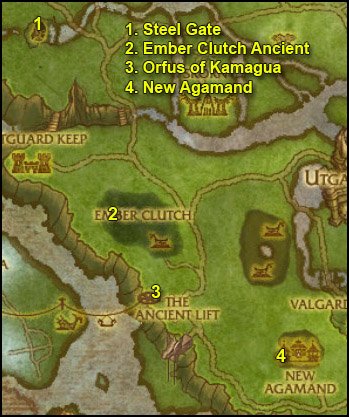
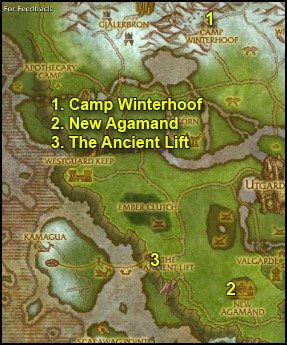
2. Ride south/southeast to the Ember Clutch (37,47). Find the Ember Clutch Ancient. It’s a big treant who patrols this area, he’s easy to find if you look for the yellow “!” on your minimap. Get his quest [71] Root Causes.
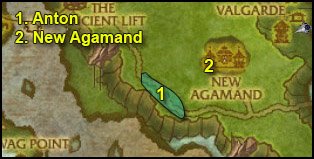
3. Ride further south/southeast to The Ancient Lift (40,60). Get [71] The Dead Rise! from Orfus of Kamagua.
4. Ride southeast to New Agamand (52,67).
Get the new flight path.
Turn in [71] New Agamand and get all the available quests from here:
- [71] A Tailor-Made Formula
- [72] Give it a Name
- [71] Shield Hill
- [71] Green Eggs and Whelps
Turn in [72] Give it a Name, do NOT get the follow up.
Sell junk, repair, re-stock food/drink.
1. Go west to Thorvald’s Camp (47,68 ). Kill Thorvald, loot the Dragonflayer Patriarch’s Blood.
Go back to New Agamand, turn in [71] A Tailor-Made Formula, get [71] Apply Heat and Stir.
 Right-click the Empty Apothecary Flask from your inventory while standing close to the Cauldron right next to the quest giver.
 Right-click the Flask of Vrykul Blood while standing close to the table on the other side of the quest giver.
Repeat these two steps until you obtain a Balanced Concoction.
Turn in [71] Apply Heat and Stir, get [71] Field Test.
2. Get out of New Agamand and ride north to Halgrind (51,58 ).
 Use the Plague Spray on 10 Vrykuls.
3. Ride west/northwest to Ember Clutch (42,55).
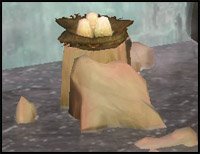
Look for Proto-Drake Eggs while in the area.

 Target the egg, right-click Tillinghast’s Plague Canister.
This will spawn a Plagued Proto-Whelp, kill it and loot a Plagued Proto-Whelp Specimen. Repeat this step 10 times while doing the next steps.
4. In this area you should see a couple of buildings. Inside the southern one you’ll find Skeld Drakeson (42,53). Kill him.
Also kill 5 Dragonflayer Handlers.
5. Find the Ember Clutch Ancient (easy to spot with the minimap), turn in [71] Root Causes.
Now finish [71] Green Eggs and Whelps.
6. Go back to New Agamand. Turn in:
- [71] Green Eggs and Whelps, get [71] Draconis Gastritis
- [71] Field Test, get [71] Time for Cleanup
- [71] Time for Cleanup, get [71] Parts for the Job
==Note== From now on, kill every kind of Shoveltusk you see on your way, until you’ve looted 6 Shoveltusk Ligament.
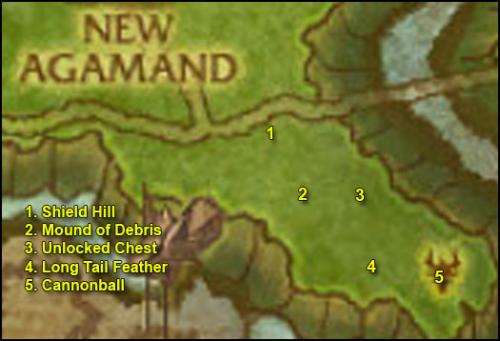
1. Ride southeast to Shield Hill (57,74). Kill every Risen Vrykul Ancestor on your way while going through the next step, until you’ve looted 5 Ancient Vrykul Bones.
2. First go southeast and look for a Mound of Debris inside a small pit at (58,77).
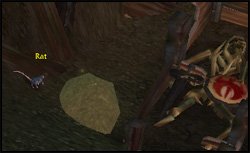
Right-click it and loot Fengir’s Clue.
3. Go about 100 yard east to another pit, look for an Unlocked Chest (60, 77).
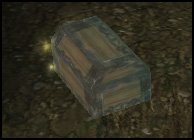
Right-click it and loot Rodin’s Clue.
4. Go another 100 yard south/southeast to another pit. Look for a Long Tail Feather (60,80).
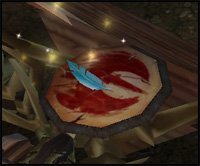
Right-click it and loot Isuldof’s Clue.
5. Go about 150 yards east to a last pit, look for a Cannonball (62,80).
Right-click it and loot Windan’s Clue.
Finish [71] Shield Hill before you get out of here.
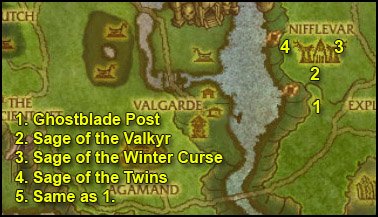
1. Cross the bridge east and then ride northeast to Ghostblade Post (67,61). Get the two quests:
- [71] Against Nifflevar
- [71] The Enemy’s Legacy
2. Go north to Nifflevar, kill everything on your way while following the next steps, until you complete [71] Against Nifflevar.
Go to the first building you encounter at (67,57). Inside you should find a scroll on the floor.
Right-click it and loot the Saga of the Valkyr.
3. Go north/northeast to the small building east of the bonfire (69,53). There you’ll find another scroll. Loot the Saga of the Winter Curse.
4. Go to the longhouse west of the bonfire (65,54). You’ll find the last scroll there. Loot the Saga of the Twins.
Finish killing what you need for [71] Against Nifflevar.
5. Go back to Ghostblade Post, turn in:
- [71] Against Nifflevar
- [71] The Enemy’s Legacy
==Optional== If you want to do the achievement Friend or Fowl?, there’s a spot with lots of Fjord Turkeys south of this camp (69.50, 65.00).
1. Go back across the bridge and follow the road west until you find Anton (47,70). Buy a Fresh Pound of Flesh from him.
By now you should have looted 6 Shoveltusk Ligaments, if you haven’t, go kill Shoveltusks until it’s done.
2. Go back to New Agamand. Turn in:
- [71] Shield Hill
- [71] Parts for the Job, get [71] Warning: Some Assembly Required
Go to the flightmaster and dismount.
Get the quest [72] To Venomspite!
This will fly you to Venomspite.
Get the new flight path.
In Venomspite, turn in [72] To Venomspite! and get [72] The Forsaken Blight and You: How Not to Die.
Also get [72] Funding the War Effort from Quartermaster Bartlett on your way out.
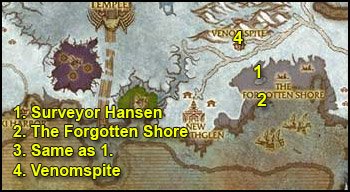
1. Go southeast to Surveyor Hansen (79,65). Get [72] Beachfront Property.
2. Go south to the Forgotten Shore (80,72). Kill ghosts in this area and also look for Forgotten Treasures.
Stay in this are until you finish:
- [72] Beachfront Property
- [72] The Forsaken Blight and You: How Not to Die
- [72] Funding the War Effort
3. Ride back to Surveyor Hansen, turn in [72] Beachfront Property.
4. Ride to Venomspite, turn in:
- [72] Funding the War Effort
- [72] The Forsaken Blight and You: How Not to Die, get [72] Emerald Dragon Tears.
We won’t do [72] Emerald Dragon Tears in this chapter, but keep the quest. It will be used in my Dragonblight Guide.
1. Fly to Camp Winterhoof, turn in:
- [72] The Frost Wyrm and its Master (if you did it)
- [71] Sleeping Giants
- [71] The Walking Dead
- [71] Necro Overlord Mezhen
- [72] The Slumbering King
2. Fly to New Agamand.
Sell junk, repair and re-stock food/drink.
3. Ride northwest to The Ancient Lift, turn in [71] The Dead Rise! and get [71] Elder Atuik and Kamagua.
Take the ancient lift (just stand on the Drakkar). This will take you to the Isle of Spears.
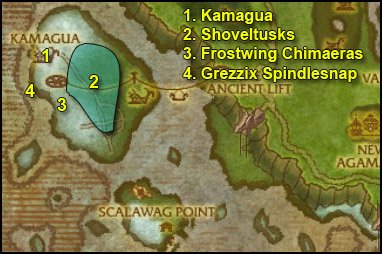
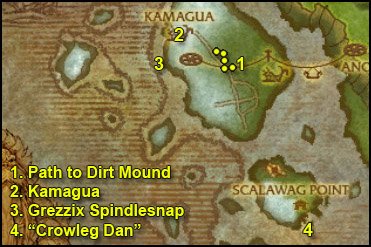
1. Ride north to Kamagua (25,58 ).
Get the new flight path.
Turn in [71] Elder Atuik and Kamagua, get [71] Grezzix Spindlesnap.
Also get the other quest [71] Feeding the Survivors.
2. Go southeast to the colored area. There you’ll find Island Shoveltusks and Spearfang Worgs. You have to kill both, because if you don’t kill the worgs, they’ll killsteal the Shoveltusks from you. You can find Shoveltusks anywhere on the grass area of this isle, as colored on the map. You can also try to find the Shoveltuk Herd, they walk up and down the snow line:
Kill stuff in this area until you have 6 Island Shoveltusk Meat.
Go back to Kamagua, turn in [71] Feeding the Survivors, get [71] Arming Kamagua.
3. Go to the snow hills south of the village (27,65). Kill Frostwing Chimaeras until you get 3 Chimaera Horns.
==Note== If this spot is crowded, there’s another spot with Chimaeras northeast of Kamagua at (27,55).
Go back to Kamagua, turn in [71] Arming Kamagua, get [71] Avenge Iskaal.
4. Swim southwest to a small boat with Grezzix Spindlesnap (23,63). Turn in [71] Grezzix Spindlesnap, get [71] Street “Cred”.
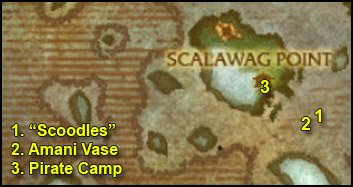
Talk to Lou the Cabin Boy and click on the text. He will ferry you to Scalawag isle.
Once you’re there, go north and find “Silvermoon” Harry under a tent, turn in [71] Street “Cred”, get the follow up [71] “Scoodles”.
Get [71] Forgotten Treasure from Handsome Terry.
1. Swim southeast to (38,84). There you’ll find a big orca named “Scoodles”.
Kill it and loot the Sin’dorei Scrying Crystal.
 Right-click the Fish Bladder in your inventory.
This will make you breathe underwater, it has 3 charges too, so you can re-use it if needed.
Now dive down and you should see 3 Wrecked Ships under you, go to the middle one (the only one who still got a mast). Go inside the ship and loot the Eagle Figurine (38,85):
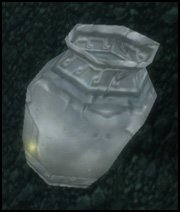
2. Swim to the other wrecked ship southwest of this one, go inside and loot the Amani Vase (37,85):
3. Go back to the pirate camp. Turn in:
- [71] Forgotten Treasure, get [71] The Fragrance of Money
- [71] “Scoodles”, get the 4 follow ups:
- [71] The Ancient Armor of the Kvaldir
- [71] The Frozen Heart of Isuldof
- [71] The Lost Shield of the Aesirites
- [71] The Staff of Storm’s Fury
Get the quest [71] Gambling Debt from Taruk.
Go back to “Silvermoon” Harry. Talk to him, click on the text, beat him. After he gives up, talk to him again, click the text.
Go back to Taruk, turn in [71] Gambling Debt, get [71] Jack Likes His Drink.
Go inside the wooden building, talk to Olga, the Scalawag Wench. Click on the text and give her 1 Gold. Watch her drunk Jack Adams, once he passes out, right-click him and click on the text.
Go back to Taruk, turn in [71] Jack Likes His Drink, get [71] Dead Man’s Debt.
Go a little east and get [71] Swabbin’ Soap from Scuttle Frostprow (38,80)
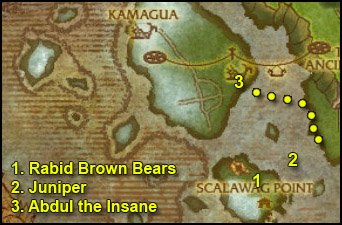
1. Follow the little path north, it will take you to a plateau with lots of Rabid Brown Bears (34,78 ). Kill them all until you have 4 Bear Musk (Drop rate is ~40%)
2. Swim northeast to a little isle with a ghost called Juniper on it (38,75). Wait for the boat there and get on it when it comes.
On the boat, turn in [71] The Lost Shield of the Aesirites, get [71] Mutiny on the Mercy.
Go down in the Ship’s Hold, kill 5 Mutinous Sea Dog and loot 5 Barrel of Blasting Powder off them.
Go back to Captain Ellis, turn in [71] Mutiny on the Mercy, get [71] Sorlof’s Booty.
Go to the other side of the ship where you should see The Big Gun.
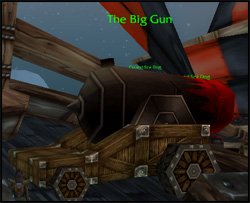
Wait for the ship to engage Sorlof and when it does, right-click The Big Gun repeatedly until Sorlof dies. Jump off the ship and loot Sorlof’s Booty.
3. Swim north/northwest towards the ship docked on the southeastern side of the Isle of Spears (35,65).
==WARNING== Before you get close to the ship, read the next paragraph.
There’s a tough elite called Abdul the Insane on the ship, he’s immune to cc. You just have to avoid him, wait for him to go to the top deck and go down in the ship’s hold, where you’ll find The Staff of Storm’s Fury.
Loot it.
Get out of the ship, run away from Abdul if he jumps you.
 Right-click the Horn of Kamagua. This will summon a tuskarr to help you kill those pirates.
Kill 8 Crazed Northsea Slaver.
1. Go northwest and find the way up a plateau at (29,61), then cross the bridge east to the next plateau. On that plateau you should find a Dirt Mound.
Get full HP/mana before you right-click it, cause you’ll get attacked by 3 ghost pirates when you do.
When ready, righ-click the Dirt Mound, kill Black Conrad’s Ghost and loot Black Conrad’s Treasure.
2. Ride back to Kamagua, turn in [71] Avenge Iskaal.
A new quest should be up in the village, get [72] Travel to Moa’ki Harbor.
Sell junk, repair, re-stock food/drink.
3. Go southwest to Grezzix Spindlesnap (23,63) and once again talk to Lou the Cabin Boy and click on the text.
Back at Scalawag Point, turn in:
- [71] Dead Man’s Debt
- [71] The Fragrance of Money, get [71] A Traitor Among Us
- [71] A Traitor Among Us at Zeh’gehn, get [71] Zeh’gehn Sez
- [71] Zeh’gehn Sez at Handsome Terry, get [71] A Carver and a Croaker
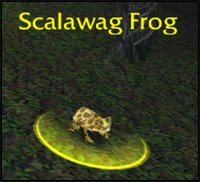
Look around for a Scalawag Frog and right-click it.
Go to “Silvermoon” Harry and buy a Shiny Knife.
Turn in [71] A Carver and a Croaker, get the follow up [71] “Crowleg” Dan
4. Go to the docked ship just south of here, you’ll find “Crowleg” Dan on the top deck (36,83). Talk to him and kill him.
Go back to Handsome Terry and turn in [71] “Crowleg” Dan, get [71] Meet Number Two.
Go to the top of the wooden building, turn in [71] Meet Number Two, get [71] The Jig is Up.
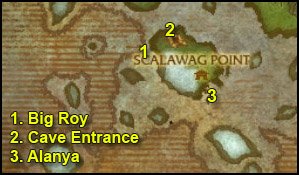
1. Follow the path north and then west to the other side of the isle. There in the water you should see Big Roy. Kill it and loot Big Roy’s Blubber.
2. Go northeast and you should find a cave entrance (33,75).
[71] The Jig is Up, one of the two quests we’ll do in this cave, can be easily soloed by classes who can kite (like mages, warlock, hunter). It can also be soloed by other classes with cooldowns/pots, depending on your gear and talent spec. It requires you to beat “Mad” Jonah Sterling down to 30% and then to kill Hozzer, a huge bear. They are both elite and hit kinda hard, but they can be slowed, stunned, feared. If you can’t solo it, try to find help. The rewards for this quest are:
Sailor’s Knotted Charm
First Mate’s Pocket Watch
Strike of the Seas
Don’t forget to loot Jonah Sterling’s Spyglass from Hozzer after you kill it.
If you can’t find help for this quest, just save it for later or abandon it, as you prefer. There’s no follow up.
We still have another quest to do in this cave, and it’s doable even if you can’t kill “Mad” Jonah Sterling.
Inside the cave, you just have to hug the left wall and you can go past “Mad” Jonah without aggroing him, don’t worry about Hozzer either, he’s sleeping, you can run past him and go to the end of the cave, where you’ll find The Frozen Heart of Isuldof.
Loot it and get out of the cave.
Ride back to Scalawag Point. Turn in [71] The Jig is Up if you did it.
3. Go south to Alanya (36,82). She stands on the docks next to the flying machine. Talk to her and click on the text.
This will fly you to a small isle with a ghost ship. Go down in the ship’s hold and loot The Ancient Armor of the Kvaldir.
Once you got it, go back to the flying machine fly back to Scalawag Point.
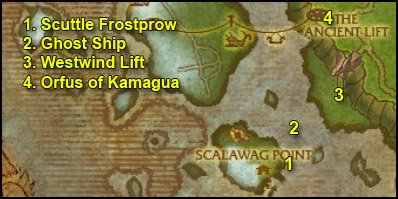
1. Go east to Scuttle Frostprow, turn in [71] Swabbin’ Soap.
2. Go northeast, swim to the small isle and wait for the ghost ship to come. Then turn in [71] Sorlof’s Booty, get the follow up [71] The Shield of the Aesirites and get off the ship.
3. Swim northeast to Sorlof’s Strand, mount up and ride further northeast to the Westwind Lift (42,68 ). Take the lift.
4. Once up top, ride northwest to the Ancient Lift (40,60). Turn in the 4 quests:
- [71] The Ancient Armor of the Kvaldir
- [71] The Frozen Heart of Isuldof
- [71] The Lost Shield of the Aesirites
- [71] The Staff of Storm’s Fury
Get the follow up [71] A Return to Resting
1. Ride north to Ember Clutch.
 Right-click Tillinghast’s Plagued Meat.
A Proto-Drake will fly down and eat it and you should get a quest complete message shortly after.
2. Go east to Halgrind.
 Right-click the Abomination Assembly Kit.
You’ll take control of an abomination. Use it to gather a bunch of Vrykuls (use Ability #2 everytime it’s up to ensure that they keep chasing you). Once you have a decent bunch (at least 5+), use Ability #1 to exterminate them.
Re-summon your abomination and repeat until you have exterminated 20 Plagued Vrykul.
3. Go south to New Agamand. Turn in:
- [71] Draconis Gastritis
- [71] Warning: Some Assembly Required
4. Go southeast to Shield Hill (58,77).
Visit the four ghosts we visited earlier . Besides this time, you have to stand next to their skeleton.
 And right-click the Bundle of Vrykul Artifacts.
Do this on at the 4 skeletons to complete [71] A Return to Resting.
5. When done, go back to The Ancient Lift, turn in [71] A Return to Resting, get [71] Return to Atuik.
Take lift down and ride to Kamagua, turn in [71] Return to Atuik.
A daily quest should be available now, we won’t do it in this guide because it can take a little too long to complete for what it gives. Feel free to do it if you aren’t in a hurry though: [71] The Way to His Heart…
In Kamagua, go to the docks and board the turtle for Moa’ki Harbor.
In Moa’ki Harbor, turn in [72] Travel to Moa’ki Harbor.
Get the new flight path.
Take a turtle ride to Unu’pe, Borean Tundra.
Get the new flight path in Unu’pe.
Mount up ride to Warsong Hold.
We’re done with this chapter. Don’t worry if you are not level 72 yet, you are not quite supposed to be there if you followed my guide without any rested bonus and without doing instances. It’s totally normal, just keep on following my guide.
Time to explore the Borean Tundra, go to the next chapter!
I hope you enjoyed this guide. If you want to return the favor, please try to contribute.
-Jame
© 2008 Copyrights www.wow-pro.com All Rights Reserved