
 by Jame
LEVEL 55
Ride west/southwest until the entrance to Un’Goro. (27,57)
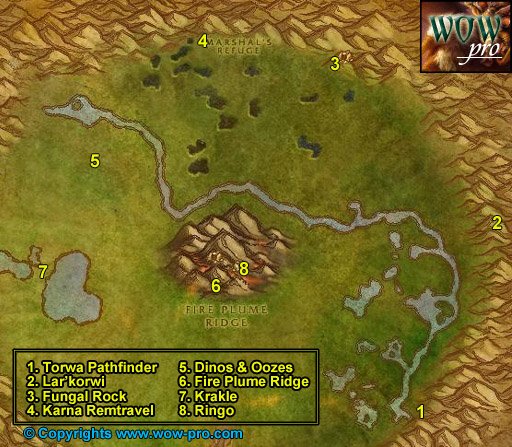
1. Down the slope in Un’Goro talk to Torwa Pathfinder (71,76). Get the 2 quests from him:
[55] The Mighty U’Cha and
[56] The Bait for Lar’Korwi
2. Ride north until the eastern crystal pylon, go up the trail and further east and you should see some huge dinosaur skeletons at (80,49). Be full health/mana and ready to face a level 56 mob. Open Torwa’s pouch in your inventory, loot the Preserved Threshadon Meat and the Pheromone Mixture, right click the meat, and then right click the Pheromone, Lar’korwi will appear, kill him. He’s rather easy, I had no problems to solo it at all at level 55. Loot Lar’korwi’s Head..
3. Ride north/northwest to Fungal Rock (63,16). Enter the cave, at the fork take the narrow path in the middle, then go right and keep going until you hit the end of the cave. Just be very careful where you fight the Un’Goro Gorilla, they call for help.
At the end of the cave in a room with a puddle of water and a rock in the middle you’ll find U’cha, lvl 55 Gorilla. There’s another gorilla in the same room but you can pull it solo if you wait for U’cha to go away. Then pull U’cha solo, kill it and loot his pelt.
Clear the way out of the cave, then kill all the apes outside the cave, make a clear path because you are gonna escort A-Me 01 out of this cave soon.
Once there’s no ape left outside the cave, go back in and go right at the fork this time. After 2 or 3 more apes you’ll find A-Me 01. Turn in the quest, get the follow up, turn it in (since you already have the mithril casing), then get the next follow up, [53] Chasing A-me 01. This will start the escort quest, once again the golden rule of escort quests, let A-me 01 infront, let her get hit first and then get the mobs off her.
4. Escort her until Karna Remtravel and turn in the quest.
Just above of Karna Remtravel is Marshall’s Refuge, go there and get the quest [55] Lost! from Spraggle Frock.
Sell and repair.
5. Go southwest until you hit the river (40,27). On the southern side of the river you’ll find plenty of Dinos and some Oozes.
In this area, kill every Frenzied Pterrordax, Elder Diametradon and Ooze you find.
Keep doing this until you complete:
[51] Shizzle’s Flyer
[51] Roll the Bones (they drop from the Elder Diametradons approximately 25% drop chance)
[55] Beware of Pterrordax
And have gathered about 30 Un’goro Slime Samples.
This might take a while but this is decent grinding since there’s quite a lot of mobs, and you are completing 4 quests at the same time.
Warning: Be careful, 2 devilsaurs roam this area from time to time.
6. When you are done with these 4 quests, go southeast to Fire Plume Ridge, climb the mountain from the southern side in the middle (49,53). Find your way to the top of Fire plume ridge, you’ll have to do almost a full circle around it for that, ignore the cave with Ringo for now. Kill every fire elemental on your way and you should get the 9 Un’Goro Ash you need.
When at the top of Fire Plume Ridge, next to the lava pool you should see a conic stone named “Fire Plume Ridge Hot Spot“. Search your inventory for Krakle’s Thermometer, right click it next to the conic stone, this should complete the quest [55] Finding the Source. Don’t get too close to the cave at the top, there’s a lvl 56 Elite elemental there, avoid it.
7. If you got 9 Un’Goro Ash already no need to kill more elementals, just get off fire plume ridge from the west side and ride west until Golakka hotsprings and find Krakle behind the geyser hill (30,50). Turn in the quest and get the follow up [55] The New Springs.
Ride east/southeast to Torwa Pathfinder (71,76). Turn in the 2 quests:
[55] The Mighty U’cha
[56] The Bait for Lar’korwi
8. Go northwest to Fire Plume Ridge (yes, again!). Climb on it from the southern side in the middle (49,53) then go a bit east to reach the cave where Ringo is (52,51). Turn in the quest [55] Lost! and get the follow up [55] A Little Help from My friends. Search your inventory for Spraggle’s Canteen and put it on a hotkey. Everytime Ringo faints, click the canteen while being next to him. Get off the mountain by the eastern side, then go north, run to Marshall’s Refuge while making sure Ringo always follows you, try to avoid mobs as much as possible. Run inside Marshall’s Refuge until Spraggle Frock, you’ll get the quest complete message.
Time to turn in some quests!
[55] Beware of Pterrordax
[55] A Little Help from my Friends
[51] Roll the Bones
[51] Shizzle’s Flyer
Destroy Spraggle’s Canteen.
Hearthstone to Orgrimmar.
Sell, repair and restock consumables (5 stacks)
You can put the Un’goro slime samples in the bank, for more bag space.
Now you have two options:
1. Get a 5 man group together and go to Sunken Temple. Follow my Sunken Temple Instance Guide. This should make you hit level 56. When you are done with Sunken Temple, turn in all the quests besides [52]Zapper Fuel, we will go turn in it later in the guide.
2. You don’t want to do Sunken Temple, then I suggest you go grind somewhere you like. There are plenty of good grinding spots at this level. You can try the Deadwood Furlbogs in Northern Felwood to get neutral faction with the Timbermaw Tribe and being able to turn in the totem quest, or you can go grind on the Scarlet Lumberjacks in Western Plaguelands, or anywhere with mobs in your level range. Grind up to level 56.
LEVEL 56
Hearthstone back to Orgrimmar.
Sell, repair, restock consumables (4 stacks)
Visit your class trainer.
Fly to Winterspring.
Ride west and go to Donova Snowden, turn in [52]The Videre Elixir, get the follow up [52]Meet at the Grave. Don’t turn in the other quests.
Ride back to Everlook and fly to Ratchet, turn in [55]Volcanic Activity.
Fly to Gadgetzan, go to the Gadgetzan grayveyard, just east of Gadgetzan (53,28). Drink the Videre Elixir, you’ll die, but don’t worry, no durability loss from this, it’s normal. Release spirit but don’t resurrect, go directly north from the Graveyard and up the mountain, you should soon see the yellow dot on your minimap, go to it and talk to Gaeriyan, turn in and get the follow up [52] A Grave Situation. Go back to the graveyard, resurrect and click the gravestone named “A Conspicuous Gravestone“, complete the quest and get the follow up [52] Linken’s Sword. You can destroy the other Videre Elixirs.
Fly to Marshall’s Refuge, Un’goro Crater. Turn in the quest [52] Linken’s Sword, get the follow up [52] A Gnome’s Assistance, go talk to J.D. Collie inside the crystal cave, turn in the quest, watch her do her speech and get the follow up [54] Linken’s Memory.
Hearthstone to Orgrimmar if your stone is ready.
Fly to Splintertree Post, Ashenvale.
Ride to Felwood.
No map needed this time, as you already know all the locations we’ll use from the previous two felwood circuits.
In Felwood, go north to Emerald Sanctuary (51,82), turn in [54] Cleansed Water Returns to Felwood, get the follow up [55] Dousing the flames of Protection.
Also turn in [54]Verifying the Corruption and [54] Linken’s Memory, get the follow up [54] Silver heart.
Go west on the other side of the road and find Maybess Riverbreeze (47,83), turn in [55]Cleansing Felwood. Talk to her and ask her for a Cenarion Beacon. From now on when you kill stuff in Felwood you can get Corrupted Soul Shards, which you will turn in later for Cenarion Plant Salves. With those salves you can cure corrupted plants in felwood and get consumables and buffs in return.
Get back on the road, ride to Jaedenar (40,57). in Jaedenar clear the way westwards until the corrupted moonwell you already went to before to fill up the vial. Enter the Shadow Hold (35,58).
At this point if you can find people to group it will be much easier. Dousing the Flames of Protection is doable solo (but kinda hard), on the other hand there’s an escort quest which is very hard to solo, if not impossible depending on your class and equipment. It also depends on how crowded the area is, if there’s lots of people killing stuff in the shadow hold already, it’s doable solo. Anyway, give it a try solo, but grouping for this one is just easier.
Clear the way down the first tunnel, in the first room you’ll find a captured elve named Arko’narin. This is the NPC that gives the escort quest, but to get it you first need to find a Blood Red Key from one of the mobs inside Shadow Hold, click it and get the quest [55] A Strange Red Key. You have to turn this quest at Captured Arko’narin later. The follow up will be the escort quest.
In the same room you can find the 1st and 2nd brazier (the 2nd one is on the slope going to the next tunnel), click them to turn them off.
If you are in a group, and get a Blood Red Key (the whole group can loot it if it drops), tell everyone to turn in the first quest at the captured elf. When everyone has turned in the first quest [55] A Strange Red Key, one person should start the follow up, which is the escort quest.
Note: You have to click on the elf through the cage. Some people try to click the cage itself, but that doesn’t work.
Escort Arko’Narin to her equipment, then escort her out, things can get rough at times because she engages 2 or 3 lvl 55 mobs a the same time and is fragile until she has her equipment on. In the same room where her equipment is you’ll find the 3rd and 4th Brazier, turn them off too. At the exit a 53 Elite mob will attack you.
Defeat it and then Arko’narin will leave and you’ll get the quest complete message.
If you don’t find anyone to group with and the escort quest is too difficult for you, just don’t do it, clear your way inside the Shadow Hold and turn off the 4 braziers.
Clear the way out of Jaedenar, get back on the road and ride north then go west to Bloodvenom Post. Turn in [56]Wild Guardians and get the follow up [58]Wild Guardians.
Get back on the road and ride north until Irontree Woods.
Go to the crater at (49,27), you’ll find plenty of Toxic Horrors there, kill them until you got 3 Toxic Horror Droplet. There’s more Toxic Horrors all around the big green pool just north of the crater.
In the same area, kill Itontree Stompers until one of them drops an Irontree Hearth.
Go up the plateau east of Irontree Woods, where you will find plenty of bears and wolves. Kill them until you have 11 Silver Claws.
Get back on the road and ride to Winterspring. In Winterspring ride southeast to Donova Snowden, turn in [55]The New Springs and get the follow up [56]Strange Sources. Turn in [56]Toxic Horrors and get the follow up [57]Winterfall Runners.
Get back on the road and ride east to Everlook.
**Should you find the Winterfall Runners on your way, make sure to kill them and loot the Winterfall Crate. However don’t actually go out of your way to look for them, just kill them if you encounter them while following the next paragraphs**
In Everlook get the quest [58]Are We There, Yeti?. Sell, repair and restock food/drink (4 stacks)
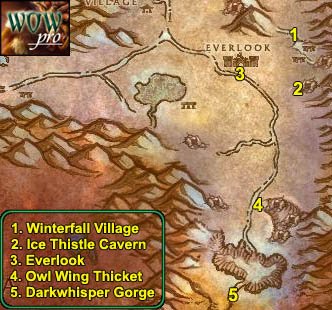
1. Go east of Everlook to Winterfall Village (66,33), kill 8 Winterfall Shamans and 8 Winterfall Ursa there.
2. Go south of Winterfall Village, to Ice Thistle Hills, this time enter the cave further to the east up the hills (68,42) and kill Ice Thistle Matriachs/Patriachs until you get 2 Pristine Yeti Horn.
3. Go back to Everlook, turn in [58] Are We There, Yeti? and get the follow up. Find a goblin named Legacki, she stands to the left of the Inn. Target her and right click Umi’s Mechanical Yeti from your inventory.
Sell junk and repair.
4. Get out of Everlook, follow the road southeast / south until you find Owl Wing Ticket (63,59), the entrance of it is marked by two broken pillars and an elf named Ranshalla standing infront of it. Go inside Owl Wing Ticket and kill 13 Moontouched Owlbeasts.
5. Get back on the road and ride south, go over the ice bridge and keep going south until you discover Darkwhisper Gorge and get the complete message for [56] Strange Sources.
Hearthstone to Orgrimmar.
Sell, repair and restock consumables (4 stacks).
Fly to Splintertree Post, Ashenvale.
Ride to Felwood.
In Felwood ride to the Emerald Sanctuary. Turn in:
[55]Dousing the Flames of Protection, get the follow up [58]A Final Blow
[55]Rescue From Jaedenar(if you managed to do it), get the follow up [57]Retribution of the Light. Turn in [54] Silver heart, get the follow up [54]Aquementas.
Ride north and go to Jaedenar, clear the way and enter the Shadow Hold. Clear inside the hold further than where you went last time past the last two braziers, past the red pool with the Oozes. Just a bit further down a slope you should find a room with an altar in it’s middle, 4 warlocks/darkweavers around it, performing a ritual, and Rakaiah infront.
You can pull Rakaiah solo, the 4 warlocks will be aggro on you but won’t attack as long as you don’t get too close to them. After you got rid of Rakaiah, you will still be locked in combat mode because of the 4 warlocks, to lose combat mode you just have to run back some distance away from them until they forget you. Basically they never attack you unless you get close. However the warlock’s imp pets will attack you and you should dispose of them.
Kill the 2 other mobs on each side of the room and the one in the back, then you can kill each of the 4 warlocks one by one. When the room is clear, click on the Remains of Trey Lightforge on the altar, choose your reward and complete the quest [57] Retribution of the Light, get the follow up [57] The Remains of Trey Lightshadow.
Go past the Altar Room and down a spiral, after a couple of pulls you’ll be facing a small bridge going up straight ahead and a slope going down to your left.
Go left and keep going in that direction until you reach a big room where you’ll find Shadow Lord Fel’dan and his two succubus guards.
It wasn’t an easy fight to solo, I basically used everything I had with the mage and rogue. I sheeped Shadow Lord Fel’dan and killed the two succubus fast. Same with rogue, I sapped the shadow lord and killed it last. With the warrior I used retaliation. Don’t forget to loot the head of the Shadow Lord.
This part of the dungeon is just much easier with a group, you can try it solo but I recommend at least finding a person to duo it with.
Clear your way out of the Shadow Hold and out of Jaedenar, get back on the road and ride south to the Emerald Sanctuary, turn in the quests [57]The Remains of Trey Lightforge and [58]A Final Blow.
Ride to Bloodvenom Post. Turn in [58]Wild Guardians and get the follow up [59]Wild Guardians.
Fly to Everlook, sell, repair and restock food/drink (4 stacks).
Get on your mount and ride southeast/south along the road until Owl Wing Ticket. Kill Owlbeasts until you have 10 Berserk Owlbeast kills and have found a Blue-feathered Necklace off one of the owlbeasts. When you get the Blue-feathered neckalce right-click it to get the quest [59]Guarding Secrets.
Ride back towards Everlook. Now we’re gonna hunt for the Winterfall Runners, check the map below to see their route. I advise you start from Winterfall Village and follow the route westwards, to the Timbermaw Hold tunnel, until you find the Winterfall Runners.
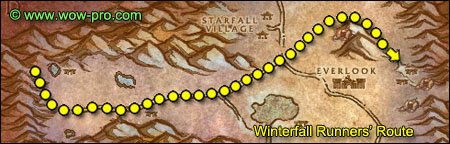
When you find the 3 Winterfall Runners (lvl 57), you don’t have to kill all 3. Just kill one fast and run away, come back and loot the crate. They all drop it.
Ride to the Timbermaw Hold tunnel entrance (27,34) and turn in the quest [58]Winterfall Activity.
Ride south/southeast to Donova Snowden and turn in [56]Strange Sources and [57]Winterfall Runners. 3 Winterfall Ambushers will spawn, just run away, they aren’t worth killing, give no loot and only 70xp each. Don’t get the follow up.
Ride back to Everlook.
In the inn get the following 3 quests:
[55]Sister Pamela
[52]Duke Nicholas Zverenhoff
[52]The Everlook Report
Fly to Bloodvenom Post, Felwood.
In Bloodvenom Post turn in [59]Wild Guardians and [59]Guarding Secrets, get the follow up [59]Guarding Secrets.
This should make you ding level 57.
LEVEL 57
Fly to Thunder Bluff, go see Nara Wildmane on the Elder Rise and turn in [59]Guarding Secrets.
Fly to Gadgetzan.
In Gadgetzan, find a goblin named Sprinkle (she’s close to the horde exit). Scare her away with the mechanical yeti.
Ride to Lost Rigger Cove (68,41), inside lost rigger cove go south to the other side of the pirate camp and then west until you find a stone circle (70,49).
Open the blue bag named “Eridan’s Supplies“, loot everything from it. Then step inside the circle and click the Book of Aquor. Aquementas, a lvl 54 elemental, will come to the circle and attack you. You don’t have to kill it, just have to stand in the stone circle and let him attack you once. If you want to kill it, just know that he is immune to frost and deals frost damage (mages use Frost Ward). He should be a cakewalk at level 57.
You should now have the Silver Totem of Aquementas. If you do, you can destroy the “Book of Aquor”, the “Silver Claws” and the “Irontree Heart”.
Ride back to Gadgetzan.
Fly to Marshall’s Refuge in Un’goro Crater.
**For those who did Sunken Temple, at Marshall’s refuge turn in [52] Zapper Fuel, don’t get the follow up.**
Go inside the crystal cave and talk to J.D. Collie, turn in [54] Aquementas and get the follow up [54] Linken’s Adventure. Go to Linken and turn it in, don’t get the follow up unless you got a few people to help you. You’d need at least a healer and a tank type. Blazerunner is a lvl 56 Elite fire elemental and he hits for 400. So just save this quest for when you are level 60 and have time to spend on that quest, the rewards aren’t that great, we did it just for the XP on the way.
**Anyway here is how to defeat Blazerunner, the last boss of the long quest chain “Linken’s Adventure”. Go to the top of fire plume ridge, clear all the elementals around to make sure they don’t add during the fight. Equip the Silver Totem of Aquementas and put it on a hotkey. Click it to dispel Blazerunner’s aura right at the start and everytime it reappears. Blazerunner is somewhat invincible when his aura is on, he keeps knockbacking people and every damage he takes is divided by 10. So be sure to always keep that aura dispelled.
Another thing, fight him inside his cave with your back facing the walls, so if he knockbacks you when the aura appears again you won’t end up being tossed off the mountain or into adds.
He’s a tough fight, I did it with a level 57 Priest, a level 55 Paladin and me (lvl 57 rogue) and it wasn’t easy. On the other hand I soloed it with my lvl 57 frost mage, thanks to kiting, it took time and several attempts though. So I recommend saving that quest for when you are level 60 and have time to spend on it, unless you got enough people to help you immediately. Anyway if you do manage to kill Blazerunner, you must also go loot the Ornate Chest in his cave. Then turn in the quest at Linken.**
Before you leave Marshal’s Refuge, find the goblin named Quixxil and scare him with the mechanical yeti.
Hearthstone to Orgrimmar.
Sell, repair, restock consumables (4 stacks)
Take a Zeppelin to the Undercity.
In the Undercity, go to the bank. Get the 30 Felwood Slime Samples, the 30 Un’goro Slime Samples, the 4 Filled Vials and the Black Dragonflight Molt.
You can also deposit Umi’s Mechanical Yeti in the bank for more bag space.
Go to the Apothecarium, turn in [52]Seeping Corruption, get the follow up, turn it in at Thersa Windsong right next to Chemist Cuely, then turnin the quest at Chemist Cuely.
Now look for Chemist Fuely, there should be an alchemy lab next to him with two pots on it: a red and a green one.
Right-click the green one and complete the quest, you’ll receive an Un’Goro Tested Sample, open it and loot it. Keep doing this until you have 5 Pure Un’Goro Samples. Then do the same thing with the red pot, until you have 5 Corrupted Felwood Samples.
You can then destroy the remaining samples you have.
Turn in [52]A Sample of Slime… and [56]…and a Batch of Ooze, get the follow up [55]Melding of Influences.
While you are in the Apothecarium, go visit the banshee queen – you have to go through the middle building and then through a curved corridor – and get the quest [56]The Champion of the Banshee Queen.
Go back to the bank, deposit the Encased Corrupt Ooze.
Go to the Innkeeper and set your hearthstone to the Undercity.
Fly to Kargath.
In Kargath get the quests [54]The Rise of the Machines from Hierophat Theodora and [52]Dreadmaul Rock from Thal’trak Proudtusk
Ride to the Searing Gorge, go to Blackrock Mountain, the path leading you through Blackrock Mountain starts at (33,75) go through Blackrock Mountain and enter the Burning Steppes.
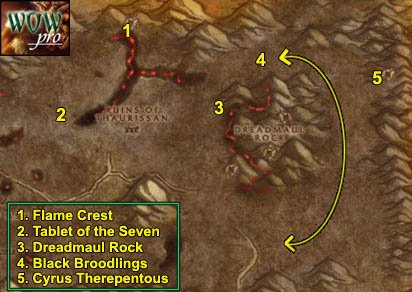
1. In the Burning Steppes get on the road and follow it going east for a while then go northeast to Flame Crest (65,24).
In Flame Crest get the new flight path and the following quests [52]Broodling Essence [50]Tablet of the Seven.
2. Go southwest to the Ruins of Thaurissan. Kill every War Reaver you see on your way. Keep going west until you reach the last rubbles of the Ruins of Thaurissan, with a dwarven statue inside (54,41). Infront of that statue you should find the Tablet of the Seven, right-click it and choose to “Transcript the Tablet“.
Stay in the ruins and kill golems until you have 10 Fractured Elemental Shards.
3. Go east to Dreadmaul Rock, on the western flank of the mountain you should find a path going up (75,38). Clear the way to the top of the mountain, where you should find an altar with a ghost next to it: Sha’ni Proudtusk (80,45). Turn in the quest and get the quest [53]Krom’Grul.
Now we must find Krim’Grul. He can spawn at various locations in any of the caves composing Dreadmaul Rock, explore them all fully until you find Krom’Grul, kill him and loot Sha’ni’s Nose-ring from him.
4. Go to the area which is north of Dreadmaul Rock (78,28), you should find Black Broodlings there. Search your inventory for Draco-Incarcinatrix 900 and put it on a hotkey. Use it on every Black Broodling before killing them. When they die while having the incarcinatrix aura on, a crystal will appear at their corpse named “Broodling Essence“. You need 8 of these.
Make a semi circle around the eastern side of Dreadmaul Rock, that’s where you’ll find the Broodlings you need.
5. Before you leave this area go to the northeastern edge of it, you’ll find a cave with Cyrus Therepentous in it.
Take his quest [54] A Taste of Flame, talk to him and click on the dialogue line, then turn in the quest, get the follow up [58] A Taste of Flame (Dungeon) if you intend to do Blackrock Depths later on.
6. Go back to Flame Crest, turn in [52]Broodling Essence, get the follow up [54]Felnok Steelspring. Turn in [50]Tablet of the Seven.
Fly to Kargath, turn in [53]Krom’Grul and [54]The Rise of the Machines, get the follow up.
Mount up and ride east to Lotwil Veratius (25,45), turn in [54]The Rise of the Machines. Only get the follow up if you intend to go to Blackrock Dephts later on.
Hearthstone to the Undercity.
Go to the bank and deposit Tinkee’s Letter.
Sell, repair and restock consumables (4 stacks)
Ride out of the Undercity, follow the road east until you find the Bulwark (83,68).
Turn in [52]The Everlook Report, at the same npc pick the other quest and turn it in instantly to get your Argent Dawn Commission. When you kill undeads while having this trinket equiped, you can collect Scourgestones from their bodies. I suggest equiping it from now on everytime you kill undeads in eastern and western plaguelands.
Turning in these Scourgestones at Argent Officer Pureheart gets you faction increases with the Argent Dawn and a token. These tokens are the only way to raise your faction with the Argent Dawn at a certain point in reverred, so save them until then. Check blizzard’s official homepage to see what rewards you get at the different faction levels.
Get [53]Scarlet Diversions from High Executor Derrington. Right-click the Box of Incendiaries next to him and loot the Flame in a Bottle.
Get [58]The So-Called Mark of the Lightbringer from Mehlar Dawnblade. Don’t get the other quests.
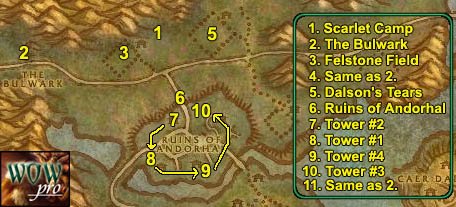
1. Ride east along the road and then north to the Scarlet Campment – northeast of Felstone Field – at (41,54). Clear the camp and then right-click on the Command Tent and once it is destroyed right-click the Scourge Banner from your inventory.
2. Ride back to the Bulwark, turn in the quest [53]Scarlet Diversions, get the two follow up [53] The Scourge Cauldrons and [56] All Along the Watchtowers.
Turn it in at Shadow Priestess Vandis and get the follow up [53]Target: Felstone Field.
3. Go east to Felstone Field (37,58).
Clear yourself a path to the Cauldron in the middle of the field, when you get close, Cauldron Lord Bilemaw will spawn, kill it and loot the Felstone Field Cauldron Key from him, then go to the cauldron and click it, turn in the quest and get the follow up [53]Return to the Bulwark.
In the Felstone Field, go to the houses on the north side of the field, enter the one which is the most to the west (37,54).
On the 2nd floor of the house you’ll find Janice Felstone, get the quest [52]Better Late than Never.
Go to the next house which (38,55) and find Janice’s Parcel inside it. Click it, turn in the quest, then click it again and get the follow up [52]Better Late than Never.
4. Ride back to the Bulwark, turn in [53]Return to the Bulwark and get the follow up [55]Target: Dalson’s Tears.
5. Ride east to Dalson’Tears (45,52), it’s the field directly east of Felstone Field. Clear yourself a path to the Scourge Cauldron, when you get close Cauldron Lord Malvinious will spawn, kill it and loot his key, go to the Cauldron and click it, turn in the quest and get the follow up [55] Return to the Bulwark.
Go to the houses on the north side of Dalson’s Tears, enter the right one (47,51). Clear what’s inside and look on the floor for Mrs. Dalson’s Diary, get the quest and complete it.
Get out of the barn and look around for a Wandering Skeleton, there is only one of this kind and he roams around the barn, so keep killing stuff around the barn until you find it, kill it and loot “Dalson Outhouse Key“. Go behind the barn, you’ll find an Outhouse (48,49). Open it, kill Farmer Dalson, loot Dalson Cabinet Key.
Go to the other house now (47,50), on the 2nd floor of it you’ll find a “Locked Cabinet“, click it and turn in the quest.
6. Get out of Dalson’s Tears and go southwest to the Ruins of Andorhal. In Andorhal try to avoid the roads as much as possible, as level 56 elite abominations roam them. So just clear yourself a path through the destroyed houses. Also avoid the center of the town of course, there’s a huge bunch of mobs there and Araj the Summoner (lvl 61 elite).
7. Clear yourself a path to the first tower you see on your right-hand side (42,66), but be careful not to aggro the Skeletal Warlord inside of it (lvl 56-57 elite). You can drop the torch at the entrance of the watch tower without aggroing the Skeletal Warlord if you just get close to it without being in it’s line of sight. Look for the “beacon torch” in your inventory and click it while standing next to the tower’s door. You should get the message “Tower Two Marked“.
8. Go southwest to the next tower (40,71). Place the beacon and you should get the message “Tower One Marked”
9. Go southeast and then east – avoid the center of the town – till you find the next tower (47,71). Place the beacon torch and you should get the message “Tower Four Marked“.
10. Go north and then northwest to the last tower (45,64), place the beacon torch and you should get the quest message “Tower Three Marked“.
11. Get out of Andorhal and ride back to the Bulwark.
Turn in [56]All Along the Watchtowers, get the follow up [55]Scholomance.
Turn in [55]Scholomance at Apothecary Dithers and get the follow up [57]Skeletal Fragments.
Turn in [55]Return to the Bulwark and get the follow up [55]Target: Writhing Haunt.
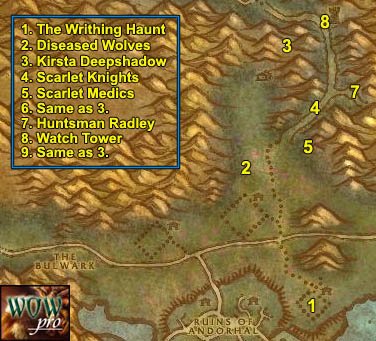
1. Ride east and then south to the Writhing Haunt (52,66). Clear a path to the Scourge Cauldron, when you get close to it, Cauldron Lord Razarch will spawn, kill it and loot the key. Clear what’s around the Cauldron and go click it, turn in the quest and get the follow up [55]Return to the Bulwark.
Directly north of the cauldron in a small house you should find a tauren lying down on the floor, Mulgris Deepriver. Get his quest [54]The Wildlife Suffers Too.
**From now on kill any diseased wolf you find on your way until you have completed [54]The Wildlife Suffers too**
2. Go north/northwest to an area just north of Dalson’s Tears (45,40), where you will find plenty of wolves to complete the quest. Kill everything in this area until you have 8 Diseased Wolf Kills. If needed, you can go grind on the Scarlet Lumberjacks just north of this spot while waiting for the wolves to respawn.
3. Go north to the Northridge Lumbermill, when you are next to the lumbermill, go northeast of it, follow a trail going down to a destroyed wagon. You’ll find Kirsta Deepshadow there (51,28), get the quest [56] Unfinished Business.
4. You can find the Scarlets Knights and Mages you need to kill for the quest just southeast of Kirsta, on the road to Hearthglen.
5. For the Hunters and Medics go to the camp further south and to the east (51,44).
6. When you completed the kill list, go back to Kirsta and turn in [56] Unfinished Business, get the follow up.
7. Go back on the road just east of Kirsta.
At (54,34) the road forks off to the left and right. Go right and up the slope you will find Huntsman Radley (57,35). She can be pulled solo if you do it at the right moment, just wait for the mage next to her to move far enough.
8. Get back on the main road and this time at the fork go north, keep going north until you hit the watch tower (53,24). Kill the 2 guards infront of it, clear the 1st floor of the tower carefully, then wait for Cavalier Durgen to show up. He goes to the top of the tower then walks back to the entrance. Wait for him to come down, you can’t kill him when he’s on top, he has 3 guards with him there.
After killing Durgen, clear the way to the top of the tower and prepare for a tough fight: there are 3 scarlet mages on top of the tower, you can actually pull just 1 or 2 if you take your time and body pull carefully. Anyway, make sure you got all your cooldowns ready for this fight. After you have cleared the top of the tower, you should find a Holy Coffer, right-click it and loot the Mark of the Lightbringer.
9. Go directly back to where Kirsta is by going southwest and jumping down in the crater where she is. Turn in the quest [57] Unfinished Business, don’t get the follow up. This should make you ding level 58. If it didn’t, go to the lumberjack camp and grind there until you ding.
LEVEL 58
Hearthstone to the Undercity.
Right after warping to the Undercity you should see a yellow dot on your minimap labelled as “Royal Overseer Bauhaus”. Go to him and turn in the quest [52]Better Late than Never, get the follow up [52]The Jeremiah Blues. You can turn this quest just a few steps away, under the stairs leading to the bank. Get the follow up get the follow up [52]Good Luck Charm.
Go visit the class trainer, sell and repair, restock consumables (5 stacks).
Ride out of the Undercity and back to the Bulwark.
Turn in [55]Return to the Bulwark, get the follow up [58]Target: Gahron’s Withering. Turn in [58]The So-Called Mark of the Lightbringer, get the follow up [58]Defiling Uther’s Tomb.
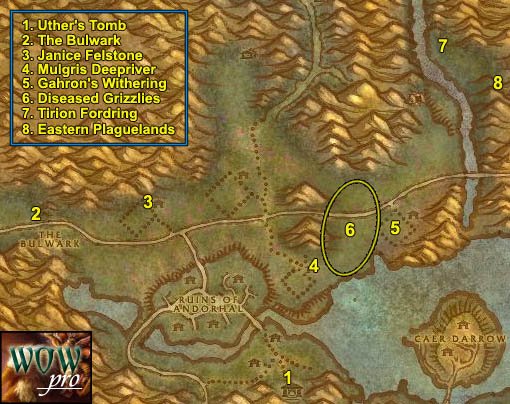
1. Ride to Uther’s Tomb (52,81), look at the map below to see the path to take. Uther’s Tomb is guarded by a level 58 elf npc, pvp flagged. If you attack it you’ll be pvp flagged, if you don’t want that you can just wait for him to do his patrol behind the statue. Equip the Corrupted Mark of the Lightbringer in your off-hand slot and wait for the 30 second cooldown, get close to the statue and right-click the Corrupted Mark of the Lightbringer directly from your off-hand slot.
2. Go back the way you came from to the Bulwark. Turn in [58]Defiling Uther’s Tomb.
3. Go east to the Felstone Field, go into the left house (38,54) on the 2nd Floor. Turn in the quest [52] Good Luck Charm at Janice Felstone and get the follow up [54] Two Halves Become One.
Get out of the house and look for a Jabbering Ghoul wandering the area in front of the barn. If it’s not there just keep the area clean until it respawns. Kill it and it will drop a “Good Luck Other-Half-Charm“.
Once you have the other half charm, go back to Janice Felstone, right click on the other-half-charm in your inventory. Turn in the quest.
4. Get back on the road and ride east, then go southeast to the Writhing Haunt. Clear the way to the house with the tauren lying down on the floor, turn in [54]The Wildlife Suffers Too, get the follow up [56]The Wildlife Suffers Too.
**From now on kill any Diseased Grizzly you see until you have killed 8**
5. Go northeast to Gahron’s Withering (62,57). Clear a path to the Scourge Cauldron, when you get close Cauldron Lord Soulwrath will, appear, kill it. He’s harder than the other cauldron lords, he knockbacks and silences, so be careful where you fight him. Loot his key then go to the Cauldron, turn in the quest and get the follow up [58] Return to the Bulwark.
6. Go to the area which is in between Garon’s Withering and the Writhing Haunt. There should be plenty of bears there. Kill everything in this area until you have 8 Diseased Grizzly Kills, then go turn in [56]The Wildlife Suffers Too at the Writhing Haunt. Get the follow up [56]Glyphed Oaken Branch.
7. Ride east until you hit Thondroril River, go north along the river bank, then cross the river so you are on the eastern bank and ride north until you find a house. In front of it you’ll see Tirion Fordring, get his 3 quests:
[56] Demon Dogs
[56] Blood Tinged Skies
[56] Carrion Grubbage
**From now on, kill on sight the following:
– Plaguehound Runt
– Carrion Worm
– Plaguebat**
8. Go south along the river and then east into Eastern Plaguelands.
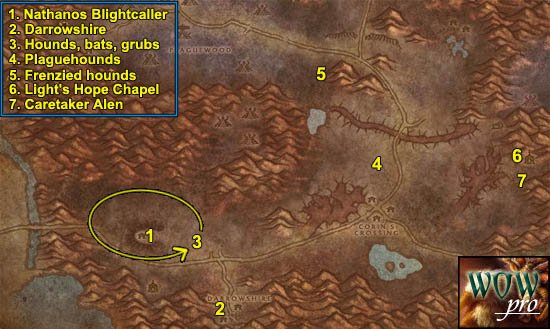
1. Go southeast while killing everything on the way. Find the Marris Stead. You should find Nathanos Blightcaller there (27,75). Turn in [56]The Champion of the Banshee Queen. Get the follow ups:
[58]To Kill With Purpose
[58]Un-Life’s Little Annoyances
[60]The Ranger Lord’s Behest
**Add the following two mobs to your kill-on-sight list:
– Noxious Plaguebat
– Monstrous Plaguebat**
2. Go southeast to Darrowshire, keep killing everything on sight that you need for quests, there should be plenty.
Inside Darrowshire, find a small destroyed house on the western side of Darrowshire. You should find Pamela Redpath there, turn in the quest [55] Sister Pamela and get the follow up [55] Pamela’s Doll.
Now you must find the 3 parts of pamela’s doll, they can be in any of the other houses in Darrowshire, mostly on the 2nd floor of it. Look on the floor for some brown objet. Everytime you get close to one of the doll parts, a level 55 ghost spawns and attack you.
Once you have Pamela’s Doll’s Left Side, Right Side and Head. Right click them in your inventory to combine them. Go to Pamela and turn in the quest. Get the two follow up quests:
[56] Uncle Carlin
[56] Auntie Marlene
3. Go back towards the Marris Stead and keep doing wide circles around it killing everything until you got 30 Plaguebat and 20 Plaguehound Runts slain. This is the best area to find them.
4. Go east to the area north of the Infectis Scar and Corin’s Crossing. Kill everything around until you have 5 Plaguehound Kills and 20 Noxious Plaguebat Kills. Also kill Carrion Grubs if you still miss Slabs of Carrion Worm Meat.
5. Once you’re done with the above, go to the area which is north of Blackwood Lake (51,41). You should find Frenzied Plaguehounds and Monstrous Plaguebats around this area, kill 5 Frenzied Plaguehounds and 10 Monstrous Plaguebats. Also kill Carrion Devourers if you still need carrion meat.
6. Go southeast, around the Pestilent Scar by the north of it and then go southeast to Light’s Hope Chapel (81,59).
Get the flight path. Turn in [52] Duke Nicholas Zverenhoff. Turn in [56] Uncle Carlin, get the follow up [55] Defenders of Darrowshire.
7. Just a bit south of Light’s Hope Chapel find Caretaker Alen (79,63). Get the quest [55] Zaeldarr the Outcast from him.
Note: Don’t sell evil bat eyes, they can be used to get Darkmoon Faire Tickets for your future epic necklace. If you aren’t interested in the Darkmoon rewards you can sell the eyes at the AH for nice cash.
8. Check how many “Slab of Carrion Worm Meat” you need, then go kill in the area south and southwest of Light’s Hope Chapel until you got your 15 Slabs Carrion Worm Meat.
Hearthstone to the Undercity.
Sell, repair, restock consumables (5 stacks).
Deposit the Glyphed Oaken Branch in the bank.
Ride out of the Undercity and ride east to the Bulwark.
Turn in [58]Return to the Bulwark. Get the quest [55]A Plague Upon Thee from Mickey Levine.
Go to High Executor Derrington and turn in the quest “Mission Accomplished!“.
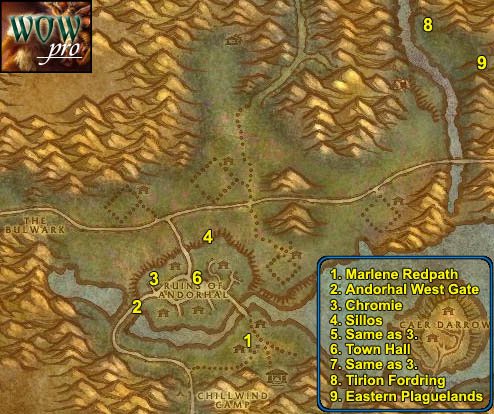
1. Go inside the Western Plaguelands and ride southeast around Andorhal, then east again to Sorrow Hill and find Marlene Redpath in the only house there is (49,78).
Turn in [56] Auntie Marlene and get the follow up [56] A Strange Historian (Elite).
Search the graveyard just north of the house where Marlene Redpath is, look for “Joseph Redpath’s Monument” among the graves (49,76). Click the grave and get Joesph’s Wedding Ring.
2. Go west for a while and then north to Andorhal, enter the Ruins of Andorhal by the western entrance.
3. Just a bit inside Andorhal go to the house to the north, it’s the only house around with a floor and not totally destroyed (39,68). Inside the house go to the 2nd floor, in one of the rooms you’ll find Chromie. Turn in [56] A Strange historian, get the follow up [56] The Annals of Darrowshire. Also ge the other quest [56] A Matter of Time.
4. Go to the northern gate of Andorhal, and east of the first watch tower you’ll find two wooden silos (45,62) which look like this:
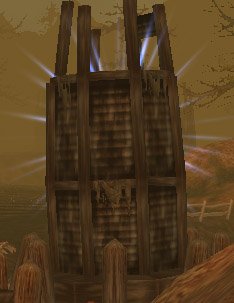
Get full hp/mana, get next to one of them and click your Temporal Displacer (looks like a horn). 1 to 3 lvl 57 worms will spawn and attack you. When it’s 3 it might be tough to handle solo, so always start those fights with full hp and if possible potions / long cooldown abilities up. Back off from the silos after you summon the worms, if you stay too close more worms will spawn sometimes, and that’s probably more than you can handle solo.
The worms only appear when the silo is sparkling blue. They take a while to sparkle again after you use the temporal displacer next to them. There’s 3 more silos just a bit more to the east.
Keep doing that until you have 15 Temporal Parasites slain.
5. Go back to Chromie, turn in [56] A Matter of Time and get the follow up [56] Counting Out time.
Now what you have to do is to check every destroyed houses in Andorhal and look for Small Lockboxes like this:
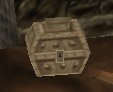
Loot the Andorhal Watch from it. Keep doing this until you have 5 Andorhal Watches.
6. Go to the town hall (with a tower clock) which is in the middle of Andorhal, close to where Araj the Summoner is, you can sneak in the town hall without having to fight any of the bunch of mobs close to it.
Inside the town hall you’ll find several “Musty Tome” lying on the floor. When you click one, there is a chance you will find the Annals of Darrowshire, but there is a higher chance that you will get a “Ruined Tome” and 1 or 2 level 57 mobs will attack you. They give no loot and no exp. Hoewever there is a trick to know which tome is the right one. There is a slight graphical difference. The pages of the fake tomes have two-tone colored pages, lightbrown and white, like this one:
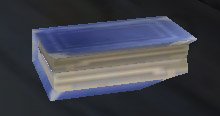
The good tome looks “newer”, and it’s pages only have one color tone, like this one:

You can easily see the difference if you zoom in 1st person view and put your mouse pointer over the books to highlight them. Loot the Annals of Darrowshire.
7. Go back to Chromie, turn in [56] Counting Out Time. The Attuned Dampener you get as a reward is only useable on Araj the Summoner, so save it for later when you are 60 and do the big quests. Killing Araj is necessary to get your Scholomance key and another quest for a decent trinket. You’ll need a solid group of 60s to kill him, but the Attuned Dampener will help.
Turn in [56] The Annals of Darrowshire, get the follow up [56] Brother Carlin.
Now you should also have finished [57] Skeletal Fragments, if you haven’t, kill some more skeletons while you are in Andorhal.
8. Get out of Andorhal by the north gate, then go east till Thondroril River and ride north to Tirion Fordring (7,43).
Turn in [56] Demon Dogs, [56] Blood Tinged Skies and [56] Carion Grubbage. Get the follow up [56] Redemption. Listen to Tirion’s tale, turn in the quest and get the follow up [57] Of Forgotten Memories.
9. Ride to Eastern Plaguelands.
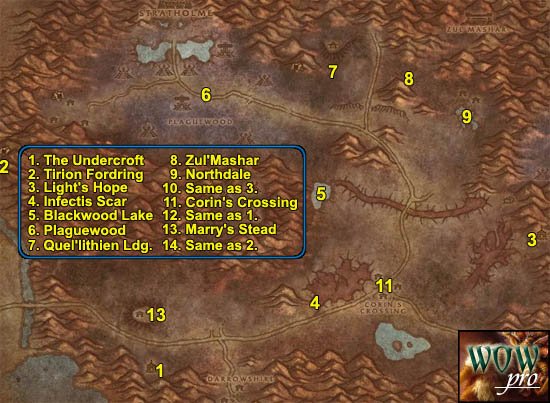
1. Go southeast to the Undercroft, which is directly south of the Marris Stead.
Behind the crypt in the Undercroft you’ll find Tiron Fordring’s Grave (28,86). Next to should be a “Loose Dirt Mound“. This is where you need help, this almost impossible to do solo unless you use a lot of creativy and everything you got. Anyway here is what happens when you click the dirt mount, Mercutio Filthgorger and 3 Dwarf Graverobbers spawn and go to the dirt mound, if you are close they of course jump you.
They all hit hard, especially Mercutio, and all have a lot of hit points for non elites. Here is what I suggest:
As soon as you click the dirt mount, run to the other side of the fence, you can jump over it if you walk up the mountain a bit. The 4 dwarves will walk to the grave and stand there.
You have two ways to do this now:
1) Polymorph Mercutio (if you have a mage with you) and kill the 3 gravediggers. Then bandage up and kill Mercutio, loot his hammer.
2) Ignore the 3 adds and go all out on Mercurio, loot the hammer and run.
Use creativity with the classes you have!
Ex: I could solo it with my rogue and my mage at level 58. With the rogue I simple used evasion and focused on Mercutio then I vanished as soon as he died. I didn’t even need a potion.
With the mage I polymorphed Mercutio, frost nova’d the 3 guards and AoE’d them to death as quick as I could. They I re-polymorphed Mercutio, used evocation, bandaged up and then killed him.
However some classes and some talent specs probably can’t manage it, so try to get some help if you can’t solo it.
And if you don’t get help immediatly, there’s something to do in the Undercroft while wait for someone to come help you:
Go inside the crypt (27,85), clear the way down, kill Zaeldarr the Outcast and loot his head.
In the same room look for a “Torn Scroll” on the floor, click it can get the quest [60] Hameya’s Plea.
If you still didn’t get anyone to help you on [57] Of Forgotten Memories, grind on the trolls in the Undercroft while waiting for someone to help you. It just takes 10 min! Call a guildmate or something. 🙂
2. Go back to Tiron Fordring, turn in [56] Of Forgotten Memories, get the follow up [58] Of Lost Honor.
3. Get back into Eastern Plaguelands and ride east to Light’s Hope Chapel. Turn in [56] Brother Carlin, get the follow up [57] Villains of Darrowshire and [56] Heroes of Darrowshire.
Turn in [55] Zaeldarr the Outcast further to the south at Caretaker Alen. Sell junk and resupply food and drink there. (4 stacks).
This should also make you ding level 59.
LEVEL 59
4. Ride west to the Infectis Scar by passing Corin’s crossing by the south side.
Go down the Infectis Scar at (49,74), then go to
(53,65) where you’ll find the “Shattered Sword of Marduk“, as marked on the map. It looks like this:

Loot it.
Get out of the Infectis Scar by the way you came in.
5. Go north to Blackwood Lake (49,51). Take a dive, in the middle of the pool at the bottom you’ll see Ghosts of Darrowshire fighting each other, amongst them you should see a glowing violet skull named “Horgus Skull” (51,50), it looks like this:

Loot it.
6. Go west to the Plaguewoods. In the Plaguewoods look around for Large Termite Mounds and loot them:
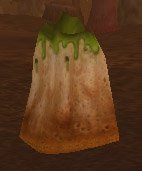
Kill stuff inside Plaguewood while looking for those termite mounds, but also try to find as much Cannibal Ghouls as possible. Anytime you kill one of these, a Spirit of Darrowshire will appear, right click it to free it. You need to free 15 Darrowshire Spirits. The Cannibal Ghouls are not so numerous though, so it will take a while, consider this as a mini grinding session, plus you are getting faction with the Argent Dawn and Scourgestones.
7. When you are done with both [55] A Plague Upon Thee and [57] Defenders of Darrowshire, go east to the Quel’Lithien Lodge (51,22). Clear yourself a path to the main building, and clear towards the right-hand wing. You should find two level 60 Quel’Lithien Protectors, kill them and then loot the Quel’lithien Registry, which should be lying on a bench.
Before you leave Quel’lithien Lodge, kill as many elves as needed to complete the quest [60]The Ranger Lord’s Behest.
8. Go east to Zul’Mashar (64,24). Clear the way up the slope, and to the east, you’ll soon face a big pyramid. At it’s base you should see tombs with some trolls roaming about them. One of them is Infiltrator Hameya.
Clear some of the trolls until you get a clear pull on Hameya, pull him solo and kill him, then loot his key.
9. Clear your way out of Zul’Mashar then go southeast to Northdale, take a dive in the pool which is just south of Northdale. Clear the elementals in the way. At (71,33), next to a cage you should see a white flag with a blue runed on it named “Symbol of Lost Honor“:

Loot it.
10. Ride southeast to Light’s Hope Chapel.
Turn in [55] Defenders of Darrowshire and [57] Villains of Darrowshire. Get the quest [56] Heros of Darrowshire. We won’t be doing it in the guide, however it’s one of the cool quest lines to do at level 60.
11. Ride west/southwest to Corin’s Crossing, kill every undead you find there until you have 7 Living Rot. You must be rather quick because the living rot only lasts 10 minutes. As soon as you have 7, right-click the Mortar and Pestle from your inventory, you should receive some Coagulated Rot.
12. Ride west and slightly south to the Undercroft. Right behind the crypt in the Undercroft you should find a “Mound of Dirt“. Not the one next to Tiron’s grave, the other one close to a charriot (28,86). Click it, turn in [60] Hameya’s Plea.
13. Ride north to the Marry’s Stead. Turn in the 3 quests, you can get the follow ups if you wish, we won’t be doing them in this guide, they can’t be solo’d, but they are good quests which you will probably want to do at level 60.
14. Ride northwest back to Tirion Fordring, turn in [58] Of Lost Honor and get the follow up [58] Of Love and Family.
Go south and then west back into the Western Plaguelands.
1. Stay on the road and keep going west until the Bulwark.
In the Bulwark turn in [55]A Plague Upon Thee and get the follow up. Also turn in [57]Skeletal Fragments and get the follow up [57]Mold Rhymes With…
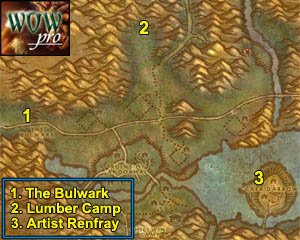
2. Go back to the Western Plaguelands and ride northeast to Northridge Lumber Camp.
Go straight to the lumber mill which is at the northeastern tip of the lumber camp.
Inside the lumber mill you should find a big crate named “Northridge Lumber Mill Crate“. Click it and place the Termite Barrel on it. A barrel with green smoke should appear, click it and get the follow up.
3. Ride south, get back on the road, then go east for a while and then go south towards the isle of Caer Darrow. Swim southeast to Caer Darrow isle, on the western side of Caer Darrow, find Artist Renfray in a wooden house (65,75). Turn in [58] Of Love and Family and get the follow up [60] Of Love and Family.
This quest will be taking you to Stratholme so it’s something we won’t do in the guide. However it is a great quest, yet another ‘must do” at level 60.
Hearthstone to the Undercity.
Sell, repair, restock food and drink (4 stacks).
Get the following items from your bank:
– Umi’s Mechanical Yeti
– Tinkee’s Letter
– Encased Corrupt Ooze
– Glyphed Oaken Branch
Ride out of the Undercity and take the zeppelin to Orgrimmar.
It’s time for you to buy your Dungeon Set 1 Bracers if you haven’t bought them already, we are gonna need them now. Also take 2x Thorium Bars with you.
Go to Thrall’s room and get the quest [60]An Earnest Proposition from Mokvar.
Fly to Everlook, Winterspring.
In Everlook, turn in [58] Are We There, Yeti? at Umi Rumplesnicker.
Turn in [54] Felnok Steelspring, don’t get the follow up.
Fly to Thunderbluff, in Thunder Bluff go to the elder rise and turn in [56]Glyphed Oaken Branch at Nara Wildmane.
Fly to Gadgetzan, turn in [57]Mold Rhymes With… at Krinkle Goodsteel, get the follow up [57]Fire Plume Forged.
Fly to Un’goro Crater, ride south to the top of fire plume mountain, (49,46). Right-click the Skeleton Key Mold from your inventory while standing very close to the lava, you should receive an Unfinished Skeleton Key.
Get off Fire Plume Ridge by the southern side and look for a Primal Ooze in the area south of the mountain (50,67). When you find one, engage it and before killing it right-click the Encased Corrupt Ooze from your inventory. You will release a little ooze which will merge with the Primal Ooze and create a Gargantuan Ooze. Kill it and loot the Merged Ooze Sample off it.
Get on your mount and ride northwest till you reach the mountain on your left-hand side, ride north along the mountain until you find two stone pillars (29,22). From there, follow the path going up the mountain until you zone into Silithus, keep going west on the road until you reach Cenarion Hold. In Cenarion Hold find the Wyvern Master and get the new flight path.
Get the following quests:
[55] Securing the Supply Lines from Windcaller Proudhorn.
[55] Deadly Desert Venom, from Beetix Fickelspragg on the 1st Floor of the Inn.
[58] The Twilight Mystery from Geologist Larksbane
[60] Secret Communication from Bor Wildmane

1. Get out of Cenarion Hold by the west side, keep going west a little bit, you’ll quickly encounter Scorpids, Spiders and Worms. Kill all of them on sight. Move to the next paragraph if you run out of mobs to kill in the blue area shown as “1” on the map.
2. Go to the Twillight Base Camp (41,42). Kill the Twilight mobs. There is also a lot of scorpids, spiders and worms in the area north of the twilight camp.
Keep kiling around this camp until you complete [60] Secret Communication, [55] Deadly Desert Venom and [55] Securing the Supply Lines.
Then kill scorpids and spiders until you have 15 Silithus Venom Samples. This might take a while, but it’s normal, this is for your new armor set quest (For Dungeon Set 2).
3. When done with all 3 above quests, go northwest until you are in the northwestern most corner of Silithus named “The Crystal Vale” (20,18). Look around for “Twilight Tablet Fragments“, they look like this:

4. As soon as you have 8 tablets, go back to Cenarion Hold and turn in the 4 quests, you can get the follow ups if you wish, we won’t be doing them in this guide.
Now you should be very close to level 60. If you aren’t close, go grind on one of the twilight camps until you are 23000XP away from level 60, this will be just enough.
Hearthstone to the Undercity, go to the Apothecarium and turn in [55]Melding Influences.
Get out of the Undercity and ride east to the Bulwark. Turn in [55]A Plague Upon Thee and [57]Fire Plume Forged. You can get the follow up if you wish, they are for the Scholomance Key and you’ll need a group for the next step.
Ride west to the zeppelin station, take a zeppelin to Orgrimmar, go to Thrall’s room and turn in [60]An Earnest Proposition. 3 Spectral stalkers (non elite) will spawn and attack Mokvar, help him to kill them.
Get the follow up [60] A Supernatural Device. This is the next step for your armor quest, but we won’t be doing it in this guide, that’s yet another thing for you to do at level 60!
Anyway, congratulations on your Dungeon Set 2 bracers and on level 60!
LEVEL 60 — End of Chapter IV!
–Jame
© Copyrights www.wow-pro.com All Rights Reserved