
 by Jame
Journey from Howling Fjord to Dragonblight
![]()
All the guides on wow-pro are FREE, there is no trick, they are just free and will remain free.
Enjoy and please contribute or Leave a tip!
70-80 WotLK Classic Leveling Guides
Alliance
- Jame’s Alliance Leveling Guide – Borean Tundra (70-72)
- Jame’s Alliance Leveling Guide – Howling Fjord (72-74)
- Jame’s Alliance Leveling Guide – Dragonblight (74-75)
- Jame’s Alliance Leveling Guide – Grizzly Hills (75-77)
Horde
- Jame’s Horde Leveling Guide – Howling Fjord (70-72)
- Jame’s Horde Leveling Guide – Borean Tundra (72-74)
- Jame’s Horde Leveling Guide – Dragonblight (74-75)
- Jame’s Horde Leveling Guide – Grizzly Hills (75-77)
1-70 Leveling Guides for World of Warcraft Classic
For guides covering levels from 1-70, please check this link:
1-70 Wow Classic Leveling Guides
Support my work
Question– Your guides really helped me out and I want to return the favor, what can I do to help?
Answer– Here’s how you can contribute:
1. Most important and easiest way to help: Spread the word. Tell people about my guide. Your friends, guildmates, boards you visit. Tell them that they are FREE and that they make you level much faster than other guides or questhelper.
2. When you try my guides, if you find any mistakes, leave a comment.
3. Post useful comments here. When people ask for advices and you know the answer, go for it and help them out, so I won’t have to do it myself 😛
4. And then of course, you can write a guide about an area of the game where you’re good. Direct message me on Twitter if you want to become an editor on Wow-pro!
5. You can also translate guides into other languages, if you are fluent in another language. Check our Guides in Other Languages section to see what has already been translated.
6. Leave a tip to the author of these guides : Donate!
Introduction
This guide is made for FAST leveling through the use of Optimized Quest Circuits. With this guide, questing will be very efficient and you’ll not waste any second running around and trying to figure out in which order to do your quests. Follow each instruction carefully and you will see for yourself. The quest choices and order to do them are optimal so that you run as few as possible while doing the most possible, turning several quests at the same time. It will be like grinding, because you’ll be killing stuff almost non-stop, besides you’ll also be completing a bunch of quests at the same time!
NOTE: Following this guide will get you the Quest Achievement for Howling Fjord: I’ve Toured the Fjord. In fact, 100% of the quests of Howling Fjord are included in the guide, or at least mentioned as optional.
Everything described in this guide can be done solo (beside when I say otherwise). You can, of course, follow this guide while duoing, grouping, it’s not a problem, it works too.
DISCLAIMER: This guide does NOT take into account tradeskills, class specific quests or PvP. It’s 100% focused on getting the most experience possible in the shortest possible time while doing a lot of quests and enjoying as much content as possible. Any race/class combination can do this guide. Any complaints about PvP, tradeskills, or class specific issues will be ignored.
Basic rules
- Spend your talent points so that you kill things as fast as possible. (e.g: Priest should specialize in Shadow Talents, Warriors in Arms/Fury, etc.
- Don’t waste your time trying to find groups for questing, you can solo everything that is described in this guide unless I say otherwise. Only group with someone when it’s not gonna be a waste of time (e.g: meeting the person at the other end of the zone to show him the way to where your quest is, that is a waste of time)
- Try to always log out in an inn or in one of the major cities when you take a break.
Shopping List:
Bags – Try to at least have 18-slot bags. We’ll go on long circuits far from any vendor, so bag space is necessary. If you can’t afford 18-slot bags, go for 16-slot ones, they are much cheaper.
Color Code:
- Quests
- Items
- Locations
- Quest objectives to kill
- NPCs
- Locs
The Guide:
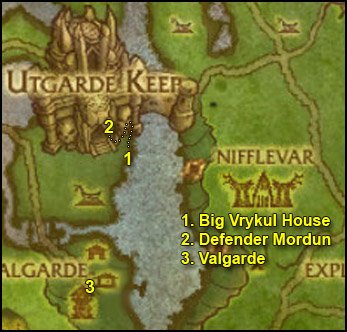
If you followed my previous guide, you should already be in Valgarde Keep.
If you didn’t, simply go to Menethil Harbor. Go to the northern pier (5,57). Take the boat to Howling Fjord. The Boat will take you to Valgarde Keep.
Once in Valgarde Keep, get off the boat and get the quest [70] Hell Has Frozen Over…
Zoom out your minimap to the maximum, this will make it easier for you to locate quests.
Go to the yellow “?” on your minimap. Turn in [70] Hell Has Frozen Over… and get [70] If Valgarde Falls…
 Get the new flight path
 Go to the inn and make it your home location.
==Note== If you wish to train First Aid, the grand master trainer is in the middle of the town, walking around the bonfire.
Go to the gate on the north side of the village. Kill stuff there until you finish [70] If Valgarde Falls… It’s quite easy, let the guards help you.
Turn in [70] If Valgarde Falls… and get [70] Rescuing the Rescuers.
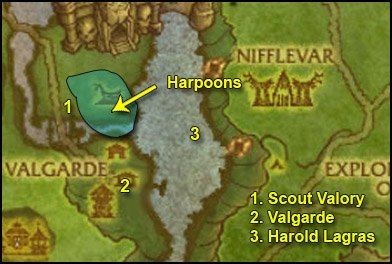
1. Go back to the north gate, go northwest while looking for Ceremonial Dragonflayer Harpoons on your way.
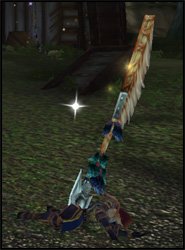
Right-click them.
At (56,55) you should find a path to get to Scout Valory. Go to her and get the quest [71] Fresh Legs.
After that, find the remaining Ceremonial Dragonflayer Harpoons you need to finish [70] Rescuing the Rescuers.
2. Go back to Valgarde, turn in [70] Rescuing the Rescuers, get [70] Prisoners of Wyrmskull.
A bunch of quests should have just popped up on your minimap, get them all:
- [70] The Human League
- [71] Into the World of Spirits
- [71] The Path to Payback
3. Dive in the water and swim northeast to Harold Lagras (63,59). Get his quest [71] Daggercap Divin’.
 Equip the Diving Helm from your inventory (you don’t need to though if your class has some sort of underwater breathing spell).
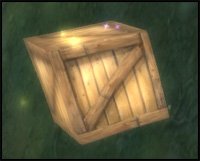
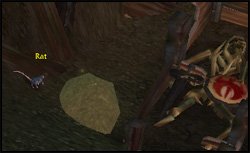
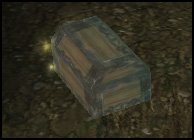
Now look around for Valgarde Supply Crates and loot them.
Also look for a Reagent Pouch on the deck of the wrecked ships nearby.
Once you have looted 10 Valgarde Supply Crates, go back to Harold Lagras, turn in [71] Daggercap Divin’.
Go back to Valgarde, turn in [71] Into the World of Spirits, get [71] The Echo of Ymiron.
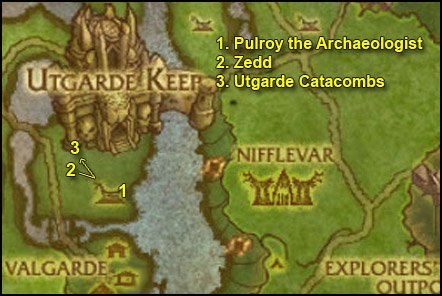
1. Go north to Wyrmskull Village and go to the yellow “?” labelled “Pulroy the Archaeologist“. Enter the building, turn in [70] The Human League, get [70] Zedd’s Probably Dead.
==Note== Kill Dragonflayer Tribesman, Thane, Death Weaver or Harpooner on your way until you have 3 Dragonflayer Cage Keys. Use those keys to rescue 3 Captured Valgarde Prisoners.

Once you’ve rescued 3 prisoners, go back to Valgarde, turn in [70] Prisoners of Wyrmskull, get [70] Dragonflayer Battle Plans.
2. Go back to Wyrmskull Village, go northwest and down to a pit where you’ll find Zedd (57,52).
Turn in [70] Zedd’s Probably Dead, get [70] And Then There Were Two…
Go in the cave just west of Zedd, at the end of it you should find the Dragonflayer Battle Plans.
Loot them.
3. Get out of that pit and take the bridge going over it. At the end of the path after the bridge you’ll find the entrance to the Utgarde Catacombs (57,50).
Go down and keep going until you find Glorenfeld. Turn in [71] And Then There Were Two… and get [71] The Depths of Depravity.
==Note== From now on, look on the floor for Wyrmskull Tablets while following the next steps.
Go further inside and at the T intersection, turn left. At the end of this corrider you’ll find the Harpoon Operation Manual lying on the floor.

Loot the manual. Get full HP/mana before you get the quest from Ares the Oathbound. It’s a timed quest so you’ll have to follow my instructions quickly.
When ready, take the quest [71] The Shining Light.
Go back to the T intersection and go straight ahead.
Go down 2 flights of stairs.
Head north till the end of the corridor, don’t worry about all the ghouls down there, your shield will protect you.
At the end of that corridor you’ll find a Sacred Artifact.
Loot it and go back to Ares the Oathbound, turn in [71] The Shining Light, get [71] Guided by Honor.
Gather the last Wyrmskull Tabelts you still need and go back to Glorenfeld. Turn in [71] The Depths of Depravity, get [71] The Ring of Judgement.
Go back to the T intersection, go down 1 flight of stairs and go west to Daegarn, turn in [71] The Ring of Judgement. Get full HP/mana before you get the follow up, it’s a little ring event where you have to defeat several gladiators before Oluf shows up.
When ready, take [71] Stunning Defeat at the Ring. Kill Firjus the Soul Caller, then 2 other gladiators will come, beat them all and then Oluf the Violent will come. Kill him and the Ancient Cipher will appear on the floor.
Loot it.
Go back to Glorenfeld, turn in [71] Stunning Defeat at the Ring, get [71] Return to Valgarde.
Hearthstone back to Valgarde. Turn in:
- [71] Return to Valgarde, get [71] The Explorers’ League Outpost
- [70] Dragonflayer Battle Plans, get [70] To Westguard Keep!
- [71] The Path to Payback, get [71] Locating the Mechanism
- [71] Guided by Honor
1. Go north, past the first two houses on your right. Enter the 3rd house at (60,51). This house is bigger than the other and there’s a big harpoon-launcher right infront of it.
 Inside the building and right-click the Incense Burner.
You should see two Vrykuls having a conversation.
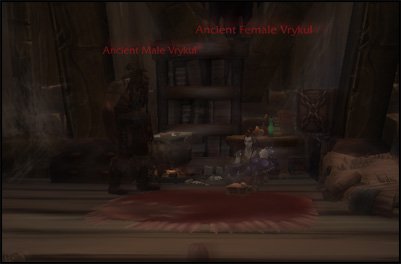
Listen to them and you’ll get a quest complete messsage for [71] The Echo of Ymiron. Once that’s done, right-click the Echo of Ymiron buff to cancel it.
Get out of the house, kill a Dragonflayer Harpooner and loot a Harpoon Control Mechanism.
2. From there, follow the trail going north along the water and then turn left, you’ll find Defender Mordun at the end of the path (60,49). Turn in [71] Fresh Legs, get [71] Into Utgarde!
Also get [71] Disarmament.
Optional – Instance: Utgarde Keep
Now you can start looking for a group for the Utgarde Keep instance.
You already have all the quests for it:
- [71] Disarmament
- [71] Into Utgarde!
It’s a very quick instance for level 71-73 players, I recommend it.
If you don’t feel like it or if you don’t find a group, you can abandon the above 2 quests. They can easily be picked up in the future anyway, if you change your mind.
3. Ride back to Valgarde, turn in:
- [71] The Echo of Ymiron, get [71] Anguish of Nifflevar
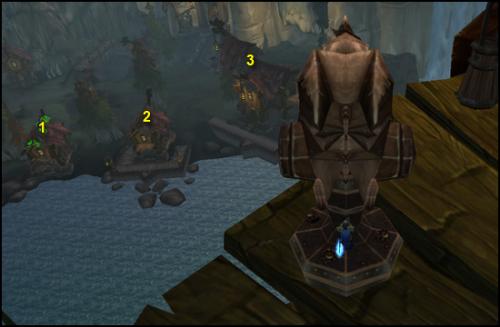
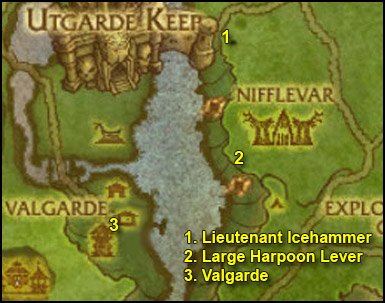
- [71] Locating the Mechanism, get [71] Meet Lieutenant Icehammer…
Talk to Captain Zorek again, ask him to send you to Lieutenant Icehammer.
After landing, turn in [71] Meet Lieutenant Icehammer…, get the follow up [71] Drop It then Rock It!
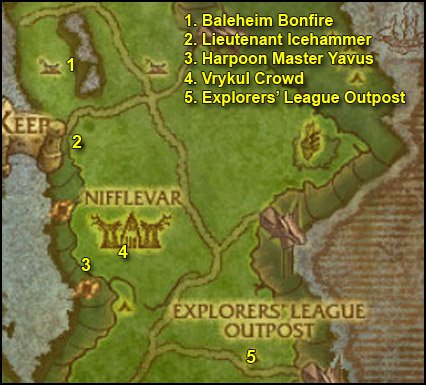
1. Mount up, go straight north to Baleheim and find the Baleheim Bonfire (65,40).
 Right-click the Alliance Banner.
3 Defenders will come and attack the banner. Defend it until you get the quest complete message.
2. Go back to Lieutenant Icehammer, turn in [71] Drop It then Rock It! and get [71] Harpoon Master Yavus.
3. Go south to Nifflevar and clear yourself a path to the big harpoon hut pointing southwest at top of the hill (67,55). Inside the hut you’ll find Harpoon Master Yavus. Kill him.
4. Get out of the hut and right-click the Incense Burner.
Go east towards the big crowd of Vrykul and listen to the speech until you complete the quest [71] Anguish of Nifflevar.
5. Mount up and ride southeast, the Echo of Ymiron buff will cancel itself once you’re out of Nifflevar.
Ride further southeast to the Explorers’ League Outpost. Turn in [71] The Explorers’ League Outpost and get [71] Problems on the High Bluff.
Turn in [71] Problems on the High Bluff and get [71] Tools to Get the Job Done.
Also get [71] Trust is Earned.
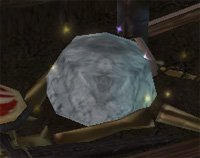
A few steps southeast of Hidalgo the Master Falconer you should find a loose rock next to a tree (75,66).
Right-click it and you’ll get some Fjord Grubs.
Go back to Hidalgo, right-click one of the Rock Falcons in the cage and feed them the grub.
Turn in [71] Trust is Earned, get [71] The Ransacked Caravan.
Go back to the Loose Rock and right-click it several times (it takes a couple of seconds to be clickable again) until you have 5 Fjord Grubs.
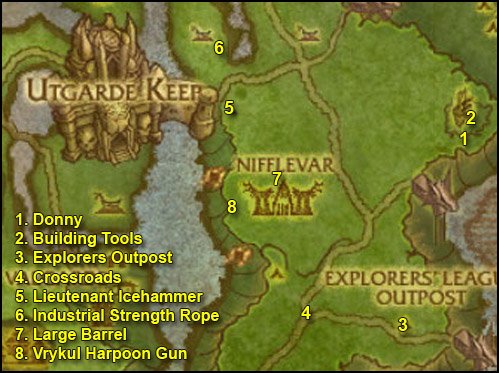
1. Ride north/northeast towards Ivald’s Ruin, clear the way to Donny (79,50). Get his quest [71] Out of My Element?.
2. Go down in the pit and look for Building Tools. They are up on the wooden planks at (79,48 ).
Loot them.
Kill what you still need for [71] Out of My Element? and then go back to Donny. and turn in [71] Out of My Element?
3. Go back to the Explorers’ League Outpost, turn in [71] Tools to Get the Job Done, get [71] We Have the Technology and [71] We Can Rebuild It.
==Note== From now on, kill Shoveltusks, Shoveltusks Calves and Shoveltusks Stags on sight until one of them drops a Pristine Shoveltusk Hide.
4. Follow the trail westwards until you reach the intersection. You should see many Fjord Turkeys at this spot.
 Target one and use your Trained Rock Falcon on it.
Repeat this step 5 times.
==Optional== You can easily complete the Friend of Fowl achievement here, there are lots of turkeys at this spot.
5. Ride back to Lieutenant Icehammer, turn in [71] Harpoon Master Yavus, get [71] It Goes to 11…
6. Ride straight north to Baleheim and find the Industrial Strength Rope at (65,41)
Loot it.
7. Ride southeast to Nifflevar and find a Large Barrel close to the northern entrance (68,52).
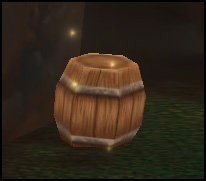
Loot the barrel.
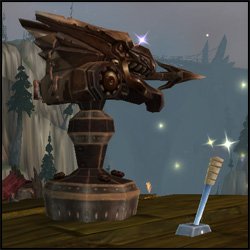
After that, go to the western harpoon-hut at (66,54). Go down and locate a Vrykul Harpoon Gun:
There’s one on each side.
 Right-click the Harpoon Control Mechanism.
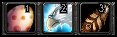
You’ll get the following action bar:
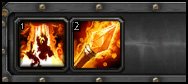
Ability #1 is to destroy buildings.
Ability #2 is to kill Flying Defenders. 2-4 of them come whenever you destroy a building.
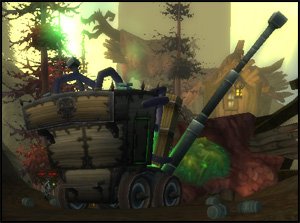
The 3 buildings you have to destroy are actually on the other side of the Fjord, as shown on the screenshot below:
Use Ability #1, aim for the roof of the first building with the green circle and left-click TWICE. (This cannon just works weirdly).
If you aimed well, some Flying Defenders will come and attack you. Target them one by one and use Ability #2.
Repeat this for the other two building and you should be done.
==Note== If you need more Defender kills, you can spawn extra by shooting the same buildings again, even if you’ve already destroyed them.
 When you’re done, click the leave vehicle button.
1. Go to Lieutenant Icehammer. Turn in [71] It Goes to 11… and get [71] Let’s Go Surfing Now.
2. Go back to Nifflevar. If you haven’t found a Steel Ribbing yet, kill Dragonflayer Warriors and Dragonflayer Rune-Seers in this village until one drops.
Once you got the Steel Ribbing, go to the southwestern harpoon-hut. The same one we went to when we killed Harpoon Master Yavus. When there, look for the harpoon-gun with a Large Harpoon Lever next to it:
Right-click it and you’ll harpoon-surf back to Valgarde.
3. In Valgarde, turn in:
- [71] Anguish of Nifflevar
- [71] Let’s Go Surfing Now
Sell junk and repair.
Go to McGoyver, the gnome working on a gyrocopter by the water.
Dismount.
Talk to him and choose the bottom option: “Walt sent me to pick up some dark iron ingots” and then click on “Yarp”. This will fly you back to the Explorers’ League Outpost.
Once there, turn in:
- [71] We Can Rebuild It
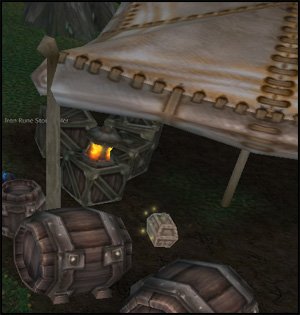
- [71] We Have the Technology, get [71] Iron Rune Constructs and You: Rocket Jumping
- [71] The Ransacked Caravan, get [71] Falcon Versus Hawk
Right-click on the Work Bench which is just next to Walt and click on the text.
Stand on the teleport rune and use the Rocket Jump ability. This should complete the quest.
Click on Leave Vehicle.
Go back to Walt, turn in [71] Iron Rune Constructs and You: Rocket Jumping, get the follow up [71] Iron Rune Constructs and You: Collecting Data.
Right-click on the Work Bench again and click the text.
Go to the blue crystal next to the cart where Gwendolyn is.
Use the Collect Data ability. This should complete the quest.
Click on Leave Vehicle and go back to Walt.
Turn in [71] Iron Rune Constructs and You: Collecting Data, get [71] Iron Rune Constructs and You: The Bluff.
Right-click on the Work Bench again and click the text.
Go step on Lebronski’s Rug. Once Lebronski starts talking to you, use the Bluff ability.
This should complete the quest.
Click on Leave Vehicle and go back to Walt.
Turn in [71] Iron Rune Constructs and You: The Bluff, get the two follow ups [71] Lightning Infused Relics and [71] The Delicate Sound of Thunder.
1. Right-click the Work Bench, click on the text.
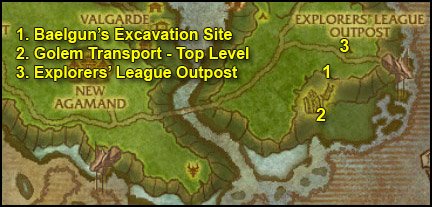
Go southwest to Baelgun’s Excavation Site. If any Iron Rune Dwarf questions you, use the Bluff ability.
Jump down to the bottom of the pit. Yes, just let yourself fall down, it’s safe because you take no falling damage while in the suit.
Warning: Stay away from Rampaging Earth Elementals. If you aggro one, just run away until he forgets you.
Once at the bottom, look around for blue crystals and use the Collect Data ability on them until you have collected 15 Iron Rune Data.
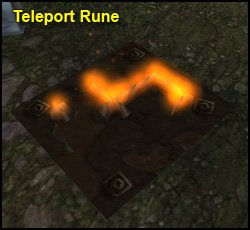
2. Look for the teleport rune called “Golem Transport – Top Level” at (73,73). Stand on the rune and use the Rocket Jump ability.
You will land on a platform with 3 Teleport Runes. Go to the middle one, called “Golem Transport – Level 2” and used the Rocket Jump ability.
Go to the cave just west of the landing spot.
Once inside the cave go deeper until you’re infront of a big statue of a titan.
Watch the script until you get the complete message.
3. Get out of the cave the same way you came from and take the lift east, it will take you back to the top. Go back to the Explorers’ League Outpost.
Turn in [71] Lightning Infused Relics and [71] The Delicate Sound of Thunder, get the follow up [71] News From the East.
Go to the loose rock a few steps southeast of Hidalgo the Master Falconer (75,66). Right-click it until you have 10 Fjord Grubs.
Put your Trained Rock Falcon on a hotkey.
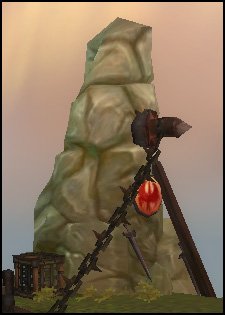
We’re gonna look for Fjord Hawks, they’re found in pairs.
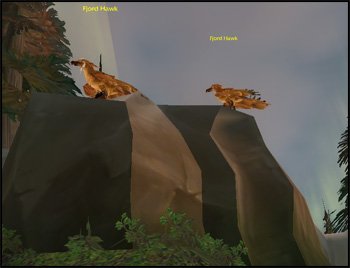
Problem: When you use your Falcon on one of them, the other one attacks you and you can’t use your Falcon on it as long as you’re still in combat. The only option is to kill it or run away.
Solution: We run away, come back and capture the second hawk, then move to the next spot. (Of course, if your class got some sort of aggro reset, use it, it saves time).
1. First Hawk Pair is right next to the Explorers’ League Outpost. Use your falcon and capture both Hawks.
2. Go north/northwest to the next Hawk Pair (74,60). Capture them both.
Then look up in the skies, there’s another Hawk Pair flying close to this spot every 15 seconds or so. Target one and wait for it to come close, then capture it. Run away and then capture the second hawk.
3. Keep going southwest to the next Hawk Pair (71,63). Capture Both
4. A little further west/southwest, past the road intersection, you should find another pair (68,64).
That should be 10 Hawks Captured now. If you’re missing some, then just restart this circuits and wait for respawns.
If you have any Fjord Grubs left in your inventory, destroy them for more bag space.
Go back to Hidalgo the Master Falconer and turn in [71] Falcon Versus Hawk, get [71] There Exists No Honor Among Birds.
5. Follow the road east to Stonewall Lift. When there, face south and you should see the Vrykul Hawk Roost (77,67).
Stand next to it and right-click your Falcon.
Your action bar will be replaced by this one:
- Ability #1 is to pick up eggs.
- Ability #2 is a speed boost, use it whenever it’s up to go to an egg.
- Ability #3 is 6 second stun, use it on Hawk Matriarch if they attack you and then fly away
Fly down and look for Fjord Hawk Eggs, they are all over the bluffs.
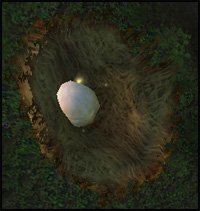
 Once you have 8 eggs, click on the cancel button.
Go back to the Explorers’ League Outpost. Turn in [71] There Exists No Honor Among Birds.
Go talk to Walt and tell him you’re ready to go.
This will fly you to Westguard Keep.
Get the new flight path.
Go to the main keep southwest. Go to the upper floor and find Captain Adams.
Turn in [70] To Westguard Keep! and [71] News From the East, get [71] The Clutches of Evil.
Get out of the keep and go to the blue “!” on your minimap. Get the daily bombing mission [71] Break the Blockade.
Wait for the Zeppelin and get on it.
 Put Petrov’s Cluster Bombs on a hotkey.
In my experience, it’s best to position yourself at the very tip of the zeppelin, switch to walk mode for safety (hit the / key on your numpad), like on the screenshot below:
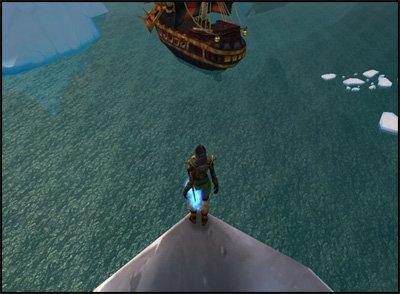
And then don’t move, just use your mouse’s left-click the rotate your camera, use the bombs and aim the green circle at the pirate canons. It’s best to aim for the canons, the pirates will die too in the process anyway.
If you don’t manage to complete the quest in one run, just stay on the zeppelin and do one more run.
Go back to Bombardier Petrov and turn in [71] Break the Blockade.
==Tip== You can repeat this quest everyday, it gives 20K exp everytime.
Sell junk, repair and re-stock food/drink.
Go to the Westguard Inn, get [71] Shoveltusk Soup Again?.
Make this inn your home location.
Go east and out of Westguard Keep, get the quest [71] One Size Does Not Fit All from Cannoneer Ely outside the gates.
1. Go to the area south and east around the cannons, complete the following 2 objectives:
- Kill Shoveltusks, Shoveltusk Calves and Shoveltusk Stags until you’ve looted 6 Shoveltusk Meat.
- Gather 10 Westguard Cannonballs:
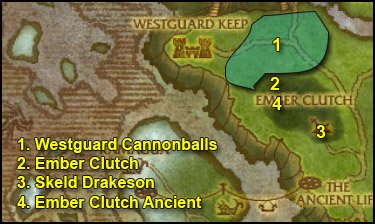
2. Go southeast to the Ember Clutch (37,47). Kill every Proto-Whelp on your way and destroy all Proto-Drake Egg you see.

Find the Ember Clutch Ancient. It’s a big treant who patrols this area, he’s easy to find if you look for the yellow “!” on your minimap. Get his quest [71] Root Causes.
3. Clear the way towards the southeastern tip of the Ember Clutch. You’ll find a couple of buildings there and inside the back one you’ll find Skeld Drakeson (42,53). Kill him.
Around this building you should find plenty of Dragonflayer Handlers. Kill 5 of them.
4. Go back to the Ember Clutch Ancient, turn in [71] Root Causes.
Now kill what you still need for [71] The Clutches of Evil and then go back to Westguard Keep. Turn in [71] One Size Does Not Fit All.
Go to the main keep and turn in [71] The Clutches of Evil, get [71] Mage-Lieutenant Malister.
Turn in [71] Mage-Lieutenant Malister, get [71] Two Wrongs….
Go to the Westguard Inn, turn in [71] Shoveltusk Soup Again?.
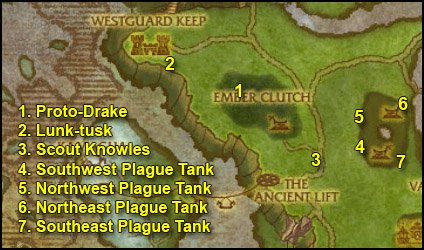
1. Go back to the Ember Clutch. Look up in the skies for Proto-Drakes.
 Target a Proto-Drake and right-click Malister’s Frost Wand
Kill the Proto-Drake. Repeat 3 times.
Go back to Westguard Keep, turn in [71] Two Wrongs… and get [71] Report to Scout Knowles.
Sell junk, repair and re-stock food/drink.
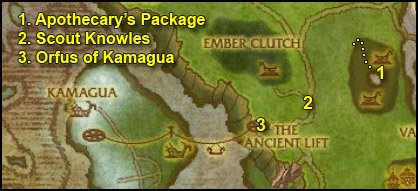
2. Get out of the keep, ride a little south and find Lunk-tusk (32,47), get [71] Orfus of Kamagua.
==Note== If he doesn’t give you that quest, it means you’ve been a very naughty guide follower and that you took the quest [71] The Dead Rise! even though I never mentioned you should take it. Abandon [71] The Dead Rise! and Lunk-Tusk will give you the quest.
3. Ride southeast to Ember Spear Tower (44,58 ). Find Scout Knowles, turn in [71] Report to Scout Knowles, get [71] Mission: Eternal Flame.
4. Ride northeast to the first Plague Tank (48,56).
 Right-click the Ever-Burning Torches while being 20 yard close to the plague tank.
This should destroy it.
5. Ride a little north to the Northwest Plague Tank (48,53). Use the torch.
6. Ride north and then east around Halgrind, until the Northeast Plague Tank (51,50). Use the torch.
7. Ride south and then southwest around Halgrind until you find the Southeast Plague Tank (52,58 ). Use the torch.
Ride back to Scout Knowles, turn in [71] Mission: Eternal Flame, get [71] Mission: Package Retrieval.
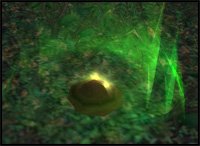
1. Go northeast to Halgrind, enter it by the northern path at (48,50). Then follow the path southeast towards the eastern tip of the pond, there you should find a Slain Apothecary and the Apothecary’s Package (51,54).
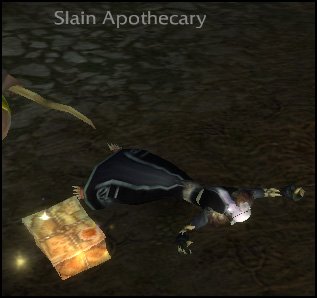
Loot it.
2. Go back to Scout Knowles, turn in [71] Mission: Package Retrieval, get [71] Mission: Forsaken Intel.
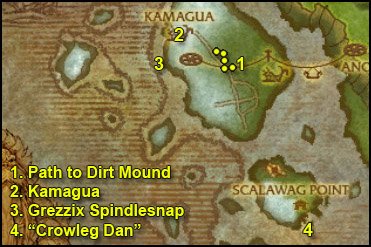
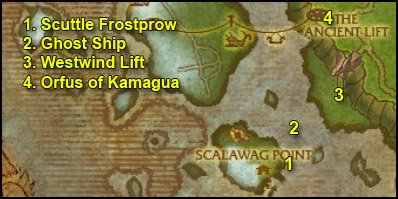
3. Follow the road west to The Ancient Lift (40,60). Turn in [71] Orfus of Kamagua, get [71] The Dead Rise!.
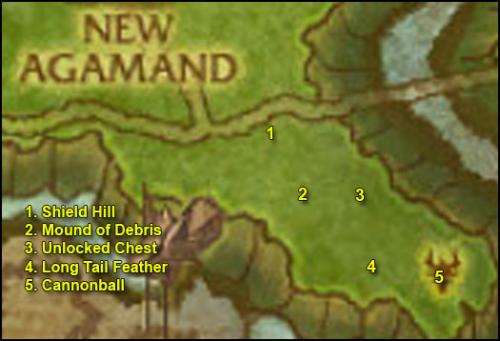
1. Ride southeast to Shield Hill (57,74).
2. First go southeast and look for a Mound of Debris inside a small pit at (58,77).
Right-click it and loot Fengir’s Clue.
3. Go about 100 yard east to another pit, look for an Unlocked Chest (60, 77).
Right-click it and loot Rodin’s Clue.
4. Go another 100 yard south/southeast to another pit. Look for a Long Tail Feather (60,80).
Right-click it and loot Isuldof’s Clue.
5. Go about 150 yards east to a last pit, look for a Cannonball (62,80).
Right-click it and loot Windan’s Clue.
Get back on the road and ride back to the Ancient Lift, turn in [71] The Dead Rise! and get [71] Elder Atuik and Kamagua.
Take the ancient lift (just stand on the Drakkar). This will take you to the Isle of Spears.
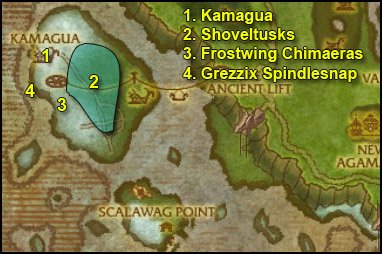
1. Ride north to Kamagua (25,58 ).
Get the new flight path.
Turn in [71] Elder Atuik and Kamagua, get [71] Grezzix Spindlesnap.
Also get the other quest [71] Feeding the Survivors.
2. Go southeast to the colored area. There you’ll find Island Shoveltusks and Spearfang Worgs. You have to kill both, because if you don’t kill the worgs, they’ll killsteal the Shoveltusks from you. You can find Shoveltusks anywhere on the grass area of this isle, as colored on the map. You can also try to find the Shoveltuk Herd, they walk up and down the snow line:
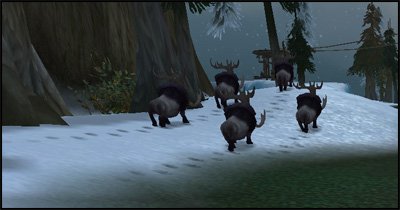
Kill stuff in this area until you have 6 Island Shoveltusk Meat.
Go back to Kamagua, turn in [71] Feeding the Survivors, get [71] Arming Kamagua.
3. Go to the snow hills south of the village (27,65). Kill Frostwing Chimaeras until you get 3 Chimaera Horns.
Go back to Kamagua, turn in [71] Arming Kamagua, get [71] Avenge Iskaal.
4. Swim southwest to a small boat with Grezzix Spindlesnap (23,63). Turn in [71] Grezzix Spindlesnap, get [71] Street “Cred”.
Talk to Lou the Cabin Boy and click on the text. He will ferry you to Scalawag isle.
Once you’re there, go north and find “Silvermoon” Harry under a tent, turn in [71] Street “Cred”, get the follow up [71] “Scoodles”.
Get [71] Forgotten Treasure from Handsome Terry.
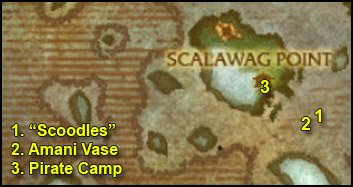
1. Swim southeast to (38,84). There you’ll find a big orca named “Scoodles”.
Kill it and loot the Sin’dorei Scrying Crystal.
 Right-click the Fish Bladder in your inventory.
This will make you breathe underwater, it has 3 charges too, so you can re-use it if needed.
Now dive down and you should see 3 Wrecked Ships under you, go to the middle one (the only one who still got a mast). Go inside the ship and loot the Eagle Figurine (38,85):
2. Swim to the other wrecked ship southwest of this one, go inside and loot the Amani Vase (37,85):
3. Go back to the pirate camp. Turn in:
- [71] Forgotten Treasure, get [71] The Fragrance of Money
- [71] “Scoodles”, get the 4 follow ups:
- [71] The Ancient Armor of the Kvaldir
- [71] The Frozen Heart of Isuldof
- [71] The Lost Shield of the Aesirites
- [71] The Staff of Storm’s Fury
Get the quest [71] Gambling Debt from Taruk.
Go back to “Silvermoon” Harry. Talk to him, click on the text, beat him. After he gives up, talk to him again, click the text.
Go back to Taruk, turn in [71] Gambling Debt, get [71] Jack Likes His Drink.
Go inside the wooden building, talk to Olga, the Scalawag Wench. Click on the text and give her 1 Gold. Watch her drunk Jack Adams, once he passes out, right-click him and click on the text.
Go back to Taruk, turn in [71] Jack Likes His Drink, get [71] Dead Man’s Debt.
Go a little east and get [71] Swabbin’ Soap from Scuttle Frostprow (38,80)
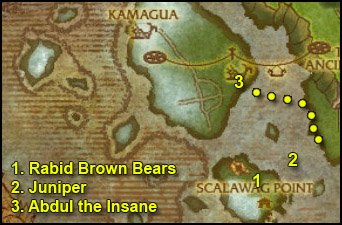
1. Follow the little path north, it will take you to a plateau with lots of Rabid Brown Bears (34,78 ). Kill them all until you have 4 Bear Musk (Drop rate is ~40%)
2. Swim northeast to a little isle with a ghost called Juniper on it (38,75). Wait for the boat there and get on it when it comes.
On the boat, turn in [71] The Lost Shield of the Aesirites, get [71] Mutiny on the Mercy.
Go down in the Ship’s Hold, kill 5 Mutinous Sea Dog and loot 5 Barrel of Blasting Powder off them.
Go back to Captain Ellis, turn in [71] Mutiny on the Mercy, get [71] Sorlof’s Booty.
Go to the other side of the ship where you should see The Big Gun.
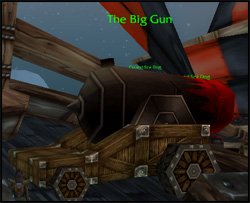
Wait for the ship to engage Sorlof and when it does, right-click The Big Gun repeatedly until Sorlof dies. Jump off the ship and loot Sorlof’s Booty.
3. Swim north/northwest towards the ship docked on the southeastern side of the Isle of Spears (35,65).
==WARNING== Before you get close to the ship, read the next paragraph.
There’s a tough elite called Abdul the Insane on the ship, he’s immune to cc. You just have to avoid him, wait for him to go to the top deck and go down in the ship’s hold, where you’ll find The Staff of Storm’s Fury.

Loot it.
Get out of the ship, run away from Abdul if he jumps you.
 Right-click the Horn of Kamagua. This will summon a tuskarr to help you kill those pirates.
Kill 8 Crazed Northsea Slaver.
1. Go northwest and find the way up a plateau at (29,61), then cross the bridge east to the next plateau. On that plateau you should find a Dirt Mound.
Get full HP/mana before you right-click it, cause you’ll get attacked by 3 ghost pirates when you do.
When ready, right-click the Dirt Mound, kill Black Conrad’s Ghost and loot Black Conrad’s Treasure.
2. Ride back to Kamagua, turn in [71] Avenge Iskaal.
==Note== If you didn’t follow my Borean Tundra guide, a new quest should be up in the village, get [72] Travel to Moa’ki Harbor. Don’t forget to turn it in next time you stop by Moa’ki Harbor, because I won’t mention it.
Sell junk, repair, re-stock food/drink.
3. Go southwest to Grezzix Spindlesnap (23,63) and once again talk to Lou the Cabin Boy and click on the text.
Back at Scalawag Point, turn in:
- [71] A Dead Man’s Debt
- [71] The Fragrance of Money, get [71] A Traitor Among Us
- [71] A Traitor Among Us at Zeh’gehn, get [71] Zeh’gehn Sez
- [71] Zeh’gehn Sez at Handsome Terry, get [71] A Carver and a Croaker
Look around for a Scalawag Frog and right-click it.

Go to “Silvermoon” Harry and buy a Shiny Knife.
Turn in [71] A Carver and a Croaker, get the follow up [71] “Crowleg” Dan
4. Go to the docked ship just south of here, you’ll find “Crowleg” Dan on the top deck (36,83). Talk to him and kill him.
Go back to Handsome Terry and turn in [71] “Crowleg” Dan, get [71] Meet Number Two.
Go to the top of the wooden building, turn in [71] Meet Number Two, get [71] The Jig is Up.
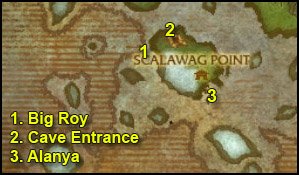
1. Follow the path north and then west to the other side of the isle. There in the water you should see Big Roy. Kill it and loot Big Roy’s Blubber.
2. Go northeast and you should find a cave entrance (33,75).
[71] The Jig is Up, one of the two quests we’ll do in this cave, can be easily soloed by classes who can kite or fear (like mages, warlock, hunter, maybe shadowpriests). It can also be soloed by melee classes with cooldowns/pots, depending on your gear and talent spec. It requires you to beat “Mad” Jonah Sterling down to 30% and then to kill Hozzer, a huge bear. They are both elite and hit kinda hard, but they can be slowed and stunned. Jonas can be feared as well, Hozzer is immune to fear though.
If you can’t solo it, try to find help. The rewards for this quest are:
Sailor’s Knotted Charm
First Mate’s Pocket Watch
Strike of the Seas
Don’t forget to loot Jonah Sterling’s Spyglass from Hozzer after you kill it.
If you can’t find help for this quest, just save it for later or abandon it, as you prefer. There’s no follow up so not a big deal.
We still have another quest to do in this cave, and it’s doable even if you can’t kill “Mad” Jonah Sterling.
Inside the cave, you just have to hug the left wall and you can go past “Mad” Jonah without aggroing him, don’t worry about Hozzer either, he’s sleeping, you can run past him and go to the end of the cave, where you’ll find The Frozen Heart of Isuldof.

Loot it and get out of the cave.
Ride back to Scalawag Point. Turn in [71] The Jig is Up if you did it.
3. Go south to Alanya (36,82). She stands on the docks next to the flying machine. Talk to her and click on the text.
This will fly you to a small isle with a ghost ship. Go down in the ship’s hold and loot The Ancient Armor of the Kvaldir.
Once you got it, go back to the flying machine fly back to Scalawag Point.
1. Go east to Scuttle Frostprow, turn in [71] Swabbin’ Soap.
2. Go northeast, swim to the small isle and wait for the ghost ship to come. Then turn in [71] Sorlof’s Booty, get the follow up [71] The Shield of the Aesirites and get off the ship.
3. Swim northeast to Sorlof’s Strand, mount up and ride further northeast to the Westwind Lift (42,68 ). Take the lift.
4. Once up top, ride northwest to the Ancient Lift (40,60). Turn in the 4 quests:
- [71] The Ancient Armor of the Kvaldir
- [71] The Frozen Heart of Isuldof
- [71] The Lost Shield of the Aesirites
- [71] The Staff of Storm’s Fury
Get the follow up [71] A Return to Resting
1. Go to Shield Hill and visit the four ghosts we visited before (58,77). Besides this time, you have to stand next to their skeleton.
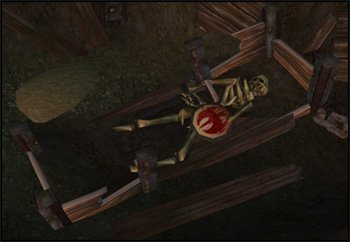
 And right-click the Bundle of Vrykul Artifacts.
Do this on the 4 skeletons to complete [71] A Return to Resting.
When done, go back to The Ancient Lift, turn in [71] A Return to Resting, get [71] Return to Atuik.
Take lift down and ride to Kamagua, turn in [71] Return to Atuik.
Go to the Westguard Inn, turn in [71] Mission: Forsaken Intel, get [71] Absholutely… Thish Will Work!
Get out of the inn, mount up.
Go northeast and get [71] Send Them Packing from Explorer Abigail.
Go southwest and get [71] Danger! Explosives! from Sapper Steelring.
Go to the keep. Inside the keep, go straight ahead and slightly to the left and take the stairs going down.
 Right-click Peppy’s Special Mix on the Dragonflayer Vrykul Prisoner.
Go back to the inn, turn in [71] Absholutely… Thish Will Work! and get [71] You Tell Him …Hic!.
Go back to the keep, go up to Captain Adams, turn in [71] You Tell Him …Hic! and get [71] Mission: Plague This!.
Go to the gryphon master Greer Orehammer, talk to him and click on the text.
 Put the Orehammer’s Precision Bombs on a hotkey.
Destroy 5 Plague Tanks in New Agamand. You already know what they look like, it’s an easy bombing mission.
Go back to Captain Adams, turn in [71] Mission: Plague This! and get [71] Operation: Skornful Wrath.
Get out of the keep and get [71] Everything Must Be Ready from Quartermaster Brevin.
Sell junk, repair and re-stock food/drink.
Ride north to Steel Gate (30,29). Get the quests:
- [71] The Cleansing
- [71] Scare the Guano Out of Them!
- [71] See to the Operations
- [71] Where is Explorer Jaren?
Turn in [71] See to the Operations at the Steel Gate Archaeologist, just off the platform. Get the follow up [71] I’ve Got a Flying Machine!.
Get inside the Steel Gate Flying Machine. The Flying Machine doesn’t behave like a normal mount. It keeps going in one direction until you make it turn (hold your mouse right-click and move to do that). To land, you simply have to bump against the floor. For a quick take off, you can use the space bar.
Fly down and land next to one of those big sacks:
Then use the Grappling Hook ability, this should hook the sack to your flying machine.
Hit your space bar to take-off and fly back up to the top. Land on one of those platforms with the red arrow above. This should deliver the sack.
Repeat this step 3 times.
Go back to the Steel Gate Archaeologist.
Click the Leave Vehicle button.
Turn in [71] I’ve Got a Flying Machine! and get [71] Steel Gate Patrol.
Get back in the Flying Machine, kill 8 Gargoyles. No need to explain this quest, it’s quite easy and fun.
Go back to the Steel Gate Archaeologist, leave vehicle, turn in [71] Steel Gate Patrol.
==Note== This is a daily quest, you can re-do it everyday for extra reputation, exp and gold.
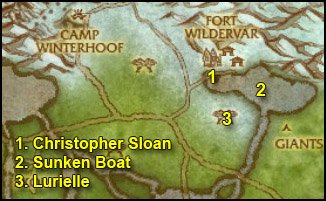
1. Ride a long way east until Fort Wildervar (60,18 ).
In Fort Wildervar, get [70] I’ll Try Anything! from Christopher Sloan.
Dive in the water, look for Water Plants.
Right-click the plant and a Forsaken Spy, a Caldemere Snapper, or a Northern Barbfish to spawn. What you want to spawn is the northern barbfish. In any case, keep opening plants and killing what spawns until you have 7 Northern Barbfish.
Go back to Christopher Sloan, turn in [70] I’ll Try Anything! and get the follow up [71] The One That Got Away.
Mount up, go into Fort Wildervar. First go to the west side of the town, get [71] The Yeti Next Door from Foreman Colbey.
Get the new flight path.
Go to the east side of the town, turn in [71] Everything Must Be Ready, get all the available quests:
- [71] The Enigmatic Frost Nymphs
- [71] The Book of Runes
- [70] Down to the Wire
- [70] Preying Upon the Weak
- [72] March of the Giants
2. Jump into the lake southeast, swim towards the center of it and you’ll find a Sunken Boat (64,19).
 Right-click the Fresh Barbfish Bait from your inventory.
Kill Frostfin.
Swim southwest until you’re out of the lake.
==Note== From now on, look for the following two things while going through the next steps.
=====Trapped Animals==== =-& ==Spotted Hippogryph Down

3. Go a little further southwest to Lurielle (62,23). Turn in [71] The Enigmatic Frost Nymphs, get [71] Spirits of the Ice.
Kill 15 Ice Elementals and loot 15 Icy Cores. They can be found all around the Frozen Glade.
Go back to Lurielle, turn in [71] Spirits of the Ice, get [71] The Fallen Sisters and [71] Wild Vines.

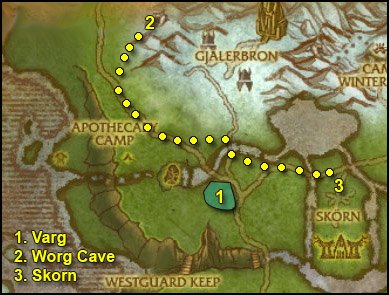
1. Ride east to the other side of the river, until you reach Giant’s Run (67,24).
Kill Every Iron Rune Stonecaller / Binder on your way, they drop the Book of Runes Chapters we need. Keep killing them until you’ve got Chapter 1, 2 & 3.
 Then right-click one of the chapters to combine them together, you’ll get the Book of Runes.
2. Now let’s find Runed Stone Giants. They spawn at various stone circles in Giant’s Run.
Then they take a walk towards the snowy hills to the north, and they despawn there. It’s easiest to wait for them at the line where the snow starts (72,16).
They’re elite and rather tough, but can be kited and stunned. Melee classes will probably have troubles to solo them, so they should try to find help. You really must try hard to finish that quest, because it has several follow ups.
 Whenever you kill a Runed Stone Giant, loot it, target its corpse and right-click the Runeseeking Pick.
You can also kill Frosthorn Rams in the area while waiting for a Runed Stone Giant to show up, as you need their meat for another quest.
Once you have 4 Runed Stone Giant Corpse Analyzed and 4 Tough Ram Meat, move on to the next step.
3. Ride west back to Wildervar, turn in:
- [71] The Book of Runes, get [71] Mastering the Runes
- [72] March of the Giants, get [72] The Lodestone
You should be level 73 by now.
Level 73
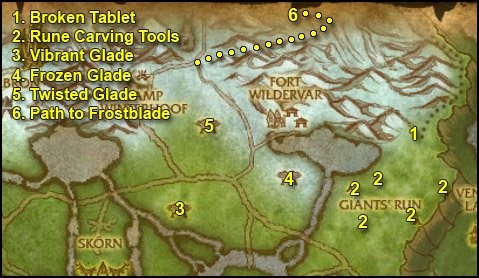
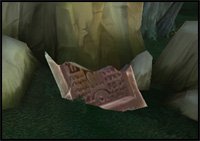
1. Ride east back to the spot where we fought Runed Stone Giants. A few steps south of the snow line you should see a Broken Tablet (72,17).
 Right-click the Rune Sample from your inventory while being close to the tablet.
Watch the script and you should get a quest complete message.
2. Ride a long way south and slightly southwest until you find a canopy at (71,29). Under the canopy you should find the Iron Rune Carving Tools.
If they are not there, try the other locations (shown as number “2” on the map). It’s always under a canopy.
3. Ride southwest until you hit the road, follow it west, cross the bridge and follow the road until the inverted “Y” intersection. At this point cut through the forest west until you reach the Vibrant Glade (53,27). We have 2 objectives to complete here:
- Kill 8 Scarlet Ivy
 Beat down a Chill Nymph below 30% health then use Lurielle’s Pendant. Repeat 7 times.
4. Ride east/northeast back to the Frozen Glade (62,23). Turn in:
- [71] The Fallen Sisters
- [71] Wild Vines
Get the two follow ups:
- [71] Spawn of the Twisted Glade
- [71] Seeds of the Blacksouled Keepers
5. Ride west/northwest to the Twisted Glade (55,19). Two objectives here as well:
- Kill 10 Thornvine Creepers
 Kill 8 Spores and use the Enchanted Ice Core on their corpse
6. Go northeast until you hit the road, follow it northwest until you find a crossroad (53,8 ).
Take the small frozen path going up into the mountains. Follow this path all the way to the top (I warn you it’s long). There you’ll find the Frostblade Shrine.
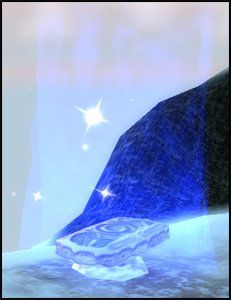
Right-click it and defeat Your Inner Turmoil.
Mount up. You have a 3 minute levitation buff now, so aim for Fort Wildervar (southwest) and levitate straight to it, cancel the levitation buff once you’re above the lake. Then go to Wildervar.
Turn in:
- [71] Mastering the Runes, get [71] The Rune of Command
- [72] The Lodestone, get [71] Demolishing Megalith
 Right-click the Tough Ram Meat from your inventory.
Go on the west side of the town, follow the path west until you reach the Wildervar Mine (60,13). Go to the bottom of the mine where you’ll find Shatterhorn.
 Right-click the Giant Yeti Meal.
Kill Shatterhorn.
Go back to the town, turn in [71] The Yeti Next Door.
Go south to Christopher Sloan (60,19). Turn in [71] The One That Got Away.
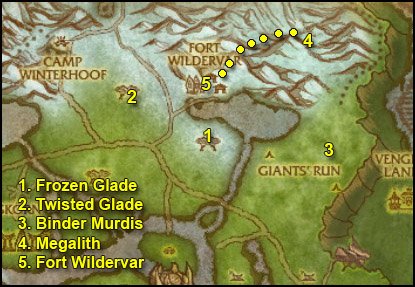
1. Ride southeast to the Frozen Glade (62,23). Turn in:
- [71] Spawn of the Twisted Glade
- [71] Seeds of the Blacksouled Keepers
Get the follow up [71] Keeper Witherleaf.
2. Ride west/northwest, to the Twisted Glade (yes, again). This time we’re looking for a blue’ish centaur called Keeper Witherleaf.
Kill him.
Go back to to the Frozen Glade and turn in [71] Keeper Witherleaf.
==Note== Now is your last chance to finish [70] Down to the Wire and
[70] Preying Upon the Weak.
3. Ride east to (72,25). There you should find Binder Murdis.
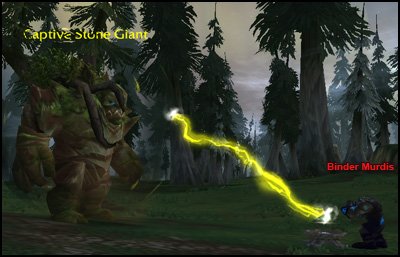
Kill him.
4. Move a little northwest and you should find a Stone Giant (71,23). It looks just like a Runed Stoned Giant, besides it’s non-aggressive.
Now we’re going to solo [71] Demolishing Megalith, a 3-player quest. To do that, we’re going to use that Stone Giant as a pet. Here’s how:
 Thanks to the Rune of Command we have from the other quest, we’ll make this stone giant our pet for 5 minutes.
After that, mount up, ride north towards the snowy hills while carefully avoiding any aggro. Go all the way up and at (70,12) you should see a snowy path going northwest (as shown on the map). Take this snowy path and you should find Megalith.
Then, let Megalith hit you once and let your stone giant pet tank for you. Give him time to build some aggro, wait till he’s down to 60% HP or so before you start attacking. With the help of the pet, any class should be able to solo megalith.
==Note== If you fail, you can go get a new stone giant pet and try again, every 5 minutes.
Good luck.
5. After you kill Megalith, go back to Fort Wildervar, turn in:
- [71] Demolishing Megalith
- [71] The Rune of Command
- [70] Preying Upon the Weak
- [70] Down to the Wire, get [71] We Call Him Steelfeather
 Type /target Steel, you should get Steelfeather in target, then right-click the Feathered Charm.
See through Steelfeather’s Eyes until you get the quest complete message.
Turn in [71] We Call Him Steelfeather
Sell junk, repair and re-stock food/drink.
Hearthstone to Westguard Keep.
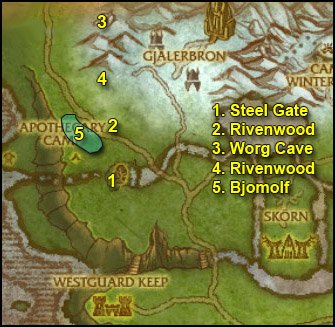
1. Get out and ride north to Steel Gate (30,29). Turn in [71] The Cleansing, get [71] In Worg’s Clothing.
2. Ride straight north until you enter Rivenwood (30,21). While going through Rivenwood, look up in the trees for Darkclaw Bat.
 Put Feknut’s Firecrackers on an action bar and use it on the floor next to a tree with a Darkclaw Bat.
The bat will come and attack you, kill it. Then look on the floor for Darkclaw Guano, it should appear just where you threw the firecrackers.
Right-click it and loot a Darkclaw Guano.
Keep going north while you do this, until you get out of the woods.
3. Once you’re out of the woods, mount up and ride north to a cave at (30,6).
 Right-click the Worg Disguise from your inventory.
Go inside the cave, turn in [71] In Worg’s Clothing, get [71] Brother Betrayers.
4. Get out of the cave, mount up and ride back to Rivenwood. Get the Darkclaw Guano you still need while going south through the woods.
5. Once done, go to the woods on the other side of the road southwest (27,21). Put on the Worg Disguise and look for a Bjomolf. He’s easy to find, he’s the only agressive worg here while you have the disguise on. He’s also bigger and has a different color. Kill him.
Ride southeast back to Steel Gate. Turn in [71] Scare the Guano Out of Them!.
1. Go to the woods southeast of Steel Gate (33,30). Put on the Worg Disguise and find Varg. Kill him.
2. Mount up and ride back all the way north to the cave. Put on the Worg Disguise, go inside the cave, turn in [71] Brother Betrayers, get [71] Eyes of the Eagle.
3. Get out, mount up and get back on the road. Follow it southeast until you reach West Spear Tower. Then, follow the road northeast until you reach Skorn (44,26).
 Once you’re in Skorn, right-click the Westguard Command Insignia from your inventory.
Westguard Sergeant will spawn. Get the 3 quests he has:
- [71] Towers of Certain Doom
- [71] Gruesome, But Necessary
- [71] Burn Skorn, Burn!
Go inside Skorn, kill things on your way.
 Whenever you kill a Vrykul, loot it and then use The Sergeant’s Machete on their corpse.
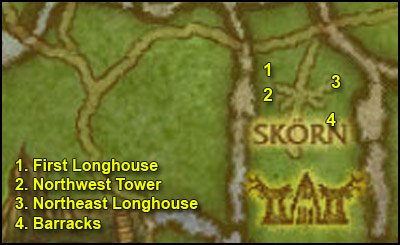
1. Go a little southwest to the first longhouse on your right (44,28 ).
 Go inside the longhouse and right-click the Sergeant’s Torch.
2. Just south of this you should see a tower, don’t get too close to it or the mages up there will shoot you. You just need to be 90 yards close.
 Use the Sergeant’s Flare.
If you’re close enough, you should get the following quest update: “Northwest Tower Targeted“.
3. Go east to the opposite end of the village, where you’ll find the Northeast Longhouse (46,28 ). Go inside and use the Torch.
4. Go a little south and you’ll find the Barracks (46,30). Go inside and use the Torch.

1. Go southwest and follow the trail going up. At the intersection go southeast.
2. A little further east you’ll find the East Tower (46,33). Use the Flare.
3. Go a little further south and you’ll find the Southeast Tower (47,36). Use the Flare.
4. Keep following the trail further south and then take a right turn, you’ll soon find The Thane’s Pyre (45,35).

At this point, you should have found a Vrykul Scroll of Ascension from one of the Vrykuls you killed. If not, kill some more Vrykul until it drops.
 Right-click the Vrykull Scroll of Ascension and get the quest [72] Stop the Ascension!.
Stand next to the pyre, right-click the Vrykull Scroll of Ascension and kill Halfdan the ice-Hearted.
5. Go southwest, take a right turn and you’ll find the Southwestern Tower (43,36). Use the Sergeant’s Flare.
You should also be done with [71] Gruesome, But Necessary. If not, kill some more Vrykuls and dismember them until you’re done.
Use your Westguard Command Insignia to summon the sergeant (not needed if he’s still with you).
Turn in:
- [71] Towers of Certain Doom
- [71] Gruesome, But Necessary
- [71] Burn Skorn, Burn!
Get the follow up [72] All Hail the Conqueror of Skorn!.
6. Go south of the tower, close to the cliff edge, this is a safe spot. Watch the video below, it will show you where to jump down to get to the next quest.
Video: [71] Eyes of the Eagle
Once you open the egg, Talonshrike will swoop and attack you. Kill him and loot the Eyes of the Eagle. Basically reproduce what I did in the video and you’ll end up in the Whisper Gulch, where our next quests are.
7. If you followed the video till the end, you should be in Whisper Gulch (37,36).
Make a /raise macro. Whenever you see an Abandoned Pack Mule, target it and use your macro.
Also look for Whisper Gulch Ore.
 Use Steelring’s Foolproof Dynamite on the ores.
This will split the ore in little fragments which you have to loot.
Explore the Whisper Gulch until you complete [71] Danger! Explosives! and [71] Send Them Packing.
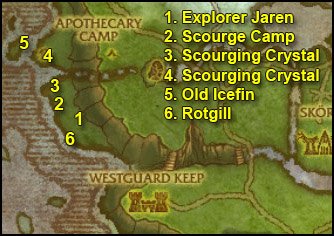
1. Jump down in the water, swim west until you can get back on land. Then ride northwest until you find Explorer Jaren (23,33). Turn in [71] Where is Explorer Jaren? and get [71] And You Thought Murlocs Smelled Bad!.
2. Go a little northwest and you should find a scourge camp (22,31). Kill scourges until one of them drops a Scourge Device.
 Right-click it to get the quest [71] It’s a Scourge Device.
Go back to Explorer Jaren, turn in [71] It’s a Scourge Device, get [71] Bring Down Those Shields.
Go back towards the scourge camp, clear the way to the Scourging Crystal.
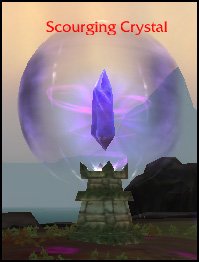
Get close to it and use the Scourging Crystal Controller.
This will destroy the shield protecting the crystal, destroy it.
==Note== Pet classes, make sure you destroy the crystal yourself. If your pet does it, you won’t get the credit.
3. Go north to the next crystal (22,29). Destroy it.
4. Go north across the water and you should find another crystal. Destroy it.
5. Swim west to the isle. There you should find Old Icefin. Get his quest [71] Trident of the Son.
6. Swim back to the previous spot. From there go south along the coast and look for Rotgill. He patrols in between the wrecked ship at (23,35) and the murloc camp north of it (22,32).
Kill Rotgill and loot Rotgill’s Trident.
Go back to Old Icefin, turn in [71] Trident of the Son.
Once done, go back to Explorer Jaren and turn in:
- [71] And You Thought Murlocs Smelled Bad!
- [71] Bring Down Those Shields
Hearthstone to Westguard Keep. Turn in:
- [71] Send Them Packing
- [71] Danger! Explosives! get [71] Leader of the Deranged
Go to the keep and turn in:
- [72] Stop the Ascension!
- [72] All Hail the Conqueror of Skorn!
Get all the follow ups:
- [71] Dealing With Gjalerbron
- [72] Of Traitors and Treason
- [71] Of Keys and Cage
Sell junk, repair and re-stock food/drink.
Don’t turn in [72] Of Traitors and Treason, we’ll do that later.
1. Ride north to Gjalerbron (35,15). Kill every Vrykul you see on your way and loot their keys. Open cages with those keys.

If you’re lucky you might also get a Large Gjalerbron Cage Key, which you can use on the Large Gjalerbron Cage on the upper platform at (36,12). You can free up to 5 prisoners at once with this cage.
==Warning== A Sepulchral Overseer patrols this area, avoid him. It’s immune to cc and kinda hurts.
Stay here until you finish both quests and find the Gjalerbron Attack Plans.
 Right-click them to start the quest [72] Gjalerbron Attack Plans.
2. Ride northwest and then north to the cave at (30,6). Put on the Worg Disguise, go inside the cave, turn in [71] Eyes of the Eagle, get [71] Alpha Worg.
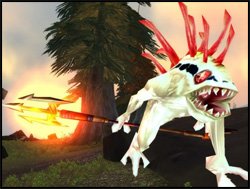
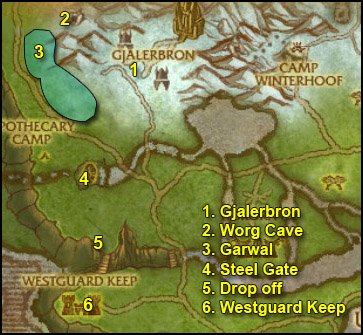
3. Go southwest and look for Garwal while being in the Worg Disguise. He patrols between (27,8 ) and (26,12) and (28,17). As shown on the map.
Kill him
4. Go back to Steel Gate, turn in [71] Alpha Worg.
5. Ride south to a drop off point at (31,35). Jump down as shown in this video:
Video: [71] Leader of the Deranged – Shortcut
Go inside the cave and kill Squeeg Idolhunter.
6. Then just clear the way back to the top, or just ride out (use at your own risk).
Ride back to Westguard Keep. Turn in:
[71] Leader of the Deranged
Go inside the keep, turn in:
- [71] Of Keys and Cage, get [71] In Service to the Light
- [71] Dealing With Gjalerbron, get [71] Necro Overlord Mezhen
- [72] Gjalerbron Attack Plans, get [72] The Frost Wyrm and its Master
Also get [71] Sleeping Giants from Mage-Lieutenant Malister.
Sell junk, repair and re-stock food/drink.
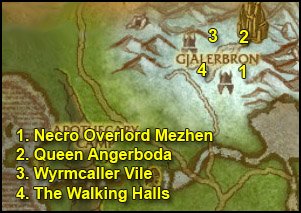
1. Go back to Gjalerbron. Go up to the higher plateau and go northeast until you reach another higher plateau. Take a right turn and go up the east slope, you’ll end up on the rear right platform (38,12).
==Note== Kill Deathless Watchers and Putrid Wights on sight from now on.
Kill the 5 Necrolords guarding Necro Overlord Mezhen, they can be pulled solo. Then kill Necro Overlord Mezhen and loot Mezhen’s Writings.
 Right-click them to start the quest [72] The Slumbering King.
2. Go to the big gate north of here. Enter the building and you should see a bunch of Necrolords trying to awake King Ymiron. Don’t worry, they can’t attack you. Clear the way around that platform and access it from the backdoor. There you should see Queen Angerboda. Kill her. You’ll see a little script involving Arthas.
3. Get out of this building and go west to the rear-west platform (37,8 ).
==Warning== We’re about to attempt to solo an elite frost wyrm. It should be doable for every class with normal gear, provided you use everything you got.
Clear the platform and kill Wyrmcaller Vile last, loot the Wyrmcaller’s Horn.
 Right-click it and eat/drink quickly while the frost wyrm flies to you.
Glacion is immune to all forms of CC, you can’t even interrupt his spells. He hits for about 1000 on cloth and sometimes cast a frost breath which does about 800 damage. If you use all your cooldowns and a pot you should be fine. It might not even been needed depending on your class/gear.
Anyway, if you can’t solo this one, try to find a friend. If all fails, just abandon the quest and come back to do it later or at level 80. It has no follow up, so no big deal.
In any case, before you go to the next step, you must have killed 10 Deathless Watchers and 2 Putrid Wights. You know where to find them, on the side platforms. There are two other side platforms southwest of the two we just visited, should you run short on Deathless Watchers.
4. Go back to the entrance of Gjalerbron. This time go inside the building right at the entrance. This will take you down to The Walking Halls (35,13).
Go down, turn either left or right. You should have several Awakening Rods by now. At least 5. If you have less than 5, you’ll have to kill a few more Necrolords, and there are plenty in these halls.
 Use the Awakening Rod on a Dormant Vrykul.
Once you’ve awakened 5 Dormant Vrykuls and slain 4 Fearsome Horrors, get out of this building.
Hearthstone back to Westguard Keep (or ride back if HS not up). Turn in:
- [71] In Service to the Light
- [71] Necro Overlord Mezhen
- [72] The Slumbering King
- [72] Sleeping Giants
- [72] The Frost Wyrm and its Master (if you did it)
Sell junk, repair and re-stock food/drink.
Go to the Gryphon Master. Dismount.
Turn in [72] Of Traitors and Treason, get the follow up [72] High Commander Halford Wyrmbane.
This will fly you to Wintergarde Keep in Dragonblight.
This chapter ends here. Don’t worry if you’re not level 74 yet, it’s normal.
Move on to the next chapter: Dragonblight.
I hope you enjoyed this guide. If you want to return the favor, please try to contribute.
-Jame
© 2008 Copyrights www.wow-pro.com All Rights Reserved