
 by Jame
Chapter 2 – [Level 41 – 50]
Journey from Stranglethorn Vale to Hinterlands
Introduction
This guide will take you from level 41 to level 50 in a breeze, but you can actually start with it at level 44 for example and catch up with the guide really quick, it’s not an issue. I suggest you read the basic rules and recommendations I listed in the Chapter I of my leveling guide if you haven’t already. No matter if you are a beginner or a veteran world of warcraft player, if you follow this guide carefully you’ll find yourself XP’ing at an hillarious rate. So please give it a try and then say how it went for you!
Shopping list:
- 2 Elixirs of Fortitude
Level 41
-
- Go to Stormwind.
Go to the Dwarven District and get the quest [43] In Search of the Temple (Elite) from Brohann Caskbelly inside a house in the Dwarven District (63,24).
Next go to just south of the entrance of The Stockades and talk to Mazen Mac’Nadir and get the quest [41] Mazen’s Behest (40,63). Walk upstairs and get the follow-up quest from Acolyte Dellis. - Stranglethorn Vale:Fly to Booty Bay, make the Inn your home point and get the quests:
- [37] Goblin Sponsorship from Baron Revilgaz in Booty Bay Inn (Top Floor)
- [41] The Bloodsail Buccaneers from First Mate Crazz just past the “Old Port Authority” building (First big building when getting off the Boat).
- [42] Skullsplitter Tusks from Kebok in the Booty Bay inn (2nd Floor).
- [43] Akiris by the Bundle from Privateer Bloads next to the Bank.
- [43] Zanzil’s Secret from Crank Fizzlebub inside the Booty Bay Inn.
- [45] Tran’Rek from Krazek in Booty Bay Inn (2nd Floor).
In the Stranglethorn Vale category you should also already have:
- [38] Kurzen’s Mystery
- [38] Panther Mastery
- [39] “Pretty Boy” Duncan
- [41] Raptor Mastery
- [41] Scaring Shaky
- [41] Venture Company Mining
- Go to Stormwind.
So here we are -13 quests to deal with. Let’s get busy! Make space in your bags, repair and buy 2 stacks of food/drink (if you don’t have that already, of course).
For those who didn’t finish the Stranglethorn Pages yet: this is your last chance, check the Booty Bay AH and ask in general channel for missing pages. If you got them all, take them with you.
-
- Circuit 1:
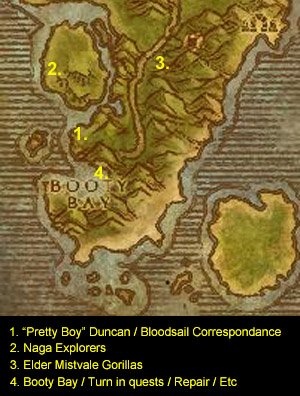 Run out of Booty Bay and take the first way left until the Bloodsail Encampment by the shore. Pretty Boy Duncan should be there (28,69). if not, keep clearing the camp until he appears. Kill Pretty Boy Duncan and loot Catelyn’s Blade from him. While you have the camp cleared, look for a map named “Bloodsail Correspondence” on one of the barrels, click it and get the follow up quest.Go northwest across the bridge and keep going along the shore until you find some Nagas. Kill Naga Explorers at (24,65) until you get 10 Akiris Reed.
Then go back to the exit of Booty Bay but this time follow the trail to the north. A bit further on the right hand side of the road you will find Elder Mistvale Gorillas (31,67). Kill Gorillas there until you get 5 Mistvale Giblets. - Run back to Booty Bay.Turn in [41] Scaring Shaky at “Shaky” Philippe on the peer and get the follow up.Turn in [41] The Bloodsail Buccaneers at First Mate Crazz a bit further towards the Inn. Get the follow up.Turn in [43] Akiris by the Bundle at Privateer Bloads next to the bank. Get the follow up.
Turn in [39]”Pretty Boy” Duncan at Catelyn the Blade inside the Inn. Don’t get the follow up, Get the quest [41] Up to Snuff from Deeg on the 2nd floor of the Inn.
Get the follow up [43] The Bloodsail Buccaneers from Fleet Master Seahorn on the 2nd Floor of the Inn.
Then turn in the quest [41] Return to MacKinley to “Sea Wolf” MacKinley in the house right next to the Inn. Get the Follow up [44] Voodoo Dues.
Finally get the quest [42] Keep an Eye out from Dizzy One-Eye who stands to the right of the Booty Bay blacksmith house. (Left when entering Booty Bay from the tunnel).
End of Circuit 1:
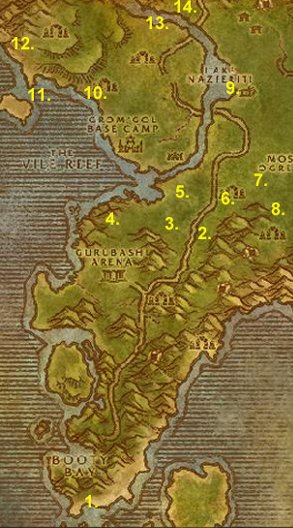
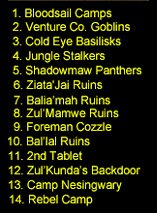
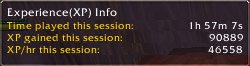
Note: Of course, I had XP rest bonus this time. I unfortunately logged my characters out in Ironforge after I finished the first Chapter of the guide. But still, if you divide it by two you still get a nifty 31000 xp / hour (actually more because the XP gained through turning in the quests isn’t affected by XP bonus).
Repair, sell and restock food/drink up to 3 stacks.
- Circuit 2:
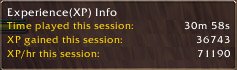
 Get out of Booty Bay and go east towards the shore named Wild Shore. From there, go southwards while killing any Bloodsails on the way until you reach the 1st camp (29,80). Clear the camp and look for a map thingy named “Bloodsail Charts” or “Bloodsail Orders”, If you don’t find either, move on further south until you find a small boat ashore, check it for maps as well. Careful, the Bloodsail Warlocks really hurt, make sure you interrupt their shadowbolts if you can, and kill them fast then deal with their pets. If you are Rogue or Mage though, I suggest sap / polymorph on the warlock first, kill the pet and then the warlock.Now go further south until you find a bigger camp (27,82). This camp will be harder to clear, but it’s possible if you do it carefully.
Check the camp for Bloodsail Orders or Charts. Basically, the Bloodsail Charts and Orders can spawn at any of the two camps or at the boat. So check all three until you got both.Then wander up and down the shore where you came from and kill Bloodsails until you get :
- 10 Bloodsail Swashbuckler Kills
- 15 Snuff (can drop from any Bloodsail)
- 1 Dizzy’s Eye (can drop from any Bloodsail)
- Circuit 1:
When that is done, get back on the main road and go north until you reach (39,41), slightly long ride.
** From this point on, if you find any Shadowmaw Panther (they are stealthed) make sure you kill them **
At (39,41) go east and you will find Venture Co. Goblins uphill. Kill them until you get 10 Singing Blue Crystals.
Then go west to the other side of the road, you should find Jungle Stalkers (34,37). Kill 10.
Then go northeast to (36,35) and kill Shadowmaw Panthers until you got 10 kills. You can find them in the area all around that big hill next to the tribal leatherworking troll NPC. They can be a bit hard to find sometimes because they are stealthers so I suggest you hit “Tab” key while running around and open your eyes well (humans use your racial ability perception). Keep doing circles around that big hill and you will find 10 panthers quickly. Kill anything on the way too while searching those panthers.
Go east to Ziata’Jai Ruins (42,36) and clear the camp of trolls. Be careful to avoid the patrols. When it’s cleared, follow the little path northeast until you reach Balia’mah Ruins (45,33). Kill all the trolls there as well. When this camp is clear, follow the path southeast and then south until you reach the ruins of Zul’Mamwe (47,38 ) and kill all the trolls you find in the ruins (Though avoid the southernmost one up the plateau, the trolls there are higher level)
If you run out of trolls go back to the first ruins of Ziata’Jai and repeat this cycle until you get 18 Skullsplitter Tusk and level 42, this is a good grinding spot.
Level 42
-
- Once you hit level 42 and got all your tusks, get back on the main road and go north until you get to the Venture Co. Base at Lake Nezferiti, go to the Operations Center which looks like an oil rig platform (42,18 ). Go on top of it and kill Foreman Cozzle, loot his Key.
Jump down and go to the small house next to the lumber mill, open the chest and get the Fuel Regulator Blueprints.Now go west across the lake and keep going west until the Bal’lal Ruins (29,20), clear the camp and click the big tablet named “Moon Over the Vale” and loot the scroll.Then go directly west from the Bal’lal Ruins and into the sea, until (24,22). Dive underwater at this spot and you should find the tablet named “Gri”lek the Wanderer” lying against the outer wall of the underwater ruins. You don’t need to kill any of the murlocs there, the tablet can be accessed safely. Loot the 2nd scroll.Then go north to the Zuuldaia Ruins and take the western entrance ( 21,10) to the Ruins of Zul’Kunda. Clear the way through the first corridor until you reach a fork, go left up the ramp. From there, face north and you should see the 3rd tablet “The Emperor’s Tomb”. Clear the way to it and loot the 3rd Scroll. Then go back to the fork and this time take the ramp up to the right, then take a u-turn to the right and go west until the last ruin (23,11). The last tablet named “Fall of Gurubashi” is inside there. Loot the 4th Scroll and then go back on the main path to the east and clear the way eastwards and out of Zul’Kunda ruins. - Keep going east to Camp Nesingwary. (35,10)Turn in:
- [38] Panther Mastery. Don’t get the follow up.
- [41] Raptor Mastery. Don’t get the follow up.
- and the pages quest if you didn’t do that already before.
Then ride north to the Rebel Camp, turn in [38] Kurzen’s Mystery, don’t get the follow up.
Warp to Booty Bay, turn in:
- [41] Venture Company Mining at Crank Fizzlebub in the Booty Bay Inn.
- [42] Up to Snuff at Deeg on the 2nd Floor of the Inn.
- [43] Skullsplitter Tusks at Kebok, 2nd floor of the Inn.
- [37] Goblin Sponsorship at Baron Revilgaz, 2nd Floor of the Inn. Get the Follow up.
- [43] The Bloodsail Buccaneers at Fleet Master Seahorn, 2nd Floor of the Inn. Don’t get the Follow up.
- [42] Keep an Eye out at Dizzy One-Eye to the right of the Blacksmith house.
- Once you hit level 42 and got all your tusks, get back on the main road and go north until you get to the Venture Co. Base at Lake Nezferiti, go to the Operations Center which looks like an oil rig platform (42,18 ). Go on top of it and kill Foreman Cozzle, loot his Key.
End of Circuit 2:
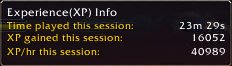
Note: I still had the darn XP rest bonus for the first 40000 xp, so chalk off 20000 XP of the total score. This results in an XP Rate of 35000 XP/ Hour.
-
- Fly to Stormwind City, go train, repair, sell, auction and restock food/drink up to 3 stacks.
- Circuit 3: (No map needed, it’s pretty simple)Fly back to Booty Bay, go out and ride north until you reach the Ruins of Jubuwal (33,51). Clear the camp until you can pull JonJon The Crow, he should come with an add, could be a hard fight but it’s doable. Loot Jon-Jon’s Golden Spyglass, then clear yourself some space around the little ruins just behind where Jon-Jon was, there stands Maury ‘Club-Foot” Wilkins with two Zanzil Something.Now you probably can’t take all 3 at the same time, so try to kill one of the minions fast then run away, rinse and repeat until you are left with just Maury Wilkins. Kill him and loot “Maury’s Clubbed Foot”.
Go back on the road and just a bit south until (33,53), go east through a breached wall and keep going until you hit the Ruins of Aboraz (40,57) and kill Zanzil Minions there until you find
Chucky “Ten Thumbs” inside the ruins and loot “Chucky’s Huge Ring” from him. Keep killing Zanzil dudes until you get 12 Zanzil’s Mixtures, avoid Zanzil the Outcast himself though. If you run out of mobs to kill, go back and forth from this camp to the other. Any Zanzil Something can drop the Mixture. - When you are done, go back (warp if it’s up) to Booty Bay and turn in:
- [44] Zanzil’s Secret at Crank Fizzlebub in the inn.
- [44] Voodoo Dues at “Sea Wolf” MacKinley (First house next to the Inn).
Don’t get the follow up but take the other quest he has: [45] Stoley’s Debt.
End of circuit 3:
Note: This one without any XP bonus, and it could have been better, I died twice stupidly at Jon-Jon the crow. 🙄
Repair, sell and refill up to 3 stacks of food/drink.
- Fly to Darkshire (Duskwood)From Darkshire go east, enter Deadwind Pass, go east through Deadwind Pass until you enter the Swamps of Sorrows.
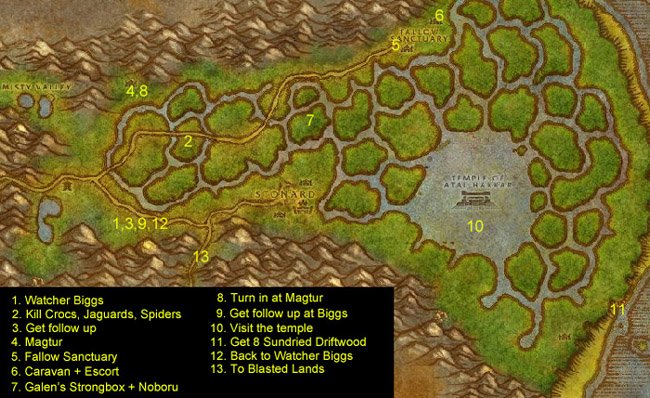 When in Swamps of Sorrows go east to Watcher Biggs (26,59), get quest [37] Encroaching Wildlife.
You can find Spiders, Jaguars and Young Crocolisks in the whole area of swamps north of Watcher Biggs. Complete the quest and then go back to him, get the follow up [35] The Lost Caravan.
Go north to the Misty Valley (13,35)
Kill Swampwalker Elders until you complete [41] Mazen’s Behest. This may take a while, the note is kind of a rare drop. So if you’re unlucky and are tired of killing stuff here, just abandon the quest.
Go east to the Harborage (26,31).
Get the quest [35] Draenethyst Crystals from Magtoor.
Go east along the mountain until you find “Fallow Sanctuary” at (54,28). Gather 6 Draenethyst Crystals (Big blue crystals scattered around the camp).
Try to find a “Scattered Crate” in one of the camps, and loot the “Lost Supplies” from it. Right Click it to start the quest [40] The Lost Supplies.
When you got 6 crystals, go further east to (63,18) where you will find a destroyed caravan. Click the Caravan Chest on it and get the Wizards’ Reagents.
Right next to the caravan you will find Galen Goodward inside a cage, before you get his quest, clear the ‘lost ones’ camps to the southwest of the cage. Then get the quest [38] Galen’s Escape and escort him out.You should let Galen go in front and get the first hits, you can also eat/drink when he is attacked by only one NPC. He regens back to full health after each fight.
After you have escorted Galen successfully, go south to (47,39). There you will find a small tent and Galen’s Strongbox next to it. Open it, complete the quest.
Stay on this island and kill everything around until you find Noboru. He will roam to this island at some point. He’s level 39 and has 2 guards, but you can definitely manage it at this level. Kill him, loot his Cudgel, right click it to start the quest [39] Noboru the Cudgel
Then go northwest to Magtoor at (26,31). Turn in the two quests.
Then go south to Watcher Biggs. Get the follow up [42] Driftwood.
Go east to the Temple of Atal’Hakkar (65,48). (Carefully avoid Stoneard).
Swim through the pool until you get the quest update for [43] In Search of the Temple then keep going east until you reach the shore.
Search southwards along the shore for Sundried Driftwood (they look like wooden planks, lying on the sand), kill murlocs when they are in the way until you have 8 Sundried Driftwood.
Go west back to Watcher Biggs and get the follow up [42] Deliver the Shipment.
Go to the Blasted Lands (follow the road east and then south).
In Blasted Lands go immediately east to Nethergarde Keep.
In Nethergarde keep, find Quartermaster Lungertz and turn in
[40] The Lost Supplies
[42] Deliver the Shipment
Find Watcher Mahar Ba and turn in [41] Mazen’s Behest.Find the Gryphon Master and fly back to Stormwind.
Repair, sell, check the auction house and go talk to Brohann Caskbelly in the Dwarven District and get the follow up [43] To the Hinterlands.
XP Rate:
Sadly I couldn’t get a screenshot of the real XP rate because I went LD a couple of times. But I’m pretty sure it was well above 25000 XP / Hour even with all the travelling.
You should be level 43 by now, if not you should grind up to level 43, on the elites outside of Uldaman for example so you get the Shattered Necklace for the pre-quest work of Uldaman.
Level 43
Now you have two options:
1. Do the Uldaman instance, I suggest you follow my Uldaman Instance Guide for maximum XP rate. Try to finish the whole instance ,and especially completing the quest [47] The Platinum Discs
2. You really don’t like Uldaman, then go to the next part of my guide, but that will mean more grinding for you. I strongly advice you to go to Uldaman though, you already have most of the pre-questing done, just need to gather a few missing quests quickly. And trust me, there will be big exp bonuses later on thanks to going to Uldaman.
After Uldaman:
-
- Go to Ironforge, sell, repair, check the auction house.
From Ironforge, fly to Menethil Harbor (Wetlands). Take the boat to Auberdine, this boat is at the northern peer. Once in Auberdine, get the flight path from the Hippogryph Master, then take the boat back to Menethil Harbor. Then take the boat to Theramore, it’s the boat that stops at the southern peer.In Theramore on the docks turn in the quest [43] Akiris by the Bundle at Privateer Groy. Talk to the Gryphon Master.If you have First Aid, you can do the quest to become master in First Aid there. You need to have a skill 225 and be level 40. Go talk to Doctor Gustaf VanHowzen in the Foothold Citadel and do the little quest where you have to bandage patients and get 3900 easy XP. - Then fly to GadgetzanIn Gadgetzan:Turn in [45] Tran’Rek, don’t get the follow up.Get quests:
- [43] Wastewander Justice
- [44] Water Pouch Bounty
- [47] Handle with Care from Curgle Cranklehop
General info about Tanaris, Feralas and Hinterlands:
While killing stuff in Tanaris if you find an item named [OOX-17/TN Distress Beacon]. Right click it and keep the quest. You’ll find beacons in Feralas and Hinterlands as well, proceed equally with those. Each of those beacons start a quest where you will have to find a Homing Robot and escort it. The beacons won’t always drop for you, they are kinda rare. The escort quests are hard to do solo especially for certain classes. But if you are lucky to find all 3 beacons you should really put the effort and finish all 3 rescue quests, it will be described when to do them in the guide later on. Anyway, if you don’t get a distress beacon, or if you don’t manage to complete the rescue quests, it’s not a big deal, this is optional, it’s a nifty exp bonus but it’s not that importantSell, Repair, re-supply food/drink (3 stacks). Get out of Gadgetzan, ride east until Noonshade Ruins (61,24), kill all the Bandits you can find there (If it’s crowded just skip this part and keep riding east).. Then go further east to Steamwheedle Port even if you still haven’t completed Wastewander Justice yet.
In Steamwheedle port get:
- [45] Pirate Hats Ahoy!
- [45] WANTED: Andre Firebeard and [46] WANTED: Caliph Scorpidsting from the wanted poster.
- [44] Screecher Spirits
- [45] Southsea Shakedown
- Go to Ironforge, sell, repair, check the auction house.
Turn in [45] Stoley’s Debt and get the follow up [46] Stoley’s Shipment.
-
- Ride back towards Gadgetzan, make a stop at Noonshade Ruins and kill bandits / thieves there until you finish Wastewander Justice and Water Pouch Bounty. If the place is crowded, there are more wastewander camps southeast of here (63,30). (Note: If you are not level 43 yet, that’s where you should grind).Go back to Gadgetzan and turn in [44] Water Pouch Bounty and [43] Wastewander Justice, get the follow up [44] More Wastewander Justice.
- Ride north to Thousand Needles and to the Shimmering Flats at the Mirage Raceway (80,75).Turn in [38] News for Fizzle at Fizzle Brassbolts.
Get quest [50] Gahz’Rilla (Dungeon) from Wizzle Brassbolts.
Turn in [36] Part for Kravel at Kravel Koalbeard, don’t get the follow up.
Turn in [37] Goblin Sponsorship at Pozzik don’t get the follow up but on the other hand get the quest [41] Keeping Pace from Pozzik. Then go talk to Zamek who is just south of Pozzik, he should have a blue question mark over the head. Start his quest, follow him, he will set up an explosive and distract Rizzle Brassbolt out of his house. While Rizzle is away go quickly loot the Unguarded Plans. Complete the quest, get the follow up [41] Rizzle’s Schematics and turn it in at Pozzik. - Ride back to Gadgetzan and fly to Thalanaar (Feralas).
In Feralas, ride west, follow the road, but carefully avoid Camp Mojache (by the north) or the guards will make a quick deal of you. Find the Grimtotem Camp at (65,47), then locate Kindal Moonweaver at (65,45), she is on the mountain overlooking the Grimtotem camp. There is a path going to her just a little west of the grimtotem camp.Once you know where Kindal is, don’t take the quest yet, go back to the Grimtotem Camp and clear the area around the bamboo cage with the Sprite Darters in it, and don’t be shy, clear a wide radius around it.When you feel that you’ve cleared enough, go quickly to Kindal and start the quest, jump down and run straight to the bamboo cage, open the cage and escort the sprites out, at least 6 of them must survive. Once you get the “6 Sprites escaped (Complete)” message, help Kindal finish off whatever she is attacking. When Kindal is not being attacked by anything, she will vanish, go find her at her initial spot, turn in the quest. If you and/or Kindal die after getting the “quest complete” message, just run back fast to where you initially found Kindal and turn in the quest before the end of the 5 min countdown. - Now Jer’Kai Moonweaver (that elf right next to Kindal) will have a quest for you,[47] Doling Justice. Take the quest, go back down to the Grimtotem Camp and kill as much as the quest requires you to. When done, go back to her and get the follow up [47] Doling Justice.
- Get back on the road, keep going west following the road and go to the shore at (44,42). Take the boat to Feathermoon Stronghold, or just swim there if the boat isn’t in sight, it’s faster.In Feathermoon Stronghold get:
- [46] The Mark of Quality
- [43] The Ruins of Solarsal
- [43] The Missing Courier
- [44] The High Wilderness
- [47] In Search of Knowledge
Then go talk to Ginro Hearthkindle, he is on the 2nd floor of a house at (31,45) get the follow up [43] The Missing Courier from him.
Talk to the Hippogryph master, make Feathermoon Stronghold your home location. Sell and Repair, re-supply food and drink (3 stacks)
- Go southwest to the Ruins of Solarsal, at (26,52) you’ll find a Gazebo (a pavilion structure opened on all sides) named “Solar Gazebo” , it’s easy to discern it as it is the only “dark” building. Click it and get the follow up quest [43] Return to Feathermoon Stronghold.Go back to Feathermoon Stronghold and get the follow up from Shandris Feathermoon [43] Against the Hatecrest. Talk to Latronicus right next to her, get the follow up and go back to the Solarsal ruins, kill Nagas until you have 10 Hatecrest Naga Scales.Go back to Latronicus, turn in the quest and get the follow up [45] Against Lord Shalzaru.Sell, repair and re-supply food/drink (3stacks).
Go south past the Ruins of Solarsol and across the water to the Isle of Dread. On the Isle of Dread, clear a path to the Cave at (26,67).
Inside the cave, go straight ahead and under a small white arch. Lord Shalzaru is up there on the other side of the pond.He is level 47 and he’s not solo, which means probably a bit hard for you to kill if you are not level 44 yet, which will probably be the case for those who skipped Uldaman. Luckily, this cavern is a very nice grind spot, kill Nagas there until you reach level 44.
Level 44
- Kill Lord Shazaru, there are 2 other nagas close to him but you can pull them one by one or just 2 at a time. Use your long cooldown abilities and potions if needed. Loot the Mysterious Relic from him.
Clear the way out and go back to Feathermoon Stronghold.Turn in the quest at Latronicus and get the follow up [45] Delivering the Relic. Go talk to Vestia Moonspear in the same building and turn in the quest.End of circuit 1: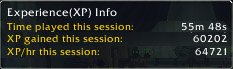
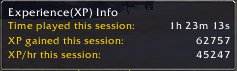
Note: Unfortunately I had XP bonus for the most part of this session, but if you do the math, it’s still at least 32000 XP/ Hour.
Then take the boat, back to Feralas, from there go south following the shore while avoiding the Water Elementals / Giants. Kill any Rogue Vale Screechers you find on the way and use Yeh’Kinya’s Bramble on their corpses, then talk to their spirit to free them. Finish [44] Screecher Spirits while going southwards.
Cross a small river, then keep going south until you find a Boat Wreckage at (45,64), it’s underwater but very close to the shore, you can actually see the tip of it, it’s a very small wreckage, don’t expect some big boat.
There will probably be an elemental or two around it that will aggro if you get close, you can try killing them (but some of them are 49) or you can run in, click the quest, get the follow up and run away. (What I did )
- Once you have the follow up [44] Boat Wreckage, go back to Feathermoon Fortress (use Hearthstone if it’s up).
In Feathermoon Fortress talk to Ginro Hearthkindle and get the follow up [44] The Knife Revealed, go talk to Quintis at the top of the tower north of this building. Get the follow up [44] Psychometric Reading and go back to Ginro, get the follow up [44] The Woodpaw Gnolls.
Sell, Repair, buy up to 4 stacks of food/drink.
Circuit 2:
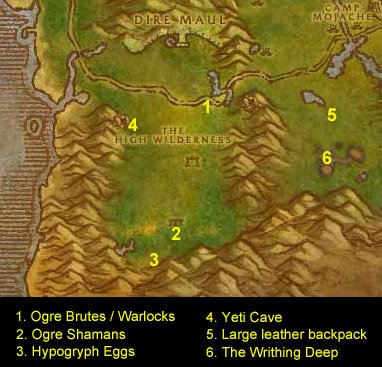
1. Go east across the sea, back to Feralas, follow the road east until you reach Ruins of Isildien (61,53). Kill ogres there until you have killed 8 Brutes and 8 Warlocks.
2. Then for the Ogre Shamans you will have to go much further south to the big temple at (59,73). Keep doing circles around the temple until you got 8 Shamans dead (there’s also shamans inside the building, sometimes you gotta kill the placeholders for them to respawn).
3. When you are done with Shamans, go further to the south and as far up the hills as you can, you will find Hippogryph Eggs on the floor at (56,76). Get a Hippogryph Egg.
4. Go northwest to the Yeti Cave (55,56). Kill Yetis, ignore the Homing Robot OOX-22/FE for now. Keep killing yetis until you get 10 Thick Yeti Hides.
When you got 10 Yeti Hides, go to the Homing Robot. (53,55)
Now, at this point you should normally have gotten a Distress Beacon with all the stuff you’ve killed in Feralas already. If you don’t, it’s not a big deal, just go to the next step. For those you did get a Distress Beacon, right click it to get the quest [45] Find OOX-22/FE! if you haven’t already. Turn in the quest.
Don’t take the escort quest if you are solo, it’s too hard for almost every class. If you are a duo or more, read the following warnings before taking the escort quest:
- 1st Warning: The Chicken robot is stupid and doesn’t assist you all the time if you get attacked. Let him in the front so he gets the first hit. He has a decent amount of HPs and heals back to full after each fight is over. You can even eat/drink a bit after a fight and let the chicken walk in the front (not too far away though). Don’t even think about looting, you don’t have time. Don’t let the chicken tank more than one at a time, and don’t let him tank too long either.
- 2nd Warning: When out of the Yeti cave, the chicken will take a left turn and go towards the road, at some point 3 yetis will ambush him. Don’t panic, you can let one of the yetis be tanked by the chicken at the beginning and deal with the other 2. Just check the chicken’s health regularly. There will be a 2nd and a 3rd ambush, be prepared for them. Especially the last one is composed of 4 Gnolls.
5. Go back to Feralas, follow the main road east until (71,48) you should be directly north of the small lake. Go to the southeastern tip of that lake and a bit more to the south try to locate a small gnoll camp next to a huge tree. (73,56). Clear the camp and look for “Large Leather Backpacks” hanging at the trunk of that huge tree. Click it and get the follow up quest [46] The Writhing Deep.
Also check your inventory for a bag named “Undelivered Parcel”, click it and start the quest [44] Thalanaar Delivery.
6. Go further south to the Writhing Deep and find the hole at (74,63), go down the spiralling ramp until you reach the bottom. There enter the tunnel towards the west, inside the tunnel at the first fork go to the right. At the end of this corridor you’ll find a circular room with the Zukk’Ash Pod inside. Clear the insects in the room. (if you are lucky, “Qirot”, a rare spawn insect will be there. Kill it for and extra green item). When the room is clear, click the Zukk’Ash Pod, complete the quest, and after Raschal the Courier is done with his speech, warp back to Feathermoon Stronghold.
Turn in all quests and get the follow ups:
[46] A Hero’s Welcome
[48] Improved Quality
Go to Shandris Feathermoon, turn in [46] A Hero’s Welcome and get the follow up [46] Rise of the Slithid.
- Fly to Auberdine (Darkshore), takes about 7 minutes. In Auberdine go on the peer and take the boat to the right, it will take you to Rut’theran Village outside of Darnassus.Turn in the quest [47] Handle with Care at Erelas Ambersky. Get the quest [47] Favored of Elune?.Go talk to Daryn Lightwind on the upper floor, turn in [47] In Search of Knowledge. Go luck for a green book on the floor, next to the little bookshelf to the north (55,91). Get the quest and talk again to Daryn and get the follow up [48] The Borrower.
- Go inside Darnassus (for those who never went there, you have to step in the pink haze at (56,90))Inside Darnassus, go to the Temple of the Moon.Turn in the 2 quests there. While you are in Darnassus, go to your class trainer (if you are Warlock or Paladin, you will have to go to Auberdine and take the boat to Menethil Harbor then fly to Ironforge. Mages can just go learn the Portal to Darnassus and warp to a big city to train), visit the Auction House, sell and repair.Then go back to Feathermoon Stronghold (Use Hearthstone if it is up — If it’s not up, there is a Hippogryph Master in Rut’theran Village, fly to Auberdine, then fly to Feathermoon.)
Now if you went to Uldaman, you should be level 45. For those who aren’t level 45 yet, go grind Nagas on the Isle of Dread (South of Feathermoon) or on yetis at the Yeti Cave (53,56) until you hit level 45.
Level 45
-
- From Feathermoon, fly to Thalanaar. Turn in the quest [44] Thalanaar Delivery at Falfindel Waywarder. Then Fly to Gadgetzan.In Gadgetzan, turn in the quest [48] The Borrower at Curgle Cranklehop, get the follow up [48] The Super Snapper FX (Elite).Right next to Curgle, click on the Egg-O-Matic. Complete the quest and you will get an Egg Crate, open it then talk to Curgle again and complete the quest corresponding to the egg you got.Sell, Repair, get up to 3 Stacks of Food/Drink.
- In Tanaris ride to the southeast until you reach Waterspring Field (63,37).
You will find numerous Wastewander camps there. Kill Wastewander Rogues (stealthers), Assassins and Shadow Mages. You can also find Caliph Scorpidsting, he wanders between the tower structures, so you should go kill from a tower structure to another until you find him. He has 2 stealthed bodyguards, it will be a hard fight, burn him down quick and run away is my advice, use long cooldown abilities and potions if needed. Then go back and loot his head.If you don’t find Caliph it’s not a problem though, it’s just some bonus XP quest, nothing important. - Once you got [44] More Wastewander Justice completed, go east towards Lost Rigger Cove. You’ll find a cave entrance at (68,41). Go through this tunnel.Now you have a lot of work to do, check the kill list of [45] Southsea Shakedown and start killing Pirates!
Clear your way south toward the main camp with the 3 houses , 2 ships ashore and the boat under construction.
Andre Firebeard spawns at the campfire right in the center of the camp. He has 3 Dock Workers close to him but you can pull those 3 without him if you pull the back one, then you have Andre solo. Or you can burn him down fast and run away (or take them all :p^^). Anyway, this place is usually crowded because it is a good grinding spot, so you shouldn’t have trouble getting help to kill Andre Firebeard if needed.Then go inside the first house to the right when entering the camp. You might get pulls of 3 at a time inside the house, you will maybe have to use the “Kill one and run away” tactic to get to the top floor of the house if you can’t take 3 at a time.. On the top floor are crates, click them to get Stoley’s Shipment.Then keep on killing pirates until you complete Southsea Shakedown and Pirate Hats Ahoy!Bonus: There is a rare spawn named Kregg Keelhaul on the boats ashore. Check for it.
If you find a Captain’s Key off one of the pirates, the chest is at the bottom level of the ship which is the most to the east. Another thing, while killing pirates by the dozen you might find a pirate footlocker on one of them (1% chance to drop approximately). In the footlocker you might find a note named “Ship Schedule”, right click it to start the quest [45] Ship Schedules, which you turn in in Steamwheedle Port for an extra 4850 XP. However, you might be unlucky and never get a footlocker, so don’t worry if you miss it, it’s optional.
- When done, get out of Rigger Cove and go north to Steamwheedle Port.Turn in:
- [45] Andre Firebeard
- [45] Southsea Shakedown
- [45] Stoley’s Shipment and get the follow up [45] Deliver to MacKinley
- [45] Pirate Hats Ahoy!
- [44] Screecher Spirits and get the follow up [47] The Prophecy of Mosh’Aru (Dungeon)
Ride west to Gadgetzan and turn in:
- [44] More Wastewander Justice
- [46] WANTED: Caliph Scorpidsting
Also turn in any stacks of 5 Wastewander Water Pouch at Spigot Operator Luglunket (he has a blue question mark overhead)
If you are not level 46 at this point, go grind on pirates until you hit 46.
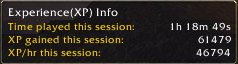
XP rate:
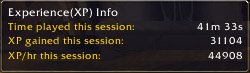
Note: The XP counter started when I arrived in Gadgetzan and turned in “the borrower” quest. No XP bonus, I think the numbers speak for themselves.
Level 46
-
- Go to Ironforge (Fly to Theramore, take the boat to Menethil Harbor and then fly to Ironforge)In Ironforge: Visit your class trainer, sell, repair, check auction house.Optional: If you did Uldaman and [47] The Platinum Discs quest, then go to the Hall of Explorers, talk to High Explorer Magellas, get the quest [50] Portents of Uldum, then talk to Historian Karnik further inside the Hall of Explorers and get the follow up [50] Seeing what Happens.Fly to Southshore, then go northeast to the Hinterlands (84,32). In Hinterlands go northeast to Aerie Peak (14,47).
Get the quests:
[45] Troll Necklace Bounty
[48] Skulk Rock Clean-up
Turn in [43] To the Hinterlands at Falstad Wildhammer and get the follow up:
[43] Gryphon Master Talonaxe
On your way up to the top get the flight path for Aerie Peak.Talk to Gryphon Master Talonaxe and get the follow up:
[43] Rhapsody Shindigger. Also get [45] Witherbark Cages from him.
Then make Aerie Peak your home location. (the innkeeper can be hard to find, he wanders about on the top floor inside the inn)
** Reminder: If you find a distress beacon on mobs in Hinterlands, right click it and get the quest**Circuit:
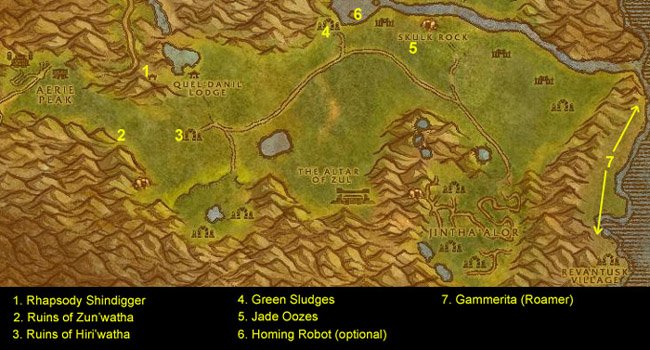
- Head out directly east of Aerie Peak, follow a small path while staying close to the mountain to your left. You will find Shindigger’s camp (26,48).Talk to Rhapsody and get the follow up [43] Rhapsody’s Kalimdor Kocktail
**While in the Hinterlands look for Wilkdkin Feathers, they are big white/brown feathers you can find on the ground throughout Hinterlands. They don’t drop off the Owlbeasts. I found most of them in between Aerie Peak and Quel’Danil Lodge. Start gathering them from now on while doing the quest circuit** - Go south to the troll ruins of Zun’watha (23,58), clear the camp and check the first and second Witherbark cages.Then go east to the troll ruins of Hiri’watha (32,57). Clear some space inside and check the “Third Witherbark Cage”Kill trolls until you get 5 Troll Tribal Necklaces.
- Go northeast to Agol’Watha (46,40) and kill 10 Green Sludges.Go east to Skulk Rock (56,44) and kill 10 Jade Ooze. Beware of the wolf stalkers there though, they are stealthed, so be prepared for unexpected adds.
- Optional: If you got the Distress Beacon OOX-22/HL, go to the lake northwest of Skulk Rock and find the Homing robot there (49,37). Turn in the quest. Before you accept the rescue quest, here is what you must know:
- This quest, unlike the Feralas one, is more likely to be done solo. It’s still not a walk in the part of course. So if you got a partner to duo it, all the better for you.
- Let the chicken run in front of you, let it get the first hit. If it’s not getting hit, it won’t fight back. Sometimes mobs are actually chasing the chicken and failing to get a hit on it, so they give up.
- You’ll have to face 2 ambushes of 3 mobs each, make sure you are full health/mana and with long cooldown abilities up when you start the escort. When the 3 ambushers attack, stand back until the chicken gets hit. Then let the chicken tank one of the 3 adds, deal with the 2 others as quick as you can, then help the chicken finish off the 3rd add.
- Go to Ironforge (Fly to Theramore, take the boat to Menethil Harbor and then fly to Ironforge)In Ironforge: Visit your class trainer, sell, repair, check auction house.Optional: If you did Uldaman and [47] The Platinum Discs quest, then go to the Hall of Explorers, talk to High Explorer Magellas, get the quest [50] Portents of Uldum, then talk to Historian Karnik further inside the Hall of Explorers and get the follow up [50] Seeing what Happens.Fly to Southshore, then go northeast to the Hinterlands (84,32). In Hinterlands go northeast to Aerie Peak (14,47).
If you don’t have the beacon, you can come back later when you get one. But of course now is the most efficient time to do it, cause it’s on your quest path
- Go southeast, to the Overlook Cliffs (70,63) and follow the path down to the shore. Search your bags for the Super Snapper FX and make a hotkey out of it. Then ride along the shore and search for a named turtle named Gammerita. She is easy to discern from the rest because she’s the only aggressive turtle (red name — turn NPC names on in your interface options, advanced options tab). She roams a lot, so you’ll find her anywhere between the waterfall (82,47) and Revantusk Village (77,77).You don’t need to kill her, just get close enough and use the Super Snapper FX on her, she will not like it and will attack you, just run away. You should now normally have a Snapshot of Gammerita in your inventory.
- Hearthstone back to Aerie Peak.Turn in the quests:[45] Troll Necklace Bounty
[48] Skulk Rock Clean-upOptional: You can turn in more Troll Necklaces at the same NPC if you have extra stacks of 5. You gain 390 XP and extra faction with these dwarves each time.Go to the top floor of Aerie Peak to Gryphon Master Talonaxe and get the follow up:
[48] The Altar of Zul
End of circuit:
Sell, repair, buy up to 3 stacks food/drink.
- Go to the Altar of Zul (49,64) and kill trolls / wolves there.Now the best would be that you shout in the “Looking for group” channel the following: “Looking for more to do [48] The Altar of Zul and get the Sacred Mallet“During peak times there’s almost always people interested in doing that.
Anyway, if you don’t find people willing to do this immediately, just keep on killing trolls / wolves in this area (or the lower level ones to the west) until you get a group going. Also use the oportunity to finish the Wildkin Feather gathering. (You need 15 feathers)You and two level 50s should be just enough to kill the 2 NPCs on top of the Altar of Zul. More will make it easier of course. I even managed to do it with just me (lvl 47 rogue) and a level 48 priest. But it was really close.On top of the temple of Zul you’ll find 2 level 50 elites. Qiaga and Morta’gya.
With me playing my mage I managed to kill them with a level 51 Hunter and a 50 Priest, I sheeped Morta and we killed Qiaga first. It went quite smooth.
Loot the “Sacred Mallet” from Qiaga. Then walk on top of the altar in the middle of it and you’ll get a quest update for [48] The Altar of Zul.
**Note: If you don’t find a group to kill the 2 elites, nevermind. You can still run up to the top of the altar, complete [48] The Altar of Zul and run away. The Mallet is really optional**
Say goodbye to your group and grind on trolls (you choose which camp) until you are one bubble away from level 47.
Optional: While grinding you can also go to Shadra’Alor and get the quest [53] Jammalan the Prophet from the Atalai’ Exile (32,74). That’s if you plan to do the Sunken Temple instance later on (I recommend it)
- Then go back to the top of Aerie Peak and speak with Gryphon Master Talonaxe. Turn in the quest and get the follow up:[47] Thadius GrimshadeDon’t forget to turn in the Troll Necklaces for extra exp at Fraggar Thundermantle (in the inn). Important: Keep Aerie Peak as your home location until further notice.
- Fly to Ironforge. Sell, repair, check AH. you really have to buy the 2 Elixirs of Fortitude if you didn’t already (See shopping list). Fly to Menethil Harbor, take the boat to Auberdine, fly to Rut’Theran village.In Rut’theran Village turn in the quest [47] Favored of Elune? at Erelas Ambersky (55,92).In the same house on the 1st floor turn in [48] The Super Snapper FX (Elite). Get the follow up [48] Return to Troyas.You should also be level 47 now. Congratulations.
Level 47
-
- Fly back to Auberdine then fly to Feathermoon Stronghold.Buy up to 4 stacks of food/drink then talk to Troyas Moonbreeze and get the follow up [50] The Stave of Equinex. Get [51] The Sunken Temple from Angelas Moonbreeze, standing next to Troyas.Circuit:

Cross the sea east to the peer in Feralas and get the two quests from the goblin named Zorbin Fandazzle (44,43)
[48] Zapped Giants
[48] Fuel for the ZappingLook inside your bags for Zorbin’s Ultra-Shrinker and put it on a hotkey.
- Then go south along the shore and start killing water elementals. Look for giants as well, they are elite but if you use the Zorbin’s Zapper on them they become totally managable. Keep killing elementals and giants until you got 15 Miniaturization Residue and 10 Water Elemental Core.Once finished, go turn in your quest at Zorbin Fandazzle.Optional: You can take the 2 follow ups (which appear lvl 55 but are still about the same mobs) if you feel like it and redo the quests several times, it’s not so bad for grinding as you get an extra 550XP, 21 Silver and faction increase with all Steamwheedle Cartel factions per quest turn in, but on the other hand those elementals are kinda hard to kill with certain classes, so I’ll let you be the judge here. (I redid both quests only once, then it was getting too boring )Note: For engineers it’s worth it, because after completing the quests, Zorbin opens his store and you can buy Schematic: Snake Burst Firework.
- Get back on the main road and ride north/northeast towards the yeti cave (51,32). On the way there also kill every Ironfur Bear and Groddoc Thunderer you find. You need 3 livers of each for [43] Rhapsody’s Kalimdor Kocktail. Kill Rage Scar Yetis until you get 10 Rage Scar Yeti Hide and a Pristine Yeti Hide (rare drop). When you get the Pristine hide, right click it and get the quest.Note: Miners / Skinners you might want to grind here a little, this is a good spot.
- Get out of the yeti cave and go north until you can get back on the main road, then northwest until you find a stone giant named Rockbiter. Get the quest [49] The Giant Guardian from him.Then go directly north to the Ruins of Ravenwind. We’re now gonna do the quest [50] The Stave of Equinex.
There are level 48-50 Harpies everywhere in those ruins, the lvl 50s will be a bit harder but manageable. Plus, they drop Vibrant Plumes for Darkmoon Faire tickets. Be careful with runners, overall, be very careful in that area, take your time to pull one by one, don’t be reckless or you will die (I did! ) - First go west to (38,15), next to a thick square tower you’ll find a dark gazebo, inside of it is the first flame, right click it. Loot the Byltan Essence.Go northeast to (40,12) to some big ruined arch, the 2nd flame is on the top of it in the middle. To get there you have to get behind the building and jump from stones to stones until you can reach the flame of Samha. Right click it and loot the Samha Essence.Then go back and jump down the building, directly northeast of it and on slightly higher ground among ruins you will find the flame of Imbel. (39,9) Loot the Imbel Essence.Then go southwest (ignore Shay Leafrunner for now if you see her) until (37,11). The Flame of Lahassa is under a dark brown gazebo. Loot the Lahassa Essence.
- Now that you have all 4 essences, go southeast to the Equinex Monolith (38,13).Clear some space around it, then go to it, search your bags for Troyas’s Stave. Right click it to charge the stave, then right click the monolith, complete the quest, get the follow up [50] The Morrow Stone.
- Get out of the Monolith area and then clear yourself a path northwest to Shay Leafrunner.Before you take the quest, here is the trick :After taking the quest you must loot the bell from the chest next to Shay. Make a hotkey of that bell. Now here is the problem with Shay, she wanders off every now and then, she always says something like “oh what a beautiful flower” and goes away. When she does that you are supposed to ring the bell and she will run back to you. The problem is that the bell has a rather long cooldown so she ends up wandering off too often.
The trick is that as soon as you ring the bell, she will run to you, so you should start running southeast / south towards Rockbiter (42,21) and she will keep running after you until she catches up. When she catches up she will say something like ‘I wandered off again, sorry”. But the cooldown on the bell will be reset already.In short: When she wanders off, ring the bell and run away, don’t let her catch up to you. Even if you get aggroed by mobs keep running. Only stop if Shay herself gets attacked, then you will have to defend her. You can run and look behind you by holding your mouse’s left click and moving the mouse, to make sure she’s still running after you.Once at the giant, turn in the quest. Then go southeast and back on the road, follow the road south and then east until (54,41).
- Now you can go south back into the Yeti Cave and try to escort the Homing Robot again if you didn’t before. It’s still really hard solo, but at level 47 I managed to do it (was extremely close with the mage though). I recommend finding someone willing to duo it with you. Anyway, one advice, just ALWAYS let the chicken get hit first before you do anything.
If you don’t manage to solo this quest or can’t find a person to duo it just abandon it. It’s really optional, but do try hard though. - Then get back on the road, keep going east and past the bridge until (65,49). When there, go down and northeast towards the grimtotem camp. Go talk to Kindal Moonweaver (those two elven chicks we already helped back then with the sprite darters).Get the quest [47] An Orphan Looking for a Home.
Then ride back to Feathermoon Stronghold.Turn in :[48] Improved Quality and
[48] Pristine Yeti Hide at Pratt McGrubben
[50] The Morrow Stone at Troyas MoonbreezeEnd of circuit:
I went linkdead right in the middle of the Ruins of Ravenwind, so no XP rate screenshot. But from what I checked before going linkdead and after. This session lasted about 2H45min. The exp rate was around 30000 XP/ Hour for a total of ~80000 XP gained.
Sell/repair/refill up to 3 stacks food/drink.
- Fly to Thalanaar and then to Gadgetzan.In Gadgetzan get:
- [46] Gadgetzan Water Survey from Senior Surveyor Fizzledowser (he’s on a mound of earth behind the houses on the west side of Gadgetzan)
- [49] The Thirsty Goblin from Maren Noggenfogger
- [49] The Dunemaul Compound from Andi Lynn (behind the Inn)
- [50] Thistleshrub Valley from Tran’Rek
- Fly back to Auberdine then fly to Feathermoon Stronghold.Buy up to 4 stacks of food/drink then talk to Troyas Moonbreeze and get the follow up [50] The Stave of Equinex. Get [51] The Sunken Temple from Angelas Moonbreeze, standing next to Troyas.Circuit:
Circuit:
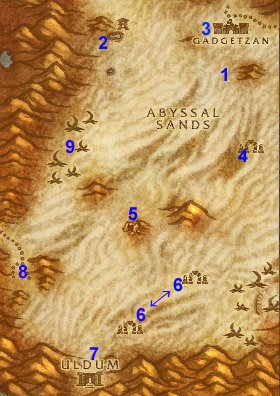
- Get out of Gadgetzan and go south until you find the skeletal remains of some huge animal (50,35). Kill all the Fire Rocs you find there. You got another of those huge skeletal remains to the southwest. Cycle between those 2 spots until you get the 3 Roc Gizzards you need for [43] Rhapsody’s Kalimdor Kocktail.
- Go northwest to the pool of water by the Sandsorrow watch (38,29). Stand by the western tip of the pool and get full health/mana. Search your bag for a black vial named “Untapped Dowsing Widget” and right click it. Two level 48 insects will pop and attack you, kill them or run away from them. It doesn’t matter.
- Go east back to Gadgetzan. Talk to Senior Survery Fizzledowser and get the follow up [47] Noxious Lair Investigation.Go south to the area named “Broken Pillar” (52,45) and talk to Marvon Rivetseeker. Turn in [51] The Sunken Temple and get the follow up [51] The Stone Circle. Also get [48] Gahz’ridian.
- Go west / southwest to the Dunemaul Compound and clear a path to the cave there (40,56). In that cave you’ll find Gor’marok the Ravager, kill him. (lvl 49 – soloable at lvl 47 without a problem)Go southeast to the Eastmoon Ruins (48,64) (yes, even if you didn’t finish [49] The Dunemaul Compound yet.) Start killing ogres there and look on the floor for Gahz’Ridian pieces. They look like white upside down plates. Kill ogres in that camp until you got 30 Gahz’Ridian Ornament and hit level 48. If it’s too crowded, there is another camp similar to this one further to the southwest named “Southmoon Ruin” (41,72). When you hit 48 and got 30 Gahz’Ridian ornament you should also be done with [49] The Dunemaul Compound. If not, kill some more ogres
Level 48
-
- Optional: If you went to Uldaman and did the quest [47] The Platinum Discs, go southwest to Uldum (38,79). The Dune Smashers have a small aggro range, you can hug the left wall and reach the Stone Watcher of Norgannon, just be careful of the one roamer. The Stone Watcher of Norgannon is at (37,81). Click the Uldum Pedestal under him and get the follow up, then talk to the Stone Watcher of Norgannon who just appeared on the pedestal. Go through his dialogue and you will complete the follow up. Then click the Uldum pedestal again, complete the quest and get the follow up [50] Return to Ironforge. Now wasn’t that the easiest 9400xp ever?
- Go west (northwest if you went to Uldum) to Thistleshrub Valley (28,67). Kill Gnarled Thistleshrubs and Thistleshrub Rootshapers until you get 8 kills of each. Also kill Thistleshrub Dew Collectors until a Laden Dew Gland drops (rare drop).
- Go north to the Noxious Lair (31,51). Kill Centipaars there, Stingers, Wasps, Tunnelers.. until you get 5 Centipaar Insect Parts. Then go back to Gadgetzan.
- In Gadgetzan turn in:
- [49] The Thirsty Goblin at Marin Noggenfogger. Get the follow up [49] In Good Taste.
- [49] The Dunemaul Compound at Andi Lynn
- [50] Thistleshrub Valley at Trank’Rek
- [49] In Good Taste at Sprinkle, get the follow up [49] Sprinkle’s Secret Ingredient.
- [47] Noxious Lair Investigation at Alchemist Pestlezugg
Get the quest:
[48] The Scrimshank Redemption from Senior Surveyor Fizzledowser.
End of circuit:
Sell/repair/restock food-drink (3 stacks).
-
- Go south to the Broken Pillar and talk to Marvon Rivetseeker, turn in [48] Gahz’ridian.Go further south to the Gaping Chasm (56,61), clear yourself a path through the insects southwards until you find the entrance spiralling down at (55,70). Take the 2nd tunnel you see when going down the spiral, the one going north (55,69). Inside the tunnel at the first fork go right. Then go through the circular room. After the circular room at the first fork go right. You will enter a big square room. The Scrimshank’s Surveying Gear (55,71) is at the western corner of the square room.
 Loot it and then go back the way you came from, and then go north until you are out of the Gaping Chasm.
 - If you don’t have the Distress Beacon, go back to Gadgetzan.If you do have the Distress Beacon for Tanaris:Go east and inside the mountain at (60,64). You will find the Homing Robot OOX-17/TN there. Turn in the quest. Get full health/mana, refresh buffs. Check if your long cooldown abilities are up. For some classes this will be hard to solo, so if you don’t manage it better find someone to duo it with. If you don’t manage that, just abandon the escort quest, it’s optional anyway.Things to know about this escort quest:
1. Let the chicken in front, let him get hit first. Sometimes mobs will aggro him but not manage to hit him while he walks and they will just give up.
2. The first part of the escort is the hardest as you will run into lvl 46-47 mobs. And at some point you will get an ambush of 3 level 46 scorpions. Use your long cooldown abilities there. After this, it gets easier.
3. Later on you will get a 2nd ambush, 3 humanoids lvl 42 (green). One will be a shadow mage though, kill it first. - Ride back to Gadgetzan, talk to Senior Surveyor Fizzledowser and get the follow up [48] Insect Part Analysis.Go talk to Alchemist Pestlezugg, get the follow up and get back to Surveyor Fizzledowser. Turn in the quest and get the follow up [49] Rise of the Slithid
.
Get your 2 Elixirs of Fortitude from the bank in Gadgetzan. Then ride north to the thousand needles. - Go to the Mirage Raceway and talk to Quentin (78,74). Turn in the quest [47] An Orphan Looking for a Home. Get the follow up, turn it in instantly (as you already have the 2 Elixirs of Fortitude).
Get the quest [47] The Newest Member of the Family and hearthstone to Aerie Peak. Go talk to Agnar Beastamer, he is inside the inn on the lower level. Turn in [47] The Newest Member of the Family.Get the follow up [47] Food for Baby.End of circuit. - Now don’t worry we are gonna hit Ironforge soon to visit the class trainer, but first, repair/sell, refill food/drink (3 Stacks).Get out of Aerie Peak by the small path to the east and go to Rhapsody Shindigger. (26,48)Turn in [43] Rhapsody’s Kalimdor Kocktail. Watch him get drunk and then get the quest [43] Rhapsody’s Tale.Ride east towards the area in between Shaol’Watha and Jintha’Alor (65,50). At this spot and widely around it you should find Silvermane Stalkers. They are level 47-48 wolves and they are stealthed. Run circles in the area I described among the trees, hit tab while looking around. You should find them quickly, they drop the stuff you need 40% of the time. (Humans: use perception / Warlocks: Buff yourself with detect invisibility)
Kill everything on your way while you are at it, like those goofy looking Owlbeasts.
-
- Once you got 5 Silvermane Stalker Flanks, ride west to Valorwind Lake at (40,60). Dive in and look for some white/red mushroom named Violet Tragan. Loot one. (Don’t right click it when its in your inventory!) Then go back to Aerie Peak, into the inn, back to Agnar Beastamer.Turn in the quest [47] Food for Baby and get the follow up [48] Becoming a Parent. Turn it in, congratulations on your new pet. It’s useless but it’s cute (and wasn’t a waste of time XP wise)
-
- Fly to Ironforge, visit your class trainer, sell, repair, auction.If you went to Uldaman before and if you did the platinum discs quest:
Go to the Halls of Explorer, turn in [50] Return to Ironforge at Historian Karnik and get the follow up [50] A Future Task.
Also get [52] Passing the Burden from him.
Turn in [50] A Future Task at High Explorer Magellas. (yet another 4700 XP and 2 Gold 20 Silver.)
Note: This is why I really advise doing certain instances. They are not a waste of time at all if you do them the right way. Here we got 3 times 4700XP only because we did a quest in Uldaman back then. - Fly to Stormwind, go to the Dwarven District to Brohann Caskbelly (64,20) and get the follow up [50] Into The Temple of Atal’Hakkar (Dungeon).Fly to Nethergarde Keep (Blasted Lands) talk to Thadius Grimshade and get the follow up [47] Nekrum’s Medallion (Dungeon).Fly to Darkshire and then to Booty Bay.In Booty Bay turn in [45] Deliver to MacKinley at “Sea Wolf” MacKinley (close to the inn) and all the Rescue OOX-22 quests you completed at Oglethorpe Obnoticus (2nd house to the right of the forge), if you completed any, that is.
If you completed all 3 rescues you get and extra quest [50] An OOX of your own. You’ll get another of those useless pets and 7100 XP as well! Which is why going through the pain of doing those 3 escort quests is in the end worth it. (Sadly the Tanaris beacon never dropped for the character I used to record the XP Rates, so I didn’t get this bonus)
- Go back to Ironforge. Now here is what I advise:Get a group together and go to Zul’Farrak. Follow this Zul’Farrak Instance Guide.It would be a waste not to go, you already have all the pre-quest work done, you just have to gather a few more quests in Tanaris (and one in Dustwallow Marsh).
Even if you don’t like instances, I really suggest you do an effort on this one, it will be a great XP boost and you also get follow up quests which will be another source of extra XP later. You don’t even have to do everything in Zul’Farrak. You can skip Antu’Sul and Witch Doctor Zum’Rah, which are arguably the hardest battles in there. You can also skip Gahz Ridian actually, but if you get someone in your group with the Mallet, you might as well go for it. Just make sure you do at least:- Kill Theka the Martyr (Get 1st Tablet)
- The Temple script (Loot Nekrum’s Medaillon)
- Kill Hydromanther Velratha (Loot 2nd Tablet)
- Go south to the Broken Pillar and talk to Marvon Rivetseeker, turn in [48] Gahz’ridian.Go further south to the Gaping Chasm (56,61), clear yourself a path through the insects southwards until you find the entrance spiralling down at (55,70). Take the 2nd tunnel you see when going down the spiral, the one going north (55,69). Inside the tunnel at the first fork go right. Then go through the circular room. After the circular room at the first fork go right. You will enter a big square room. The Scrimshank’s Surveying Gear (55,71) is at the western corner of the square room.
It took me just 2 Hours with a crapy pick-up group for a huge XP boost.
If you really don’t want to go to Zul’Farrak:
You can abandon the quests related to it and go grind up to level 49. (Because those who go to Zul’Farrak will ding 49 from turning in the quests even if they don’t do all the quests, Gazh’Rilla and Troll Temper namely)
You can grind either in Feralas on Yetis or on Harpies (good for Darkmoon Faire Tickets). You can also grind on ogres in Tanaris if you prefer.
- For those who go to Zul’Farrak, the optimal setup would be that one person of your group has the Mallet to summon Gahz’Rilla. If you can’t manage that it’s np, this is optional and you can always come back later when you have your own mallet, if you wish to.In both cases, when you stop by Tanaris, talk to Sprinkle and get the follow up [49] Delivery for Marin. Go talk to Marin Noggenfogger and get the follow up [49] Noggenfogger Elixir and turn it in. The elixirs are more fun than useful but sometimes they give nifty effects like levitation or water breathing, which can be helpful situationaly. Plus now you can buy Elixirs from Marin at will You can also bind in Gadgetzan or anywhere you please if it’s more convenient to you, for now.
Level 49
-
- So you just turned in all the quests you finished in Zul’Farrak (besides the one in Blasted Lands, cause we are going there now) or grinded your way up to level 49. Those who did Zul’Farrak should have already 4 bubbles in level 49 or close to that.Go to Ironforge and bind there (unless you are still bound in Hinterlands), Sell/repair/get 4 stacks food/drink.Fly to Stormwind, go to the Mage District, then go on top of the Wizard’s Tower (37,81).Get the quest [45] Vital Supplies from High Sorcerer Andromath.
- Fly to Darkshire (Duskwood). In Darkshire go talk to Watchmaster Sorigal (he’s just down the path from the gryphon master), get the follow up [45] Supplies for Nethergarde.Fly to Nethergarde Keep (Blasted Lands).In Nethergarde:Turn in [45] Supplies for Nethergarde at Quartermaster Lungertz.
Turn in [47] Nekrum’s Medaillon at Thadius Grimshade, he’sinside the big tower, on the highest floor. Get the follow up [47] The Divination. Turn it in, get the follow up [47] Return to the Hinterlands (Elite). - Ride out of Nethergarde Keep, go west / northwest until you find the two Blood Elves at (50,14). Get all their quests:[50] A Boar’s Vitality
[50] Snickefang Jowls
[50] The Basilisk’s Bite
[50] The Decisive Striker
[50] Vulture’s VigorStart killing directly from here, you can find all the animals you need to kill for theses quests in the upper part of Blasted Lands. Avoid the area around the Dark Portal and the Tainted Scar. Avoid anything that is level 52 or above.Kill pretty much everything on your way until you have all the quests completed. Beware of the big drake flying around named Teremus the Devourer. Besides this, just kill everything What you’ll need to kill the most though are vultures and basilisks, so here is a path you should follow, listing every possible Vulture spawn (there’s also a few vulture roamers but you’ll run into those too from time to time) so try to get all of them every cycle.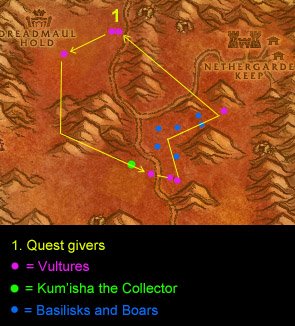
Completing all the quests will take a while, but here are a few tips:
- Melees: As soon as possible try to finish the quest [50] The Decisive Striker and go turn it in, you’ll get a +25 AGI buff for 1 Hour. When that buff wears out, go turn in either Snickerfang Jowls (+25 STR buff) or A Boar’s Vitality (+25 STA buff) depending on your preferences.
- Casters: As soon as possible try to finish the quest [50] A Boar’s Vitality and turn it in for a +25 STA buff. Later on after your sta buff wears off, try to finish [50] The Basilisk’s Bite for a +25 INT buff.
These buffs will help you killing faster, they do not stack, so wait for them to fade before you get the next one. Make good use of them
- While killing mobs in Blasted Lands you might loot an Imperfect Draenethyst Fragment on one of them. Go to Kum’Isha the Collector (51,35). Get the quest [55] Everything Counts in Large Amounts and turn it in. No need to get the follow up quest unless you get another Imperfect Draenethyst Fragment.If you are extremely lucky you’ll find a Flawless Draenetyst Sphere (I didn’t ) In that case get the other quest from Kum’Isha and turn it in.
- Turn in all the other blasted lands quest when they are done, don’t get the follow ups (they are repeatable if you want to get more of those nifty clickable buffs later on). Now you should be approximately 4 bubbles away from level 50 if you did this right.
- Hearthstone to Ironforge (or to Hinterlands if you are still bound there).Go to Aerie Peak in Hinterlands, talk to Gryphon Master Talonaxe. (he’s at the very top of Aerie Peak) Get the follow up [53] Saving Sharpbeak (Elite).Now you got 3 reasons to go to the top of Jintha’Alor. The Mallet of Zul’Farrak being one of them, but most importantly:
- [50] The Ancient Egg (Elite) and
- [53] Saving Sharpbeak (Elite)
- Build a group of level 50+ and go to Jintha’Alor (66,66). It’s doable with 3 level 50s but it will be long and very tedious at the end, I suggest you try to fill up the group.Fight your way to the top of Jintha’Alor, then go to Vile Priestess Hexx (59,78). She has one guard, you can wait till the Priestess wanders in the cave and get her guard solo. Then get the Priestess solo, kill her and loot the Hexx’s key from her. Also don’t forget to forge the Mallet of Zul’Farrak, just click your Sacred Mallet while being next to the Altar. Go inside the cave behind where you fought the Vile Priestess. Follow this path to find the Ancient Egg:
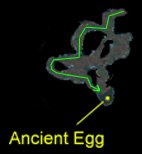 You’ll find Hitah’ya the Keeper and 2 guards patrolling around the Ancient Egg. Kill Hitah’ya the Keeper first, should be a pushover for a group of 4 or 5. Get the Ancient Egg.
Once you have the Ancient Egg, clear the way out of the cave back to the Altar, from there go north towards the other cave at (56,68). Kill the two trolls guarding it’s entrance. Then go through the cave and on the other side of it you’ll find Sharpbeak in it’s cage. Free Sharpbeak and watch him fly away with his parents.
You are done, hearthstone back to Aerie Peak and turn in the quest [53] Saving Sharpbeak (Elite). Also turn in any stacks of 5 Troll Tribal Necklaces you might have gotten during your Jintha’ Alor trip.
Go turn [50] The Ancient Egg in Tanaris at Steamwheedle port, and get the follow up quest [53] The God Hakkar (Dungeon)
- Turning in the quests will make you ding level 50 or be very close, and you can go kill some trolls next to the Altar of Zul to finish your level, or some ogres in Tanaris.For those who didn’t do Zul’Farrak: Time to grind!Ding level 50, and end of Chapter II.
-Jame
www.wow-pro.com All Rights Reserved