
 by Snowflake
Jame’s Alliance leveling Guide
Introduction:
This guide starts at level 30. It is your task to reach that level on your own and it shouldn’t be a problem, you can check the other leveling guides in our leveling guide forum for the earlier levels. The main reason why I don’t want to start a guide at level 1 is because:
- It’s not so needed
- Depending on your race/class choice you will start from different areas so covering them all would be a mess.
This guide is optimized for FAST leveling with a minimum of grinding sessions. Quests are important, they give rewards and faction and are less boring than pure grinding, BUT sometimes some quests are really a time waste and we will be skipping those and replacing them by good grinding spots when it is necessary. Some people say that Grinding is always faster than questing, this is true in theory when you don’t know which quests to take and which to avoid, and what is the best order to do them. With this guide, questing will be very efficient and much better than pure grinding. Follow each instruction carefully and you will see for yourself. The quests choices and order to do them are optimal so that you run as few as possible while doing the most possible and then turning several quests at the same time. This guide will be very useful for both veteran and novice players, and this is why sometimes I describe things in two fashion “In short” (for the veterans) and “in details” (for the novices). That way the veteran players can skip those “in details” paragraph if the “in short” one was enough information for them. So even the guide itself is optimized for the minimum reading possible, to save time! Let’s get started immediately then!
Everything described in this guide can be done solo (besides when I say otherwise). You can of course follow this guide while duoing, grouping, it’s not a problem, it works too.
Basic rules:
- While traveling, kill everything that is on your way and gives experience (Yellow mobs preferably).
- Spend your talent points so you do the most damage possible. (e.g: Priest should specialize in Shadow Talents, Warriors in Arms/Fury, Rogues Combat/Assassination, etc).
- Don’t waste your time trying to find groups for questing, you can solo everything that is described in this guide. Only group with someone when it’s not gonna be a waste of time (e.g: meeting the person at the other end of the map to show him the way to where your quest is)
- Try to always log out in an Inn when you take a break.
- If I don’t mention a quest, it means I consider it a waste of time, so don’t take it thinking I forgot a quest here and there, I didn’t . Also don’t abandon a quest unless I say you should.
- Sometimes I will be making lists of quest you should have before starting with an area, that doesn’t mean I will list the whole quest log, JUST the quests that interest us for the moment.
Useful Addons
Here is a list of addons which I use. You will mainly need an addon to display coordinates because I use them to describe locations in my guide (x,y). The one I use is FuBarLocation, which requires you to install FuBar and Ace 2. Below I listed the files you must download and install, they can all be found on this page: http://files.wowace.com/
- FuBar – A basic panel in which you can add a lot of different addons with many useful features. I use it mostly for coordinates and XP rates.
- FuBar LocationFu – This addon will make your coordinates appear on your FuBar panel.
- Fubar ExperienceFu – This will tell you how much XP/hour you are getting (optional)
- Fubar QuestsFu – Keeps track of your quests, tells you the level of the quests (optional)
- Ace 2 – You need this for the above mentioned addons to work.
- Cartographer – Enables coordinates on your map as well, which will make it easier for you to travel with coordinates. It also removes the fog on unexplored areas of the map, which helps a lot if you are unfamiliar with the zones.
Side Note: In case you don’t know how to install add-ons, make a folder called Interface in your World of Warcraft directory (if it doesn’t exist already). Then you open it and create a folder called Addons inside the Interface folder (if it doesn’t exist already). Now every Addon you want to install goes directly into the Addon folder. For example you download and unzip FuBar, you drag the folder called FuBar (not Interface or Addons) into the new Addon folder you created. You restart World of Warcraft completely and it should be working.
If it isn’t you might need to log out to your login screen and click on “Addons” in the left lower corner. Tick the box that says “Load out of date Addons”. Relaunch WoW.
Shopping List:
Every time you pass by an auction house, try to buy the following items:
- 1X Patterned Bronze Bracers ~50 Silver
- 1X Frost Oil ~ 2 Gold
- 1X Gyrochronatom ~1 Gold
These might not always be up for sale, so start checking early.
The Guide:
Chapter 1 – [Level 30 – 41] Journey from Thousand Needles to Badlands
Level 30
- In Short: Go to Theramore by boat, in Theramore learn the new flight path, go to the Inn, make it your home location, then go to Thousand Needles.
- In Details: From Ironforge, take a flight path to Menethil Harbor, if you don’t have that flight path, you’ll have to go to wetlands and then run to Menethil Harbor. In Menethil Harbor take the boat to Theramore (It is the boat that stops at the southern peer). When in Theramore, find the Gryphon Master and get the flight path. Then go to the Inn, talk to the innkeeper and make theramore your home location. After that, go through Dustwallow Marsh by following the road northwest and then south to the Barrens. When in the Barrens, go south toThousand Needles, go down the great lift (don’t attack the guard just run past him, take the elevator and keep going until he forgets you).
In Thousand Needles, go west until you reach the border of Feralas, and find the alliance outpost: Thalanaar (5,17). Get the new flight path from there.
Go southeast along the mountain, keep going until you hit Roguefeather Den (27,51). It’s grinding time! Don’t worry, there will be a lot of questing after that, but you are gonna kill these harpies until those two goals are achieved:
- you hit level 31+
- you obtain 25 Vibrant Plumes
The harpies are lvl 28-30, drop cash and silk cloth. There are a lot of them and they respawn fast. (Make sure to kill the harpies that are down on the ground and those that are in the cave up on the hill) With the 25 Vibrant Plumes you can get 60 Tickets at the Darkmoon Faire, you can then trade 50 Tickets for a 14 Slot Bag, which is a big plus at this level (unless you are a twink). Sadly the Darkmoon Faire is not always available, check this Darkmoon Faire Necklace Guide to know when the Darkmoon Faire will be available, and put your Vibrant Plumes in bank until then. If you don’t want the bag, you can either auction those plumes (they sell nicely) or save them up for your future epic necklace.
Level 31
Go east until you reach the Mirage Raceway in the Shimmering Flats(80,77). Get the following quests there:
- [30] Hardened Shells
- [30] Salt Flat Venom
- [30] Load Lightening
- [31] Rocket Car Parts
- [31] Hemet Nesingwary Jr.
- [33] A Bump in the Road
- [36] Wharfmaster Dizzywig
You can find everything needed to complete those quests all around the raceway, do long circles all around it and kill everything on the way.
If you have troubles finding buzzards, there is a nice spot with 10 of them at (87,66).
Keep doing this until you complete all the quests, get 10 Turtle Meat and hit level 32. Grind on turtles in particular, they drop scales which sell nicely. Don’t sell the Turtle Meat, put them in bank or somewhere in your inventory.
Turn in all the quests and get the follow up quests :
- [37] Goblin Sponsorship
- [35] Martek the Exiled
Before we leave, go south and zone into Tanaris. Go to Gadgetzan and talk to the Gryphon master on the other side of the town to get the new flight path. Hearthstone to Theramore, sell junk and repair.
Get out of Theramore and follow the road northwest and then south to the Barrens. In the Barrens go north then east to Ratchet. Talk to Gazlowe in Ratchet, get the follow up [37] Goblin Sponsorship. Also talk to Wharfmaster Dizzywig on the docks and get the follow up [36] Parts for Kravel
Take the boat to Booty Bay. In Booty Bay on the docks, talk to Wharfmaster Lozgil and get the follow up. Then go to the Inn in Booty Bay and make it your home location. Then go train new skills in Stormwind by gryphon ride (for rogues, there’s a trainer on the 1st floor of booty bay inn). Visit the Auction house, repair, sell, buy 4 stacks of food/drink (of course don’t buy drinks if you aren’t a class with mana).
Level 32
At level 32 the zone we will be aiming for is Stranglethorn Vale.
Quest Gathering:
- First of all get all the quests you can from Booty Bay.
- Get the quests in the Rebel Camp in Strangelthorn Vale (37,3).
- Then go to the Nesingwary’s Camp (35,10). Turn in [31] Hemet Nesingwary Jr. Get the quest [30] Welcome to the Jungle from Barnil Stonepot and turn in it at Hemet Nesingwary Jr. This should unlock several other quests, get them all.
You should have these quests:
- [31] Supply and Demand from Drizzlik in Booty Bay.
- [31] Panther Mastery From Nesingwary camp.
- [31] Tiger Mastery From Nesingwary camp.
- [32] Investigate the Camp From Krazek in Booty Bay.
- [33] The Second Rebellion From Sergeant Yohwa at the Rebel Camp.
- [34] Bad Medicine Sergeant Yohwa at the Rebel Camp.
- [34] Raptor Mastery From Nesingwary camp.
- [35] Bloodscalp Ears From Kebok in Booty Bay.
- [35] Singing Blue Shards From Crank Fizzlebub in Booty Bay.
- [36] Hostile Takeover From Kebok in Booty Bay.
- [37] Parts for Kravel From Wharfmaster Dizzywig.
- [37] Krazek’s Cookery From Corporal Kaleb at the Rebel Camp.
- [37] Goblin Sponsorship From the Baron Revilgaz on top of the Booty Bay Inn.
- [37] The Stone of the Tides From Baron Revilgaz in Booty Bay, prereq for this quest is given by Krazek in Booty Bay.
- [41] Scaring Shaky From “Sea Wolf” McKinley in Booty Bay.
No need to take the Green Hills of Stranglethorn quests (the one with the chapters), it will just encumber your quest log for now. You will complete each chapter when you get the right pages. So while you hunt always look out for these:
Hunting
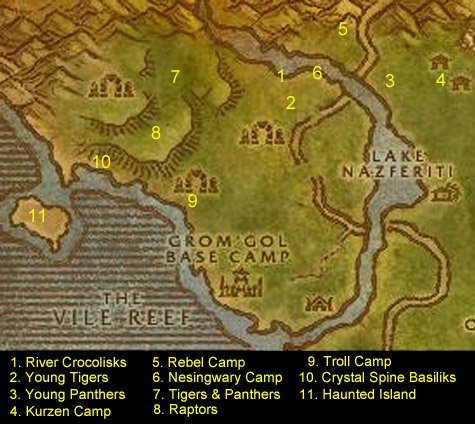
Step 1: Kill River Crocolisks which can be found all along the river in northern Stranglethorn Vale until you find 2 Large Crocolisk Skins. While you search for crocs you can also kill Young Tigers close to the river for Tiger Mastery.
Step 2: Then kill 10 Young Tigers (or as much as you still got left)
Tigers can be found mostly south and around the Nesingwary camp.
Step 3: Kill Young Panthers, they are mostly found on the other side of the river to the east. (41,10).
Step 4: Go further northeast to the Kurzen Camp (44,11) and kill 15 Kurzen Jungle Fighters as well as Kurzen Medecine Men until you get 7 Jungle Remedies (might take a while). Also you’ll need a Fern Extract from one of the piles of crates scattered around the Kurzen Compound.
Step 5: Once all 4 quests are done go turn them in (besides Supply and Demand, which you will turn in later) at the Rebel Camp where you get the follow up:
- [38] Special Forces.
Step 6:And at the Nesingwary camp where you get the follow ups:
- [33] Tiger Mastery
- [33] Panther Mastery
Step 7: Go west until you reach a plateau (30,9). Up there you can find Panthers and Tigers. Kill 10 of each.
Step 8: Further southwest on the plateau you should find Stranglethorn Raptors, kill 10.
Step 9: Go south and down the plateau until you find the troll camp at Bal’lal Ruins (29,20)
It should take a while to get 15 bloodscalp ears but it is a nice grinding spot anyway. So grind at this spot until you hit level 33. If you don’t have enough trolls there is another camp northeast at the Tkashi Ruins (33,15).
Level 33:
Step 10: From the troll camps, go west until you hit the shore, and move along the shore towards the north until you find Crystal Spine Basilisks. If you run short on Basilisks, there is more on the lower plateau to the east along the shore. If there aren’t any basilisks just go kill some trolls until they respawn. Kill basilisks until you get 10 Singing Crystal Shards.
Step 11: After that, take a swim westwards until you hit the island at loc (21,22), you will have to go towards the middle of the island so the quest [37] The Stone of the Tides is completed, but be careful with the lvl 37ish elementals on the isle.
Step 12: When you completed all 6 quests, go turn in the 3 mastery quests at camp nesingwary and get the follow ups:
- [35] Tiger Mastery
- [36] Raptor Mastery
- [38] Panther Mastery
Check if you completed any of the chapters of the Stranglethorn pages quests as well and turn them in if you did.
- Chapter I: page 1,4,6,8
- Chapter II: page 10,11,14,16
- Chapter III: page 18,20,21,24
- Chapter IV: page 25,26,27
Make sure you repair and sell junk at the vendor before you go again. You will probably need a lot of space in your bags with the extra pages you will find.
Step 13: Now you probably must be about halfway to level 34. It’s time to go grind at Kurzen camp or on the Trolls, up to you. When you are 1 bubble away from lvl 34, warp to Booty Bay.
When in Booty Bay. Turn in the following quests:
- [31] Supply and Demand at Drizzlik in the “Tan-your-hide-Leatherwork” shop. It is situated on the top floor and not too far from the inn in Booty Bay.
- [35] Singing Blue Shards on the ground floor in bootay bay inn.
- [35] Bloodscalp Ears
- [37] Krazek’s Cookery
- [32] Investigate the Camp on the 2nd floor of the booty bay inn.
- [37] The Stone of the Tides on the top floor of Booty Bay inn to Baron Revilgaz.
This should make you level up.
Step 5: Get follow up quests:
- [36] Hostile Takeover
- [36] Some Assembly Required
- [37] Water Elementals
- [41] Venture Company Mining
Note: If some follow up quests aren’t mentioned it is because they aren’t worth the trouble. Just take the ones listed above.
level 34:
Since you are lvl 34 now, go train if you wish to do so. Closest place to train is Stormwind by gryffon. (Unless you are a rogue, there’s a rogue trainer on the 1st floor of Booty Bay inn).
While you are on gryffon (or in Booty Bay), ask in general channel if anyone has any page you need, and trade your spare pages in exchange or just buy them, they go for 10-15 silver on average. You can also check the Booty Bay auction house for missing pages. I suggest you even buy them overpriced (Offer 20-30 Silver for a page and you should get it quickly). The sooner you complete the page collection, the better for your bag space. Anyway, time to hunt again!
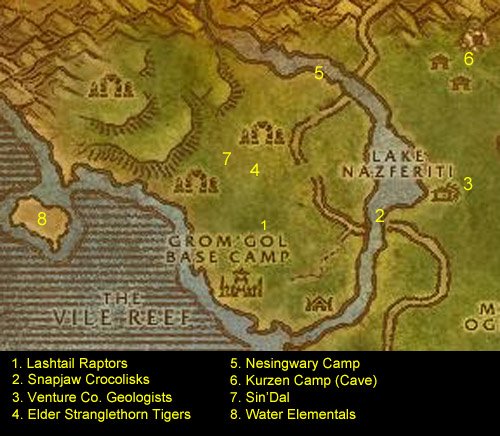
Step 1: When you are done, go back to the jungle, follow the road north until you hit loc (39,22). And go westwards (towards the area north of Grom’Gol Camp). You should find plenty of Lashtail Raptors there. Kill them as much as needed for the quests.
Step 2 & 3: When done with raptors, you should hit the river to the east and search along the banks for Snapjaw Crocolisks. At the same time you can start heading to the Venture co. Camp next to Lake Nazferiti and kill Geologists there (44,20), they drop the “tumbled crystals” you need for [36] Hostile Takeover. You can find crocolisks on both sides of the river, all around Lake Nazferiti and all the way down to Mizjal Ruins. Keep killing Goblins and Crocolisks until you get both quests complete.
Step 4: When done with that, head northwest until you hit the area in between Bal’al Ruins and Tkashi Ruins (33,15). There you wil find Elder Stranglethorn Tigers and kill 10 of them.
Step 5: Once done, go to Nesingwary Camp and turn in
- [35] Tiger Mastery
- [36] Raptor Mastery
Get the two follow ups and complete any chapter to get rid of pages taking up bag space.
Step 6: Go northeast until you hit the Kurzen Camp, this time go straight for the cave there and kill Commandos and Headshrinkers. Careful the Commandos are stealthers.
Step 7: When done with that go southwest to find Sin’dall. Sin’dall is on top of a hill at (31,17) right in the middle of Bal’al and Tkashi ruins. It is definitely soloable at lvl 34, just make sure all your long cooldown abilities are up.
Step 8: Once Sin’dall is dead, head west until you hit the island you discovered before (21,22), and kill Water Elementals there until you get 6 Water Elemental Bracers.
Step 9: At this point you should be getting close to level 35. If you are not, grind on trolls until you are about 3 bubbles of XP away from it.
Step 10: When that is done, go turn in your quests at the Nesingwary and Rebel camps, at the Rebel Camp get the folllow up [38] Kurzen’s Mystery. By now you should have completed your page collections or be close, if you aren’t it’s ok, we will be back in Stranglethorn Vale in about 3 levels and then you ll for sure complete it.
Step 11: Warp to Booty Bay, turn in the quests
- [36] Hostile Takeover at Kebok (inn).
- [37] Water Elementals at Baron Revilgaz on to of the Inn. Get follow up [37] Magical Analysis.
- [36] Some Assembly Required at Drizzlik (Leather-and-hide shop),
Don’t get the follow up. Go to the bank and get the 10 Turtle meat you saved since Thousand Needles, and make space in your bags in case you still have Stranglethorn pages.
Time to travel!
If you already know how to get there, go to Southshore in Hillsbrad Foothills (or take a Gryffon Ride)
If you don’t know how to get there:
Take a gryffon ride to Stormwind, then use the tram or gryffon to Ironforge, then gryffon ride to Southshore or Arathi. If you don’t have those flight paths, fly to Wetlands. From Menethil in Wetlands follow the road east and then north until you zone into Arathi Highlands; keep going north until you reach Refuge Pointe (46,46). Get the flight path there. From Refuge Pointe take the road west until you reach Hillsbrad Foothills. In Hillsbrad Foothils follow the road west and then south at the 3rd fork. Southshore is at loc (50,55). Talk to the Gryphon Master in Southshore. and bind at the Inn. You should be level 35 or close by now.
Gather all the quests in Southshore, you should have:
- [30] Down the Coast
- [33] Hints of a New Plague?
- [33] Syndicate Assassins
- [34] Costly Menace
- [36] Crushridge Bounty
And [31] Soothing Turtle Bisque which you can complete immediately because you already got 10 Turtle Meat. You can buy the soothing spices from the merchant in the first house to the right when entering Southshore from the north.
Don’t bother with [34] Bartolo’s Yeti Fur Cloak unless you are a Leatherworker or got a Leatherworker friend who can make a Hillman’s cloak. You can buy a Bolt of Woolen Cloth at the auction house or ask a tailor.
Level 35
Let’s start with some Murloc slaughtering!
Step 1: The murlocs are right next to the town on the western shore. Kill 10 Tidehunters and 10 Oracles.
Step 2: Go turn it in and get the follow up. Go back and kill more murlocs until you get 10 Murloc Heads.
Step 3: Go turn in the quest, get the follow up. Speak with Marshal Redpath in Southshore, get follow up and talk to Lieutenant Fahren again. Get the follow up [32] Stormwind Ho!
Sell and repair (there’s an armorsmith behind a small house next to the inn)
Step 4: Time to hunt Nagas now. The ones you need are on the eastern shore, right next to the town. Kill 10 Daggerspine Shorehunters and 10 Daggerspine Sirens, go back to Southshore and talk to Lieutenant Farren again and get the follow up [32] Reassignment.
Step 5: Now take a flight path to Refuge Pointe (Arathi Highlands). In Refuge Pointe get the quest [36] Worth its Weigh in Gold from Apprentice Kryten.
Step 6: Go southeast until you reach the Go’Shek Farm (60,53) and find the NPC named Quae, she is looking over the Go’Shek Farm from the northwest edge. Talk to her and take the follow up quest [36] Hints of a new Plague?. You need to find and kill a Forsaken Courier and loot a Sealed Folder from him.
In Short: The Forsaken Courier roams from the Go’Shek Farm all along the road up until the wall to Hillsbrad Foothils. He is lvl 35 and doesn’t have that much hit points, but he has 4 level 35 bodyguards. Find a way to kill and loot the Courrier. You can do it solo at level 35, I’ve done it with 5 different classes and I’ve heard about other players doing the same. For instructions on how to kill the courier with a certain class, see below.
In Details Now you need to find and kill the Forsaken Courier, he roams from the Go’Shek Farm all along the road up until the wall to Hillsbrad Foothils. He has 4 bodyguards, all level 35.
There are many ways to kill it though, even solo at level 35.
- Warrior: for exemple, charge the courrier, hit Retaliate, use Intimidating Shout, kill the courier fast, loot it and then run away.
- Mage, burn him down as fast as possible, start from max range with Pyroblast if you got it, use ice root on the bodyguards, finish the courrier fast. Use a Health Potion if needed.
- Rogue, you can single the courier out. Use Distract so that only one guard stops while the rest keeps walking, then kill the guard solo, rinse and repeat until you get the courier solo. You can also just rush in the pack, hit Evasion and kill the courier quickly before evasion runs out.
- Warlock and Hunter: Send in the pet and burn the Courrier as fast as possible while your pet dies.
- Priest: Powerword:Shield and Renew yourself, be at max range, start with Smite, then a Mind Blast while the mobs run to you, then a Shadow Word:Pain. The bodyguards should be on you at this moment, use Psychic Scream, and keep on burning the Courrier with Mind Flay / Mind Blast.
- Paladin Just go for the courier and use your invulnerabilities.
There must be a way for each class to solo this at level 35, use creativity, potions, and long cooldown abilities. If you don’t manage it, try to get a partner to duo it.
Step 7: Once you got the Sealed Folder from the Forsaken Courier, go back to Quae (60,53). Turn in and get the follow up [37] Hints of a new Plague?, where you have to escort Kinelory.
For the escort, one word of advice: Let Kinelory be in the front, always walk behind her, when mobs aggro her, help her take them out one by one. And make sure they don’t run far. Kinelory is quite a tank and can also heal a bit. If you let her be in front and don’t let runners create trains, you will complete the quest easily.
Step 8: When completed, talk to Quae and get the follow up. Then go southeast of Go’Shek Farm to the troll village (63,65).
Kill trolls until you get 10 Tusks. Kill Witch Doctors until you get 4 Medicine Pouches. Further inside the village and to the south (68,75) you will find a cave. Inside the cave you will find Witherbark Shadow Hunters and get the Hunter Knife you miss to complete the quest.
Step 9: Once completed, run back to Refuge Pointe in Arathi and turn in the troll quest.
Hearthstone to Southshore, and talk to Phin Odelic and complete the quest “Hints of a New plague”.
Sell and repair.
Step 10: Go north and follow the road north until you zone to Alterac Mountain (96,47). A bit further up and to the right you will find Soferan’s Naze (58,67). Clear the Syndicate camp there, and in the middle of the camp on a table you should find parchments named “Syndicate Documents”. Right click one of them and get the two quests [34] Encrypted Letter and [34] Foreboding Plans.
Then go northwest towards the snowy mountains where you will find Crushridge Ogres, they drop the Dirty Knucklebones you need.
When you run short on ogres, you can go to the southwest where you will find the area called “Corrahn’s Dagger” (47,76). There you can kill Syndicate Footpads and Syndicate Thieves as well as Mountain Lions and Hulking Mountain Lions. I suggest you go back and forth from this spot to the ogres whenever you run short on mobs. Do this until the Ogre and Syndicate quests are completed. Then there’s more Lions further to the west at “The Headland” (38,55).
You should keep going westwards while killing lions until you complete your quest. At this point you should be close to level 36, if not, grind on ogres / syndicates until you are about 2 bubbles away from level up.
Step 11: Go northwest towards Dalaran until you reach Archmage Ansirem (18,78). Turn in the quest [37] Magical Analysis and get the follow up [37] Ansirem’s Key. Then warp to Southshore or run there if Hearthstone isn’t ready.
Turn in the 5 quests in Southshore. Get the follow up [34] Letter to Stormpike from Loremaster Dibbs. Don’t get the other follow ups.
Congratulations on level 36.
Level 36
Step 1: Take a gryphon ride to Ironforge, go to the hall of explorers northeast of the Gryphon master and get the quest from Roetten Stonehammer [33] Reclaimers’ Business in Desolace. Also turn in the quest [34] Letter to Stormpike at Prospector Stormpike in the Hall of Explorers, don’t get the follow up. Then go to the inn of Ironforge and bind yourself there.
Step 2: Fly to Stormwind. Repair, sell stuff and train new skills. Also, go turn in [32] Reassignment, at Major Samuelson in Stormwind Keep. (72,16)
Step 3: Fly to Booty Bay. In Booty Bay, turn in the quest [37] Ansirem’s Key at Catelyn, she is on the 1st floor inside the Booty Bay in. Get the follow up [39] “Pretty Boy” Duncan.
Step 4: Take the boat to Ratchet. And then:
- In short: Go to Desolace
- In detail: From Ratchet, follow the road to the west until you reach Stonetalon Mountains. In Stonetalon Mountains follow the road west/northwest until you are past Sunrock Retreat and reach Mirkfallon Lake, keep following the road until you can go west in between two cliffs. Follow this path, go south through the charred vale and you will arrive in Desolace.
When in Desolace, go to Nijel’s Point . To access it you have to go further southwest until loc (67,16).
Talk to the Hyppogryph master.
Then get quests:
- [31] Centaur Bounty
- [33] Vahlarriel’s Search
- [33] Reagents for Reclaimers Inc.
- [35] Strange Alliance
- [39] Down the Scarlet Path
- [39] The Karnitol Shipwreck.
We are not taking the quest [35] Brutal Politics because we decide to be friendly with the Gelkis Centaur Tribe which involves lowering faction with the Magram Centaurs. It doesn’t really matter anyway if the Magram centaurs hate you.
Circuit 1:
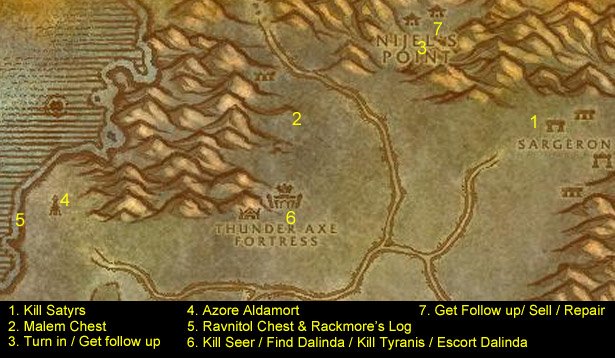
- Let’s start with [33] Reagents for Reclaimers, kill Hatefury Satyrs in Sargeron, southeast of Nigel’s Point (75,20).
- When you got 10 Hatefury Claws and 10 Hatefury Horns go west to the area just north of Thunder Axe Fortress (56,17) you will find a ruined caravan there. Look for Malem Chest. It’s not actually a chest, rather a crate. Open it, get the follow up.
- Go back to Nijel’s Point and get the follow up. Turn in the Satyr quest as well but don’t get the follow up (huge time waste). Sell and Repair.
- Go southwest and past Thunder Axe Fortress. Then go west towards the sea until you see a big tower. Azore Aldamort is next to the tower just north of it down the cliff (38,27). Get the quest [33] The Sceptre of Light.
- From there, go southwest to the shore towards (36,30), you should see the mast of a sunken ship. The Ravnitol Chest is on the shore at (36,30). Open it, and get the follow up quest. Right next to the chest is a black book named “Rackmore’s Log“. Click it and get the quest [36] Claim Rackmore’s Treasure. The Silver Key drops from Drysnap Pincer or Crawler. The Gold Key drops from any Slitherblade Naga.
Take a swim and kill Drysnaps around the ship until you get a Silver Key. It takes about 10 kills on average. Then further north go kill Siltherblade Nagas until you get a gold key. 10 kills on average as well to get a Golden Key. - Once you have both keys, go east to the Thunder Axe Fortress. Enter the fortress through the main gate (56,30), go kill the Seer (he has one guard) on top of the 1st watch tower to the left past the gates. Loot the Sceptre of Light.Then go in the big building and talk to Dalinda, get the follow up quest [33] Search for Tyranis. Tyranis is in the other building (the smaller of the two), southwest of the main one. Kill Tyranis and loot the pendant.
Go back to Dalinda. Before you talk to her, clear the whole building. After you talk to her she will start to walk out of the fortress, escort her and make sure she doesn’t die.
Warning: Dalinda is one of those stupid escort NPCs who don’t stop when YOU are attacked. So let her in the front and make sure she gets hits first. Once out of the fortress she will run away and you will get a “Quest Complete” message. - Go northeast and back to Nijel’s Point, turn in quests, get follow up [39] The Karnitol Shipwreck. Sell and Repair, next circuit is gonna be long!
Circuit 2:
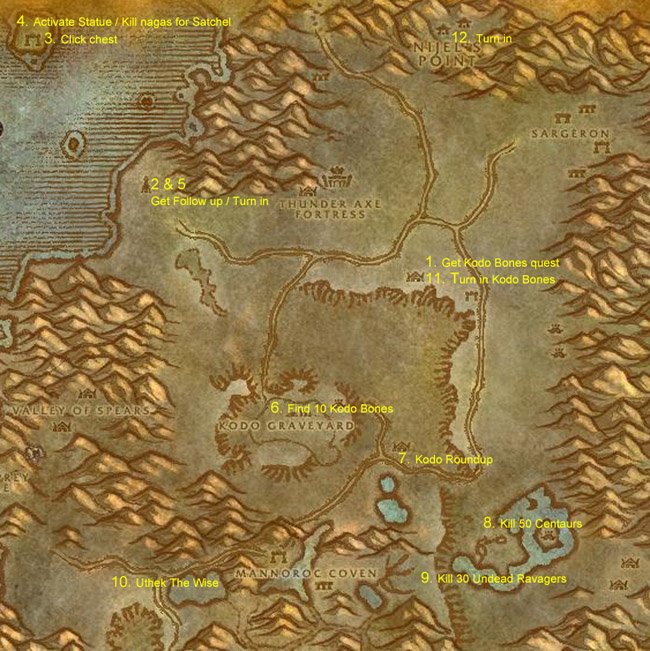
- Go south to Kormek’Hut (62,38). Get the quest [39] Bone Collector (62,39) from Bibbly F’utzbuckle.
- Then go west to the big tower and turn in your quest [33] The Sceptre of Light to Azore Aldamort. Get the follow up [38]Book of the Ancients
- Go northwest and take a swim towards the Ranazjar Isle (30,. Clear the eastern shore of the isle. You should find a chest in between a tree and the white building. Click it to complete [36] Claim Rackmore’s Treasure.
- Then clear yourself a path through the Nagas so that you can reach the statue on the northwestern part of the isle (28,6). Clear the way around the statue, get full health/mana and go click the statue twice. Lord Kragaru will spawn, a lvl 38 Naga. Kill it (soloable at 36) and loot the Book of the Ancients.
Before you go, kill Slitherblade Tidehunters and Slitherblade Sea Witches until one of them drops Karnitol’s Satchel. Takes 15 kills on average (Took me only 4 once, and another time it took 29 kills). - Swim back to Azore Aldamort get your rewards.
- Now go southeast towards the Kodo Graveyard (48,55). Gather 10 kodo bones there, kill the Carrion Vultures if they are in the way. When you loot a bone there’s a 50% chance a lvl 37-38 Kodo Apparition will pop up and attack you. You can run away or deal with it, up to you, they disappear after about 10 minutes.
- Once you got 10 Kodo bones, run east to Scrabblescrew Camp (60, 61) and get the quest [34] Kodo Roundup.
Go back to the Kodo Graveyard and use the Kombobulator Rod on any Ancient, Aged or Dying Kodo. Once you have one tamed, run back with it to the goblin, then right-click on the tamed kodo. Rinse and repeat 5 times to complete the quest. - When done with that, go southeast to the Magram Village (70,70) and kill centaurs until you are friendly with the Gelkis (exactly 50 Kills, 46 if you are human). You can check your reputation with the Gelkis Centaur Clan by opening your character panel (“C” key) and clicking on the reputation tab or just directly press “U” key.
After those 50 Kills you should also have 15 Centaur Ears by now, if you don’t, just kill some more centaurs.
At this point you should be level 37 already. If not, you should keep on grinding on Centaurs until you hit level 37.
Level 37
- Go southwest toward the big arch (63,79). Kill 30 Undead Ravagers there. Beware of the Outcast Necromancers, interrupt them when they cast their summon spell. If not, they summon an Undead Ravager.
- When done with the 30 Ravagers, from the big Arch, go west, stay close to the mountain on your left until you reach Gelkis Village. Then go northwest until you find Uthek The Wise (36,79). Turn in the quest [35] Strange Alliance, don’t get the follow up.
- Take the road east / northeast and then north. Follow the road until you reach Kormek’s Hut (62,38) and turn in [39] Bone Collector.
- Then go north to Nigel’s Point and turn in all the quests. Get the follow ups:
- [39] The Karnitol Shipwreck
- [40] Down the Scarlet Path
Titan Panel XP rate results:
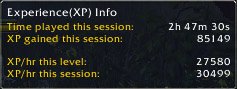
This session started with the Satyr quest and finished right now after turning in all the quests in Nijel’s Point. That was done with a level 36 character with average gear, solo, on a new server (no twink). I’ve tried it with 3 different classes and it works just as well. And there is still two quests to turn in, that’s just to show how efficient the quest path of desolace can be when done the right way.
Warp to Ironforge, go to the Hall of Explorers and turn in the quest [39] The Karnitol Shipwreck.
At this point, you got 2 options:
- Go to Scarlet Monastery. I highly recommend this, an instance run will slow down your exp rate (unless you get a good group going fast). But every 10 level or so you need some gear upgrades and instances are the best for that, Scarlet Monastery is a great instance, not too time consuming. And you already got the main quest. Go further in the Hall of Explorers and get [38] Mythology of the Titans from Librarian Mae Paledust. Repair, sell, check auction house etc. Then fly to Southshore, turn in the quest [39] Down the Scarlet Path and get the follow up [40] In the Name of the Light. Get a group together and go to Scarlet Monastery in Tirisfal Glade, follow our Scarlet Monastery Guide and you should be fine.
- You don’t like instances at all. In that case, go to the next step of the guide, Badlands.
Note: Doing Scarlet monastery got me about 75000 XP. That’s almost a full level, so I was level 38 and halfway to level 39 before going to Badlands.
Level 38:
Badlands:
- You should be in Ironforge, if not, use Hearthstone, as you should still be bound there. Get the Patterned Bronze Bracers, the Frost Oil and the Gyrocronatom from your bank (or buy them now if you didn’t yet). I suggest you buy 4 stacks of food/drink at least before leaving.
- Go to the Hall of Explorers and get the quest [37] Ironband wants you! from Prospector Stormpike.
- From Ironforge, fly to Thelsamar, if you don’t have the flight path, run out of Ironforge, follow the road east and take the tunnel at the South Gate Outpost (86,51) You will be in Loch Modan then, follow the road northeast to Thelsamar.
- In Thelsamar get the quest [39] Badlands Reagent Run from Ghak Healtouch in the alchemy supplies house. Then go southeast to Ironband’s Excavation Site (65,65). Get the follow up quest from Prospector Ironband [38] Find Agmond. Then go southwest to Badlands.
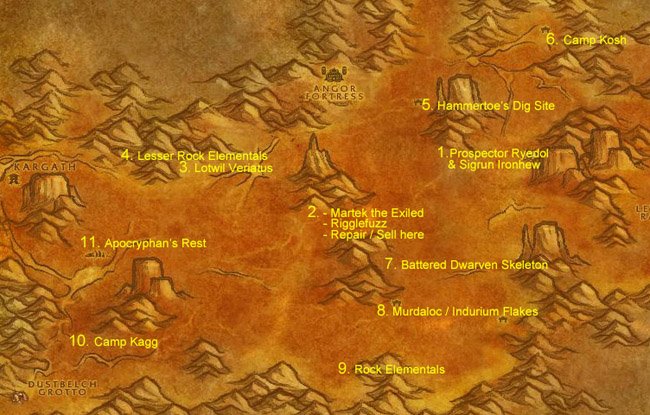
In Badlands kill any Buzzard or Coyote you find on your way.
- Go south, past Hammertoe’s Dig Site, until you find Prospector Ryedol and Sigrun Ironhew (53,43). Get quests:[35] A Dwarf and His Tools
[38] Mirages - Go southwest and find Martek the Exiled (42,52)
Turn in the quest and get follow up:[39] Indurium
also get quest [40] Barbecued Buzzard Wings from Rigglefuzz.Note: Whenever you need to sell or repair, go to this spot. There is a goblin smithing supplier and it’s the only vendor and repairer in Badlands. - Then go west and a bit to the north until you find Lotwil Veriatus’s Camp (25,44). Get quest [37] Study of the Elements: RockGet [37] Coolant Heads Prevail, turn it in, get the Follow up [37]Gyro…What? and turn in.
- Just west of Lotwil Veriatus you will find a lot of Lesser Elementals. This is a very nice grinding spot, they are easy to kill and drop stones which you can stack up and sell to merchants for nice cash. (However, you should try to AH Solid stones, deeprock salt and Elemental Earth, they sell fairly nice at the Auction house). Stay at this spot until you get 10 Small Stone Shard and hit level 39. If you don’t like elementals, or if the spot is already overcrowded, go east to Angor Fortress, and kill Dwarves. For those who didn’t go to Scarlet Monastery this will mean a long grinding session, but this will also mean good XP rate and cash (and you need to get your mount soon!). Go turn in [37] Study of the Elements: Rock at Lotwil Veriatus and get the follow up.
Level 39
- Go east and a bit to the north to Hammertoe’s Digsite.At (53,34) under a tent next to a big keg you will find a Crumpled Map on the floor. Click it and get the quest [35] A Sign of Hope. Then keep on killing Dark Dwarves until you get Ryedol’s Lucky Pick.
- Then go northeast to Camp Kosh where you can find the Supply Crate. (67,22)When you got the crate, go back to Prospector Ryedol south of Hammertoe’s Digsite and turn in the quests.
Get the follow up [39] Scrounging from Sigrun Ironhew. - Go south to Agmond’s End and find a Battered Dwarven Skeleton (50,62), click it and complete the quest and get the follow up [42] Murdaloc.
- Kill 12 Stonevault Bonesnapper and Murdaloc, you can find him inside the camp next to the Dwarven Corpse. Keep killing those Troggs until you get 10 Indurium Flakes as well.
- Once both quests complete go south into the mountains and kill Rock Elementals at (40,73) until you get 3 Large Stone Slabs.
- Go west to the ogre area named Camp Cagg (10,72), kill ogres there until you get 7 Scrap Metal. This may take a while.
- Go north to Apocryphan’s Rest (16,60) and kill Buzzards / Coyotes until complete [40] Barbecued Buzzard Wings and [39] Badlands Reagent Run.
When that is done, go east to Martek the Exiled (42,52) and turn in the quests [39] Indurium and get the follow up [38] News for Fizzle. Turn in [40] Barbecued Buzzard Wings to Rigglefuzz as well. Repair and sell while you are here.
Then go northeast and turn in [40] Scrounging at Sirun Ironhew.
After that go west to Lotwil Veriatus and turn in the quest, get the follow up [42] Study of the Elements: Rock.
You should be getting close to level 40 at this point, about 35000 xp to go normally, if you still follow the “kill everything on your way” rule. Go grind on Rock Elementals or Lesser Rock Elementals, Dark Dwarves or Troggs. There are a lot of Dwarves at the Angor Fortress. It’s up to you. Should take about 1h30 of grinding.
It went quite well for me, I was doing 41000 XP/Hour before I got to the grinding part. This is my XP rate starting from the moment I talked to Propector Ryedoll until level 40.
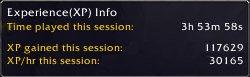
So that’s approximately 1 level and a half in 4 Hours. If you can do better, I would love to know!
Level 40
- At level 40 warp to Ironforge, train skills, repair, auction house, etc. Go get your mount if you can afford it (if not, you should soon, cause there is more elemental killing and grinding to do )
- When ready to go, fly to Thelsamar, turn in [39] Badlands reagent run. Go to Prospector Ironband and turn in [42] Murdaloc. Then go back to the Badlands.
- Go to the southwestern part of the map (17, 83) and kill Greater Rock Elementals until you get 5 Bracers of Rock Binding. There’s another camp of Greater Rock Elementals further to the west past the Ogres (6,83).
This will be hard because some of the elementals are level 44. Try to find level 42 or 43 ones if the level 44 are too hard for you. - When you are done, grind until you are about 5000 xp or less from level 41. Grind on Elementals, or Dwarves, up to you. Warning: This is a long grinding session, if grinding is too boring for you, then by all means do something else, go to Scarlet Monastery a few times for exemple. Also one of the reasons for grinding here even though we got a few quests we could do in Stranglethorn Vale is that I want to save these quests for later so we can do the whole rest of Booty Bay quests in one run. So right now we are already setting up a very juicy XP session for the future.
- Once you are 5000 xp away from level 41, go to Lotwil Veriatus, turn in [42] Study of the Elements: Rock and get the follow up [42] This is Going to Be Hard. Then go talk to his assistant Lucien Tosselwrench. Get quest [42] Stone is Better than Cloth and complete it, as you should still have the patterned bracers. This will make you ding level 41.
This grinding sessions was tested by 3 different characters, the XP/Hour rate was in between 22000 XP/HOUR and 26000 XP/HOUR depending of the class. And there is still a nice little XP boost to come when completing the following steps. So grinding isn’t bad at all, of course it’s not as good as an optimized quest circuit, but it’s still decent and you will see for yourself, it will bring a nice sum of cash. The stones from the elementals stack and sell nicely at the merchant, plus, they drop Elemental Earth which goes for at least 50 silver each at the AH. Same thing with the Dwarves, they drop Silk and sometimes Mageweave. Sell Silk / Mageweave at the AH and you’ll get ‘rich’ quickly.
Level 41
Complete [42] This is going to be hard and get the follow up. Talk to Lotwil and complete the quest but BEFORE you accept the next step from Lotwil, be warned: A level 45 Elemental will spawn and you will have to defeat it. At level 41 this is hard but possible for every class. Just use every long cooldown ability you have as well as potions. Loot “Lotwil’s Shackles of Elemental Binding” from the Fam’retor Elemental and go turn in the quest to Lotwil. Congratulations, you are done with Badlands and with the first Chapter of this leveling guide! Warp to Ironforge and sell / repair / auction etc.
-Jame
© Copyrights www.wow-pro.com All Rights Reserved