
 by Jame
Journey from Borean Tundra to Howling Fjord
![]()
All the guides on wow-pro are FREE, there is no trick, they are just free and will remain free.
Enjoy and please contribute or Leave a tip!
70-80 WotLK Classic Leveling Guides
Alliance
- Jame’s Alliance Leveling Guide – Borean Tundra (70-72)
- Jame’s Alliance Leveling Guide – Howling Fjord (72-74)
- Jame’s Alliance Leveling Guide – Dragonblight (74-75)
- Jame’s Alliance Leveling Guide – Grizzly Hills (75-77)
Horde
- Jame’s Horde Leveling Guide – Howling Fjord (70-72)
- Jame’s Horde Leveling Guide – Borean Tundra (72-74)
- Jame’s Horde Leveling Guide – Dragonblight (74-75)
- Jame’s Horde Leveling Guide – Grizzly Hills (75-77)
1-70 Leveling Guides
For guides covering levels from 1-70, please check this link:
1-70 Wow Classic Leveling Guides
Support my work
Question– Your guides really helped me out and I want to return the favor, what can I do to help?
Answer– Here’s how you can contribute:
1. Most important and easiest way to help: Spread the word. Tell people about my guide. Your friends, guildmates, boards you visit. Tell them that they are FREE and that they make you level much faster than other guides or questhelper.
2. When you try my guides, if you find any mistakes, leave a comment.
3. Post useful comments here. When people ask for advices and you know the answer, go for it and help them out, so I won’t have to do it myself 😛
4. And then of course, you can write a guide about an area of the game where you’re good. Direct message me on Twitter if you want to become an editor on Wow-pro!
5. You can also translate guides into other languages, if you are fluent in another language. Check our Guides in Other Languages section to see what has already been translated.
6. Leave a tip to the author of these guides : Donate!
Introduction
This guide is made for FAST leveling through the use of Optimized Quest Circuits. With this guide, questing will be very efficient and you’ll not waste any second running around and trying to figure out in which order to do your quests. Follow each instruction carefully and you will see for yourself. The quest choices and order to do them are optimal so that you run as few as possible while doing the most possible, turning several quests at the same time. It will be like grinding, because you’ll be killing stuff almost non-stop, besides you’ll also be completing a bunch of quests at the same time!
NOTE: Following this guide will get you the Quest Achievement for Borean Tundra: Nothing Boring About Borean. In fact, 100% of the quests of Borean Tundra are included in the guide, or at least mentioned as optional.
You’ll also get this achievement on the way: D.E.H.T.A’s Little P.I.T.A..
Everything described in this guide can be done solo (beside when I say otherwise). You can, of course, follow this guide while duoing, grouping, it’s not a problem, it works too.
DISCLAIMER: This guide does NOT take into account tradeskills, class specific quests or PvP. It’s 100% focused on getting the most experience possible in the shortest possible time while doing a lot of quests and enjoying as much content as possible. Any race/class combination can do this guide. Any complaints about PvP, tradeskills, or class specific issues will be ignored.
Basic rules
- Spend your talent points so that you kill things as fast as possible. (e.g: Priest should specialize in Shadow Talents, Warriors in Arms/Fury, etc.
- Don’t waste your time trying to find groups for questing, you can solo everything that is described in this guide unless I say otherwise. Only group with someone when it’s not gonna be a waste of time (e.g: meeting the person at the other end of the zone to show him the way to where your quest is, that is a waste of time)
- Try to always log out in an inn or in one of the major cities when you take a break.
Shopping List:
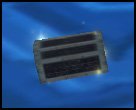
Level 71 – Overcharged Capacitor – Made by Engineers with 375+ skills. The materials are quite easy to get so it shouldn’t be too diffcult. Mail this item to yourself and leave it in the mail until I tell you to grab it.
Color Code:
- Quests
- Items
- Locations
- Quest objectives to kill
- NPCs
- Locs
The Guide:
Go to Stormwind Harbor, go to the northern pier, take the boat to Borean Tundra. The boat will take you to Valiance Keep.
==Note== Zoom out your minimap to the maximum, it’s easier to find quests that way.
In Valiance Keep, get the quest [71] Enlistment Day.
 Get the new flight path.
Go south to the barracks, go up a floor and into the main room. Turn in [71] Enlistment Day, get [71] A Time for Heroes.
Get out of the barracks, go to Sergeant Hammerhill and turn in [71] A Time for Heroes, get [71] The Siege.
Also get [71] A Soldier in Need from Medic Hawthorn just outside the gates.
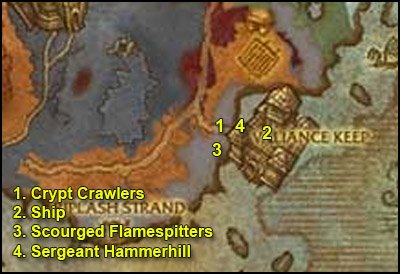
1. Kill 6 Crypt Crawlers.
Go back to Sergeant Hammerhill, turn in [71] The Siege, get [71] Death From Above.
2. Go back to the keep and go inside the ship’s cargo. Kill the cultists in there and right-click the First Aid Supplies.

Loot Hawthorn’s Anti Venom.
Also right-click the Cultist Shrine and get the quest [71] Cultists Among Us.
Go to Captain “Lefty” Lugsail on the upper deck of the ship. Turn in [71] Cultists Among Us and get [71] Notify Arlos.
Go back to Medic Hawthorn, turn in [71] A Soldier in Need.
3. Go just a little south, look above and you’ll see Scourged Flamespitters.
 Target one and use the Reinforced Net.
Kill it. Repeat this 6 times.
4. Go back to Sergeant Hammerhill, turn in [71] Death From Above, get [71] Plug the Sinkholes.
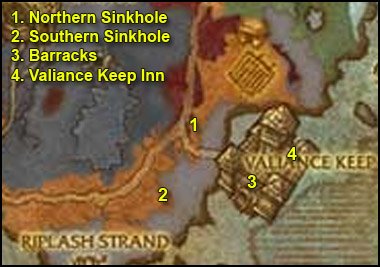
1. Ride northwest to (54,64). There you’ll find the Northern Sinkhole.

 Right-click the Incendiary Explosives next to them.
2. Ride south/southwest to the Southern Sinkhole (51,72). Blow it up.
3. Go back to Valiance Keep. Turn in [71] Plug the Sinkholes, get [71] Farshire.
Get [71] Word on the Street from Mark Hanes, standing a few feet away.
Go to the barracks, turn in [71] Notify Arlos, get the newly available quests:
- [71] A Diplomatic Mission
- [71] Enemies of the Light
4. Go to the Valiance Keep Inn (59,68). On the upper floor you’ll find Leryssa. Turn in [71] Word on the Street, get [71] Thassarian, My Brother.
Also get all the other available quests from around the inn:
- [71] Nick of Time
- [71] Distress Call
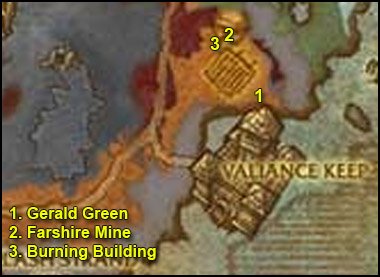
1. Take the northern exit of Valiance Keep, go further north and you’ll find Gerald Green (58,63). Turn in [71] Farshire, get [71] Military? What Military?.
2. Go north/northwest to the Farshire Mine (57,57).
You should see two yellow “?“s on your minimap. Go to the first one, turn in [71] Military? What Military? and get [71] Pernicious Evidence.
Go to the 2nd one, turn in [71] Thassarian, My Brother, get [71] The Late William Allerton.
Get out of the mine, go back to Gerald Green, turn in [71] Pernicious Evidence and get the 3 available quests:
- [71] It’s Time for Action
- [71] Take No Chances
- [71] Reference Material
==Note== From now on, kill Plagued Scavengers on the way and look for Farshire Grain.
 Right-click Wendy’s Torch near them.
3. Go north/northwest to the burning building next to the mine (56,58). Look for a red book called Fields, Factories and Workshops.
Loot it.
Finish the other two quests and go back to Gerald Green. Turn in:
- [71] It’s Time for Action, get [71] Fruits of Our Labor
- [71] Take No Chances
- [71] Reference Material, get [71] Repurposed Technology
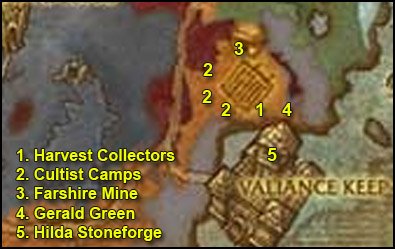
1. About 100 yards west of here you should find a small patch with Harvest Collectors.
 Kill one, loot it, target its corpse and use Jeremiah’s Tools on it.
Do that for all the Harvest Collectors you find on your way from now on.
2. Further west you should find three camps of Cultist Necrolytes channeling magic around pink summoning circles at (56, 63), (54,62) and (54,60).
Kill Cultists Necrolytes until one drops a Cultist Communique.
3. Go to the Farshire Mine again. Go to the end of the mine, kill Captain Jacobs and loot the Cart Release Key.
Go back a few steps and locate a cart with a Cart Release Lever.
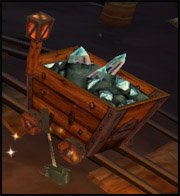
Right-click it.
Now get out of the mine and finish [71] Repurposed Technology.
4. Go back to Gerald Green, turn in:
- [71] Fruits of Our Labor, get [71] One Last Delivery
- [71] Repurposed Technology
5. Go back to Valiance Keep, turn in [71] One Last Delivery at Hilda Stoneforge (57,67). Get the follow up [71] Weapons for Farshire.
Sell junk, repair and re-stock food/drink.
Go to the barracks, to the upper floor, turn in [71] Enemies of the Light, get [71] Further Investigation.
Go to the inn, go to the upper floor and turn in [71] Further Investigation at Vindicator Yalaa. Get the follow up [71] The Hunt is On.
Turn in [71] The Late William Allerton at Leryssa, get [71] Lost and Found.
Go down and turn in [71] Lost and Found, get [71] In Wine, Truth.
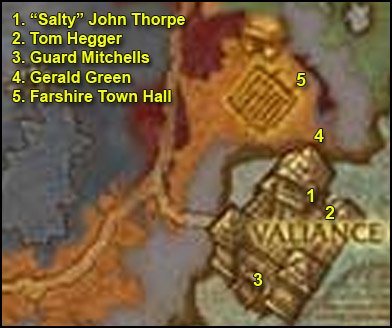
1. Go to the kitchen, where you should find “Salty” John Thorpe (59,67).
 Right-click the Oculus of the Exorcist.
Talk to “Salty” John Thorpe and click on the text. Kill him when he turns agressive.
2. Get out of the inn, turn left and go down to the docks, where you should find Tom Hegger (59,69).
Use the Oculus of the Exorcist, talk to Tom Hegger and kill him.
3. Mount up, go to the barracks, go to the jail downstairs where you should find Guard Mitchells (57,72).
Use the Oculus of the Exorcist, talk to Guard Mitchells and kill him.
Go back to Vindicator Yalaa at the inn, turn in [71] The Hunt is On.
4. Get out of the inn, mount up and go back to Gerald Green, turn in [71] Weapons for Farshire, get [71] Call to Arms!
5. Ride north/northwest to the Farshire Townhall (57,59). Go to the upper floor and you should see a Bell Rope there.
Right-click it.
Go back to Gerald Green and get your blue reward.

1. Make sure you don’t kill any animal on the way for now, or you’ll get attacked on sight by the whole camp where we’re going.
 If you killed an animal, just wait for the Animal Blood debuff to fade from you or simply jump into some water and it will remove the debuff.
Ride northwest until you hit the road, follow it north to the D.E.H.T.A. Encampment (57,44).
Get the quest [72] A Mission Statement and turn it in immediately.
A bunch of quests should be available now, take them all:
- [72] Ears of Our Enemies
- [72] Happy as a Clam
- [72] Help Those That Cannot Help Themselves
- [72] Ned, Lord of Rhinos…
- [72] Unfit for Death
==Note== From now on kill any Loot Crazed Poacher, Hunter or Diver on your way
2. Go to the field south of the D.E.H.T.A camp, look for Caribou Traps.
 Right-click your Pile of Fake Furs while standing next to the traps.
Repeat 8 times.
3. Go west to Lake Kum’uya (53,45), go westwards through the lake while killing 10 Loot Crazed Divers.
4. On the western side of the lake, go up the high bluffs and look for Nedar, Lord of Rhinos (47,44). He roams in the field (as colored on the map).
He’s kinda easy for an elite. Kill him and his mount “Lunchbox”.
5. Go east/northeast and look for Trapped Mammoth Calfs, you can find them in the area I colored on the map.
 Stand next to them and right-click your D.E.H.T.A Trap Smasher.
Repeat 8 times.
6. If you don’t have 15 Nesingwary Lackey Ears at this point, go get the rest then go back to D.E.H.T.A Encampment. Turn in:
- [72] Unfit for Death, get [72] The Culler Cometh
- [72] Happy as a Clam, get [72] The Abandoned Reach
- [72] Ned, Lord of Rhinos…
- [72] Help Those That Cannot Help Themselves, get [72] Khu’nok Will Know
- [72] Ears of Our Enemies, no need to get the follow up
(It’s just a repeatable quest you can turn in anytime you want, should you get extra 15 Ears)
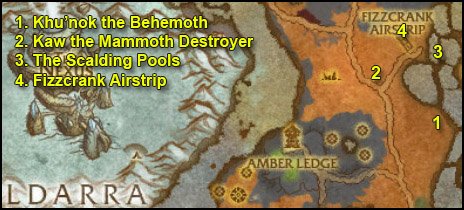
1. Ride north to Khu’nok the Behemoth (59,30). Turn in [72] Khu’nok Will Know, get the follow up [72] Kaw the Mammoth Destroyer.
2. Find a Wooly Mammoth Bull, they should no longer be agressive towards you now. Right-click it to mount it.
Once you mount a Wooly Mammoth Bull, you’ll get the following action bar:
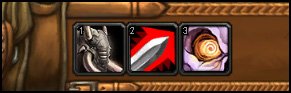
Ability #1 AoE Damage, short cooldown, use it everytime it’s up.
Ability #2 It’s a charge stun. Use it whenever it’s up. For that, you have to run away to get a little bit of range and then re-cast it.
Ability #3 It’s an AoE Fear and it only works on Kaw’s minions, which you don’t need to fear anyway because they’ll die to Ability #1 very fast.
Basically, kill Kaw’s mount with Ability #1 and then you can “kite” Kaw. Run away from him, use the charge stun and follow it up with Ability #1. Run away again and repeat, you should take no more damage after Kaw’s Mount is dead.
Now that’s you’re prepared, ride northwest to (54,24), you’ll find Kaw the Mammoth Destroyer there. When you get close, he’ll jump on his mount and attack you.
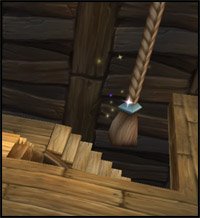
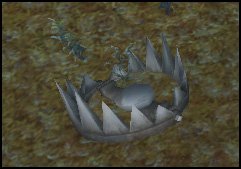
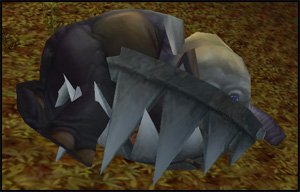
Kill his mount, then kill him and his halberd will appear on the floor.
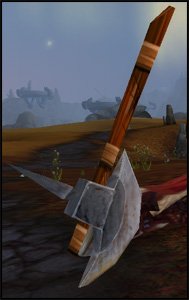
Loot Kaw’s War Halberd.
==Note== The Halberd can be looted even if someone else killed Kaw.
3. Go northeast to the Scalding Pools (59,22). Kill robots there (Scavenge-bot 004-A8, Sentry-bot 57-K or Defendo-tank 66D) until one drops The Ultrasonic Screwdriver.
 Right-click it to start [71] The Ultrasonic Screwdriver.
4. Go northwest to Fizzcrank Airstrip (57,20).
Get the new flight path.
Turn in [71] Distress Call at Fizzcrank Fullthrottle, he is on the upper floor of the inn (there’s a small elevator in it). Get the follow up [71] The Mechagnomes.
Talk to Fizzcrank Fullthrottle and go through his text until you complete the quest.
Get out of the inn turn in:
- [71] The Mechagnomes, get [71] Re-Cursive
- [71] The Ultrasonic Screwdriver, get [71] Master and Servant
Also get all the available quests:
- [71] Dirty, Stinkin’ Snobolds!
- [71] King Mrgl-Mrgl
- [71] What’s the Matter with the Transmatter?
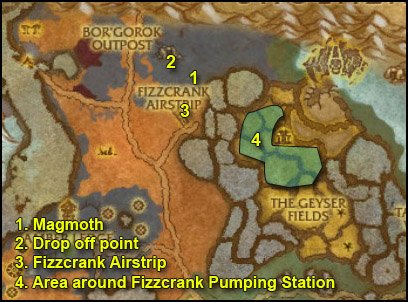
1. Go north to Magmoth (58,15). Look for Crafty’s Stuff while going through the next steps.
==Tip== If you fight Magmoth Shamans, kill the Fire Totems first before the shamans, they hurt but they die in one hit.
2. Clear the way northwest and you’ll find a hole entrance at (55,12). Jump from the spot shown on the video below and you should land in the water. Down there you should find Bonker Togglevolt.
Video: Shortcut to Bonker Togglevolt
If he’s not there it just means someone else is already doing the escort quest, so just kill stuff around here while waiting for him to come back.
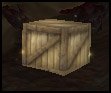
Get the quest [72] Get Me Outa Here! and escort him out while looting as many Crafty’s Stuff as you can.
3. Once you’ve escorted Bonker successfully, get the last crates you need while going back to Fizzcrank Airstrip.
Turn in:
- [72] Get Me Outa Here!
- [71] Dirty, Stinkin’ Snobolds!, get [71] Just a Few More Things…
4. Go southeast to the area around the Fizzcrank Pumping Station. There are 3 things we need to do on the way:
- Pick up Fizzcrank Spare Parts.
 Kill Fizzcrank Mechagnomes, loot them and then use the Re-Cursive Transmatter Injection on their corpse. You can find a lot of those gnomes under and on the pumping station itself.
- Kill robots on your way, loot them and then use The Ultrasonic Screwdriver on their corpses.
Follow the pipeline southeast until you reach the Pumping Station (64,23). There you should find Crafty’s Tools.
Loot them.
Now finish [71] Re-Cursive, then go back to Fizzcrank Airstrip. Turn in:
[71] Re-Cursive, get [71] Lefty Loosey, Righty Tighty.
Go inside the inn and up the elevator, get [71] Finding Pilot Tailspin from Fizzcrank Fullthrottle.
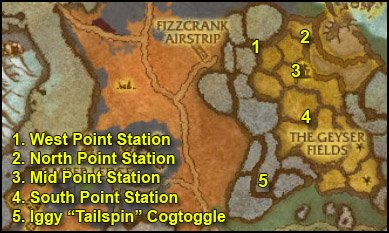
1. Follow the pipeline southeast until you reach West Point Station (60,20).
Right-click the West Point Station Valve. Twonky will spawn and attack you, kill it.
2. Go east/northeast to North Point Station (65,18). Click the valve, kill ED-210.
3. Go south/southwest to Mid Point Station (64,22). Click the valve, kill Max Blasto.
4. Go south/southeast to South Point Station (65,29). Click the valve, kill The Grinder.
==Note== Finish gathering Fizzcrank Spare Parts before going to the next step.
5. Mount up, ride southwest to Iggy “Tailspin” Cogtoggle (62,36). Turn in [71] Finding Pilot Tailspin, get [71] A Little Bit of Spice.
==Note== The robots in this area also count for [71] Master and Servant
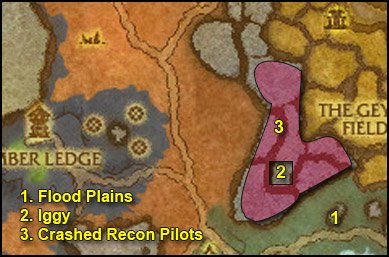
1. Ride southeast to the Flood Plains (65, 41). Kill gorlocs there until you loot 4 Gorloc Spice Pouches. There are more gorloc camps east of this one if you need.
2. Go back to Iggy, turn in [71] A Little Bit of Spice, get [71] Lupus Pupus.
 Target an Oil-stained Wolf and right-click the Wolf Bait from your inventory.
Right-click the Wolf Droppings and loot the Microfilm. There are more wolves in the pools all around this one. Keep doing this until you get 8 Microflims.
Then turn in [71] Lupus Pupus, get [71] Emergency Protocol: Section 8.2, Paragraph C.
3. Now look for Fizzcrank Recon Pilots.
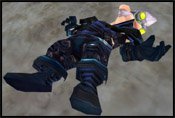
Right-click them and search their bodies to get Fizzcrank Pilot’s Insignias. They can be found in the southern half of the Scalding Pools, as shown on my map. You can do that while staying mounted, even if attacked. Gather 6 Fizzcrank Pilot’s Insignias.
When done, go back to Iggy, turn in [71] Emergency Protocol: Section 8.2, Paragraph C, get [71] Emergency Protocol: Section 8.2, Paragraph D.
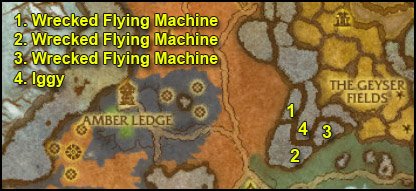
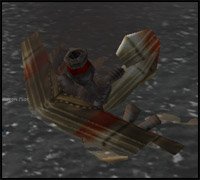
1. Go northwest to (61,34). There you should find a Wrecked Flying Machine.
 Right-click the Emergency Torch next to it.
2. Go south to (61,40). There should be another Wrecked Flying Machine. Use the Emergency Torch.
3. Go northeast to (63,37). There should be another Wrecked Flying Machine. Use the Emergency Torch.
4. Go back to Iggy, turn in [71] Emergency Protocol: Section 8.2, Paragraph D, get [71] Give Fizzcrank the News.
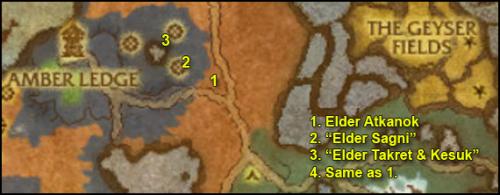
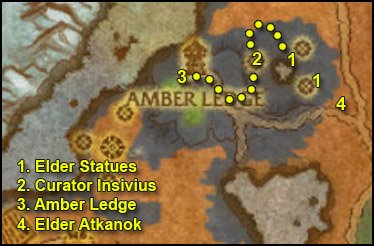
1. Ride west to a rock called Elder Atkanok (55,36). Get both quests from here:
- [72] The Honored Ancestors
- [72] Reclaiming the Quarry
2. Go down in the Coldrock Quarry. Kill Beryl Treasure Hunters on sight as you go.
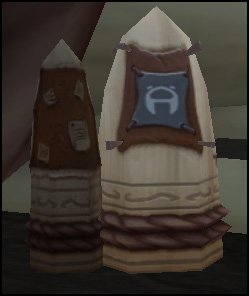
Just a little down the first slope you should find the first elder you need to identify: “Elder Sagni” (53,34).
Right-click it.
3. Go a little further northwest until (52,32). You should see the two elders you’re missing to your left and right. Right-click Elder Takret and Elder Kesuk.
Go back to Elder Atkanok, turn in [72] The Honored Ancestors, get [72] The Lost Spirits.
Go back in the quarry. Kill a Beryl Hound and loot its Core of Malice.
 Use the Core of Malice on Kaskala Craftsmen and Kaskala Shamen to free them.
Repeat this until you finish [72] The Lost Spirits. There are many Beryl Hounds at (52,31).
Kill the remaining Beryl Treasure Hunters you need for [72] Reclaiming the Quarry.
4. Go back to Elder Atkanok. Turn in:
- [72] The Lost Spirits, get [72] Picking Up the Pieces
- [72] Reclaiming the Quarry, get [72] Hampering Their Escape
==Note== Look for Tuskarr Ritual Objects while following the next steps.
1. This time, we’re not going inside the quarry, but around it. Follow the cliff line south of the quarry, kill Beryl Reclaimers until one drops a Gnomish Grenade.
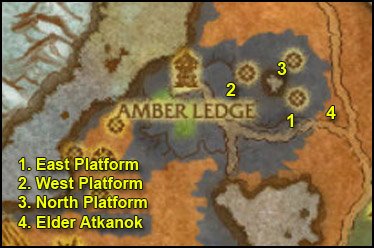
Get close to the East Platform (53,35) as shown on the screenshot below.
 Right-clik the Gnomish Grenade.
2. Get another grenade. Go further west along the cliff line until (50,34) and destroy the Western Platform.
3. Go down inside the quarry, clear the way to the North Platform (52,32). Stand under it and use a grenade.
4. Gather the last Tuskarr Ritual Objects you need and then go back to Elder Atkanok. Turn in:
- [72] Picking Up the Pieces, get [72] Leading the Ancestors Home
- [72] Hampering Their Escape, get [72] A Visit to the Curator
1. This quest is exactly like the first one we did in the quarry with the 3 Elders we identified. You have to go to the exact same 3 stones.
 Besides this time, whenever you stand next to one of the stones, right-click the Tuskarr Ritual Object.
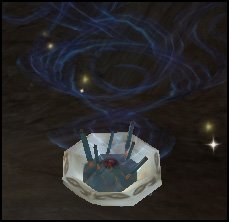
2. Go up the slope northwest until you are out of the quarry, then go west and then south along the cliff edge until you find Curator Insivius on a blue platform at (50,32). Kill him.
3. About 200 yards south of this platform you should find a path going up towards Amber Ledge at (50,36). Ride to Amber Ledge.
Get the new flight path.
4. Go back to the quest givers, turn in:
- [72] Leading the Ancestors Home
- [72] A Visit to the Curator
We’re done here.
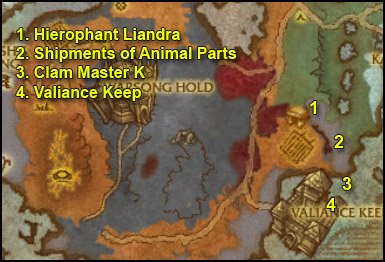
1. Ride south/southeast to Hierophant Liandra (58,55). Turn in [72] The Abandoned Reach, get [72] Not On Our Watch.
2. Go southeast towards the shore, kill Northsea Thugs on your way and loot Shipment of Animal Parts. They drop from Northsea Thugs and can also be found on the floor.

Go back to Hierophant Liandra, turn in [72] Not On Our Watch, get [72] The Nefarious Claim Master…
3. Mount up, ride southeast all the way to the shore, dive in the water and you should see a wrecked ship at the bottom of the sea (62,66).
Around that ship you should find Clam Master K, kill him.
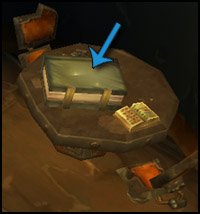
At the bottom of the ship you should also see a Wine Crate.
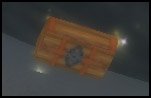
Right-click it to loot the Kul’Tiras Wine.
4. Swim southwest back to Valiance Keep. Go to the inn, turn in [71] In Wine, Truth, get [71] A Deserter.
Get out of the inn, mount up and ride to the barracks, go down to the jail and turn in [71] A Deserter, get [71] Cowards and Fools.
Sell junk, repair and re-stock food/drink.
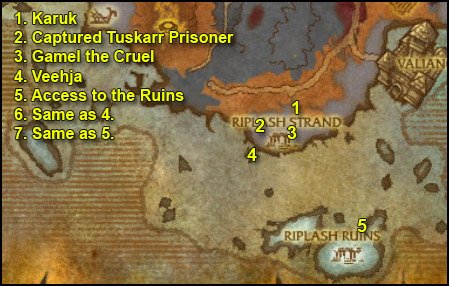
1. Ride southwest to Karuk (47,75). Turn in [71] A Diplimatic Mission and get the follow up [71] Karuk’s Oath.
2. Go down to Riplash Strand and go west until you see a Captured Tuskarr Prisoner, fighting a naga at (44,78).
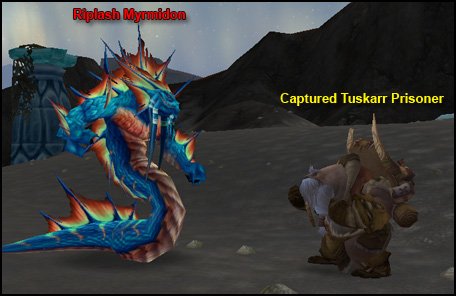
Help the tuskarr to kill the naga and he’ll give you a quest [71] Cruelty of the Kvaldir.
Now kill what you still need for [71] Karuk’s Oath.
Go back to Karuk, turn in [71] Cruelty of the Kvaldir and [71] Karuk’s Oath, get the follow up [71] Gamel the Cruel.
3. Go south to a cave at (46,79). Go inside and kill Gamel the Cruel.
Go back to Karuk, turn in and get the follow up [71] A Father’s Words.
4. Go precisely southwest to Veehja (44,80).

Turn in and get the follow up [71] The Trident of Naz’jan.
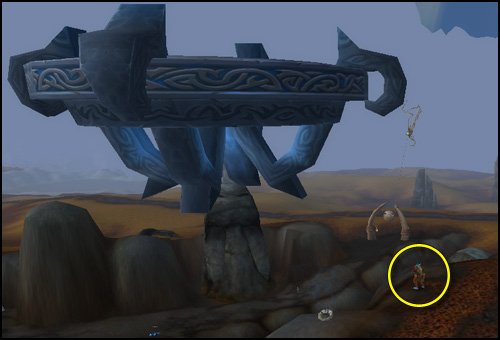
5. Swim east/southeast towards a big tower far in the distance. There you’ll find a spot where you can jump out of the water, as shown on the image below:
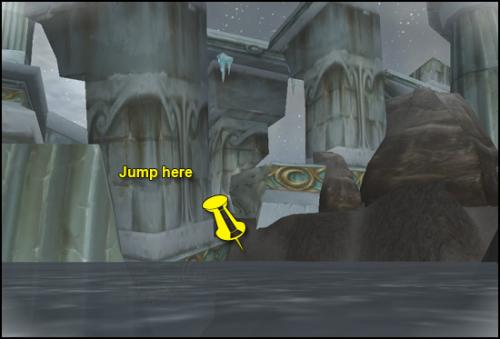
From there you’ll see some stairs to your left.
At the top of those stairs you’ll find Ragnar Drakkarlund. Kill him and loot the Trident of Naz’jan.
6. Swim west/northwest back to Veehja, turn in [71] The Trident of Naz’jan, get the follow up [71] The Emissary.
7. Go back to spot 5.
 Look in your inventory for the Trident of Naz’jan, put it on an action bar.
This time instead of going up on the isle, we’re going to swim down and look for Leviroth, a big monster at the bottom of the sea. Make sure your breath is full before you dive in.
Use the Trident of Naz’jan on Leviroth and then finish him off.
When done with that, swim northwest back to the mainland, go to Karuk and turn in [71] The Emissary.
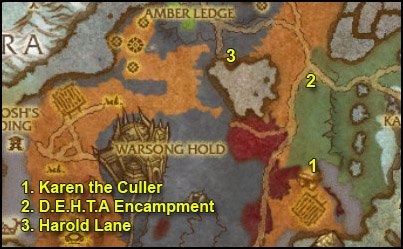
1. Go northeast to the end of the cliff at (57,56). There you should find Karen “I Don’t Caribou” the Culler . She has two guards, stealthed. It’s still an easy fight, no elites. Kill her.
2. Go back to D.E.H.T.A Encampment. Turn in everything:
- [72] The Nefarious Claim Master…
- [72] The Culler Cometh
- [72] Kaw the Mammoth Destroyer
Get the final quest from D.E.H.T.A Encampment: [72] The Assassination of Harold Lane. You can also turn in extra ears if you got 15 of them to get the buff, which will be help you solo our next quest.
3. This quest has you kill Harold Lane, an elite humanoid located on the northwestern side of Lake Kum’uya (50,42). He can probably be solo’d by any class if done properly, thanks to an item provided for the quest, the Cenarion Horn.
 I recommend using the horn right after you start the fight, this will stun Harold Lane for a few seconds and take a large chunk out of his HPs (about 50%), as long as the whole stampede tramples over him. So make sure he doesn’t move. Stand still while you cast the horn.
Then you have to take care of the rest of his health. Harold Lane can be stunned and his movement can be slowed. Use every cooldown you got and you should be fine. Health pot too if needed.
==Tip== Melee classes, when he drops his trap, move away fast before it activates, that way you won’t get rooted.
If you don’t manage to solo it, because of your class or your lack of gear, try to find help, with two people this quest is a pushover, because you get to use 2 Stampedes on poor Harold Lane.
Once you’ve killed him, go back to D.E.H.T.A encampment, turn in [72] The Assassination of Harold Lane. Congratulations on your achievement.
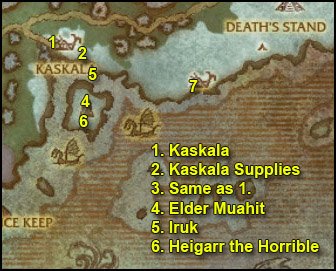
1. Go east to Kaskala (64,46). Turn in [71] Cowards and Fools, get [72] The Son of Karkut.
Get the two other quests:
- [72] Not Without a Fight!
- [72] Preparing for the Worst
2. Kill 12 Kvaldir Raiders and pick up 8 Kaskala Supplies.
There are a lot of those supplies further sourtheast down the shore (73,53).
3. Go back to the quest givers, turn in:
- [72] Not Without a Fight!, get [72] Muahit’s Wisdom
- [72] Preparing for the Worst
4. Go to the isle southeast and find Elder Muahit (67,55). Turn in [72] Muahit’s Wisdom, get [72] Spirits Watch Over Us.
5. Go directly north of here and a little bit northeast, dive in the water and look for Iruk (68,50). He’s directly under the last “A” of Kaskala on the map.
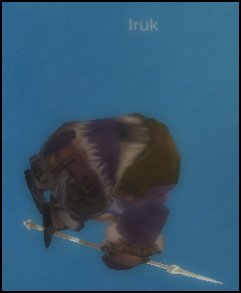
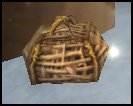
Right-click it and search for Issliruk’s Totem.
Go back to Elder Muahit. Turn in [72] Spirits Watch Over Us, get [71] The Tides Turn.
6. Go a little south and kill Heigarr the Horrible (68,56).
Go back to Elder Muahit, turn in [71] The Tides Turn.
Hotawa (who is standing next to Elder Muahit) should now offer you the quest [72] Travel to Moa’ki Harbor. Take it.
7. Swim east and go to Unu’pe (78,52).
Sell junk and repair. Re-stock food/drink.
Get the new flight path.
Fly to Fizzcrank Airstrip. Turn in:
- [71] What’s the Matter with the Transmatter?, get [71] Check in With Bixie
- [71] Give Fizzcrank the News
- [71] Lefty Loosey, Righty Tighty, get [72] The Gearmaster
 Make this inn your home location.
Get out of the inn and get [71] Scouting the Sinkholes from Abner Fizzletorque.
You should be level 71 by now.
Level 71
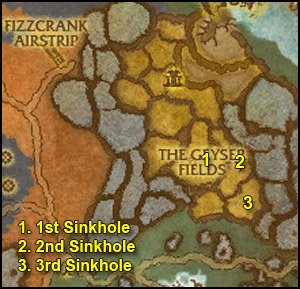
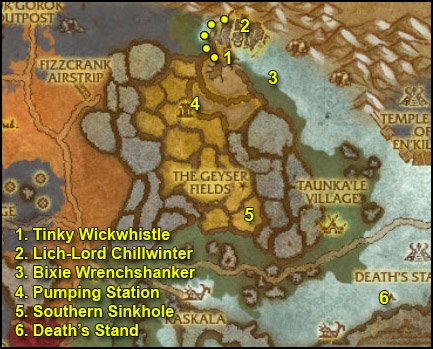
1. Go southeast to the Geyser Fields, where you’ll find the first sinkhole (66,33).
 Stand on it and right-click the Map of the Geyser Fields.
2. Go east to the 2nd sinkhole (70,32). Mark it.
3. Go south to the 3rd sinkhole (70,37). Mark it.
Hearthstone back to Fizzcrank Airstrip.
Turn in [71] Scouting the Sinkholes, get [71] Fueling the Project

1. Go to the pools southeast and look for Oil Slicks.
 Right-click the Portable Oil Collector near them.
Repeat this 8 times.
Also finish [71] Master and Servant if you haven’t already, there should be plenty of robots in this area.
Go back to Fizzcrank Airstrip, turn in:
- [71] Master and Servant
- [71] Fueling the Project, get [71] A Bot in Mammoth’s Clothing
2. Go to the plains southwest of Fizzcrank Airstrip. Kill Mammoths there (all of them, even the small calves) and loot 6 Thick Mammoth Hide.
Go back to Fizzcrank Airstrip, turn in [71] A Bot in Mammoth’s Clothing, get [71] Deploy the Shake-n-Quake!
3. Go to the Flight Master. Dismount and ask her to fly you to the “Dens of Dying to find Bixie.”
You’ll land next to Bixie Wrenchshanker (73,19), turn in [71] Check in With Bixie, get [71] Oh Great… Plagued Magnataur!
4. Go east toward the snowy hills, kill Plagued Magnataurs until you finish [71] Oh Great… Plagued Magnataur!
Go back to Bixie, turn in [71] Oh Great… Plagued Magnataur! and get [71] There’s Something Going On In Those Caves.
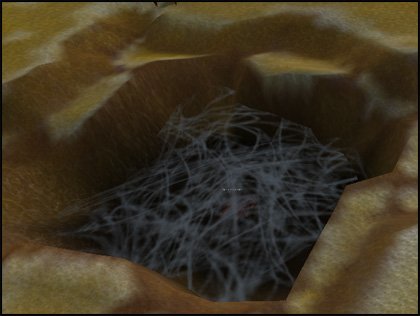
5. Ride east to a cave at (78,19). You should see a Plague Cauldron inside the cave.
 Stand close to the cauldron and right-click Bixie’s Inhibiting Powder.
Go back to Bixie, turn in [71] There’s Something Going On In Those Caves, get:
- [71] Rats, Tinky Went into the Necropolis!
- [71] Might As Well Wipe Out the Scourge
1. Ride northwest until the necropolis of Talramas. Kill any scourge on your way. Find the lower entrance on the southwestern side of the necropolis (69,15).
From there stick to the right and you’ll find Tinky Wickwhistle in a cage on the ground floor.
Turn in [71] Rats, Tinky Went into the Necropolis! and get [72] I’m Stuck in this Damned Cage… But Not For Long!
2. Get out of Talramas and ride to the other side of it (northern side), you should see Lich-Lord Chillwinter on the top of the necropolis. Kill him and loot the Piloting Scourgestone.
From there, look down in the room below and you should see Doctor Razorgrin. Jump down, kill him and loot the Magical Gyroscope.
Clear the way back down and kill Festering Ghouls until one drops an Engine-Core Crystal.
Once you have those 3 items, go back to Tinky. Turn in [72] I’m Stuck in this Damned Cage… But Not For Long! and get [71] Let Bixie Know.
If you still haven’t killed 20 Talramas Scourge, do it now
3. Ride southeast back to Bixie, turn in:
- [71] Might As Well Wipe Out the Scourge
- [71] Let Bixie Know, get [71] Back to the Airstrip
4. Ride west/southwest to the Fizzcrank Pumping Station. There’s a ramp northeastern side of the station, take it and go to the top of the station.
In a small cabin at the top of the station, you’ll find The Gearmaster’s Manual.
Loot it. Gearmaster Mechazod will spawn behind you and talk to you. After he’s done, kill him and loot Mechazod’s Head.
5. Get off the platform and ride southeast to the southern sinkhole we marked earlier (70,37).
 Right-click the Shake-n-Quake 5000 Control Unit.
Lord Kryxix will show up shortly after, kill him.
6. Ride southeast to Death’s Stand (82,47). Turn in [72] The Son of Karkut, get [72] Surrounded!
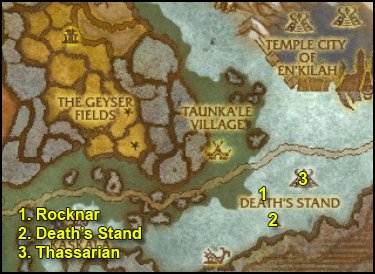
1. Go just a little north and kill Rocknar (81,43). Loot A Handful of Rocknar’s Grit.
Also kill 7 Ziggurat Defenders on the way, they are all around this place.
2. Go back to Death’s Stand, turn in [72] Surrounded! and get [72] Thassarian, the Death Knight.
3. Go northeast to The Wailing Ziggurat (85,42). You’ll find Thassarian in it, turn in [72] Thassarian, the Death Knight, get [71] Finding the Phylactery.
4. Ride northeast to a small pool (85,33.5). After you dismount, get back to full HP/mana, because you’ll get ambushed by 4 mobs in the water.
Once ready, dive in the pool and right-click the Frozen Phylactery. If it’s not there, it means someone did the quest recently, you’ll have to wait until the Frozen Phylactery respawns.
Defeat the Phylactery Guardian and loot Tanathal’s Phylactery.
Go back to Thassarian in the Wailing Ziggurat. Turn in [71] Finding the Phylactery, get [72] Buying Some Time.
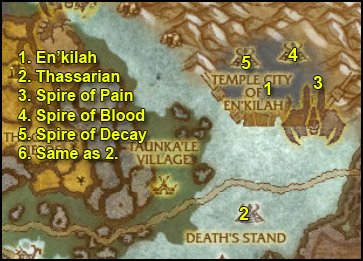
1. Ride northeast to the Temple City of En’kilah (84,32). Kill every scourge you see.
 You can use Lurid’s Bone whenever it’s up to help you kill faster.
Finish [72] Buying Some Time.
2. Go back to Thassarian. Turn in [72] Buying Some Time, get [72] Words of Power.
3. Go back to En’Kilah. First go east to the Spire of Pain (89,29).
Go inside, kill the two Mystical Webbing and then kill High Priest Talet-Kha. Loot High Priest Talet-Kha’s Scroll.
4. Go northwest to the Spire of Blood (88,22). Go to the upper floor, kill High Priest Andorath and loot High Priest Andorath’s Scroll.
5. Go west to the Spire of Decay (84,22). Kill the necromancers and then the boss. Loot High Priest Naferset’s Scroll.
6. Go back to Thassarian, turn in [72] Words of Power, get [72] Last Rites.
[72] Last Rites is a quest most classes won’t be able to solo, depending on gear as well. It can be duo’d easily if one of the two classes can heal (a Death Knight tanking and self healing can also work). Bringing 3+ players will make it a breeze though. If you don’t find help immediately, just skip the next part and go on with the guide. Just come back and read this part once you find a group for [72] Last Rites.
[72] Last Rites
After entering En’kilah. Look to your right and you’ll find the teleporter:
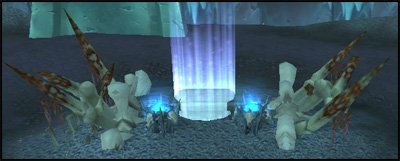
You’ll enter Naxxanar. If you want to get out, simply step on the green teleporter, right next to where you arrived.
In Naxxanar, take the upper teleporter (the blue one).
You’ll be teleported next to Thassarian. Read the following information about Prince Valanar before you tell Thassarian that you’re ready.
Prince Valanar
Abilities
- Immune to Stuns or to any form of cc
- Immune to any form of spell interruption
- Shadowbolts for 2K and hits fairly hard. If the person tanking is wearing cloth, leather or mail, I’d recommend not interrupting his spells, because they’ll probably do less damage than his melee hits (3K crits on a rogue for example). However, you can also try hiding behind walls to avoid his shadow bolts, using line of sight
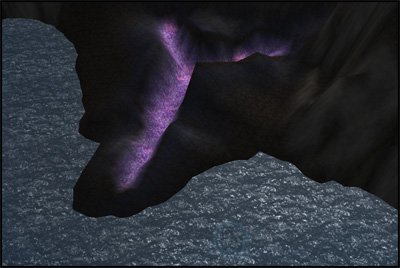
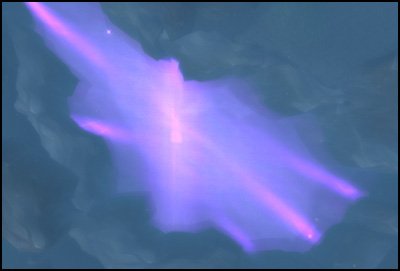
 !!Soul Deflection!! Stop attacking while he channels this. All the damage you do to him is reflected to you while under this spell. Watch out for this one. It’s easy to see when he does it, as he channels violet beams on everyone near him.
Tips
- Start slow, let Thassarian tank at the start. But don’t let him die though, he must survive or the quest will fail
- If you get low on health, just run away and run in circles under the platform until Valanar stops chasing you. Use line of sight to avoid the shadowbolts
==Note== If Thassarian dies, it’s not a big deal, Valanar will despawn too. 30 seconds later, Thassarian will respawn, talk to him again to re-start the event.
==WARNING== If you took the quest [72] The Lost Courier by mistake, abandon it.
Why? Because if you take this quest, you won’t be able to get a quest line in Howling Fjord later, which is basically a mirror quest line of this one, besides it’s better and fits into my guide better. So please, ABANDON [72] The Lost Courier.
Hearthstone to Fizzcrank Airstrip. If your hearthstone is not up, ride to Unu’pe and fly to Fizzcrank Airstrip.
Turn in:
- [71] Deploy the Shake-n-Quake!
- [71] Back to the Airstrip
- [72] The Gearmaster
Go to the mailbox and grab the Overcharged Capacitor I asked you to buy in the shopping list. If you don’t have it, no worries, you’ll finish this quest later when you get the item.
If you do have the Overcharged Capacitor, turn in [71] Just a Few More Things…, get [71] Hah… You’re Not So Big Now!.
Sell junk, repair and re-stock food/drink.
Go north to Magmoth.
 Look for Magmoth Crushers or Mates of Magmoth, use Crafty’s Ultra-Advanced Proto-Typical Shortening Blaster on them and kill them.
Repeat 5 times.
Go back to Fizzcrank Airstrip.
Turn in [71] Hah… You’re Not So Big Now!, get [71] Plan B.
Fly to Amber Ledge.
In Amber Ledge, turn in [71] Nick of Time, get [71] Prison Break.
Also get [71] Monitoring the Rift: Cleftcliff Anomaly
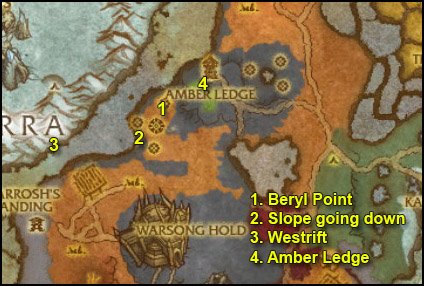
1. Go southwest to Beryl Point (43,37). Kill Beryl Mage Hunters until one drops a Beryl Prison Key.
Find an Arcane Prison.

Right-click it to free a Mage Prisoner.
2. Go further south. At (41,42) you’ll find a slope going down to the water.
3. Swim west/southwest to the Westrift (34,42)
 Right-click the Arcanometer while standing next to the rift.
4. Go back the way you came from and then ride back to Amber Ledge.
Turn in:
- [71] Prison Break, get [71] Abduction
- [71] Monitoring the Rift: Cleftcliff Anomaly, get [71] Monitoring the Rift: Sundered Chasm
Time for some mission impossible action. We’re gonna jump off a cliff and try to land in the water.
You need to have a 100% speed mount for it to work and you need to jump from the thin plank at the edge of the bridge, as shown on the image below:
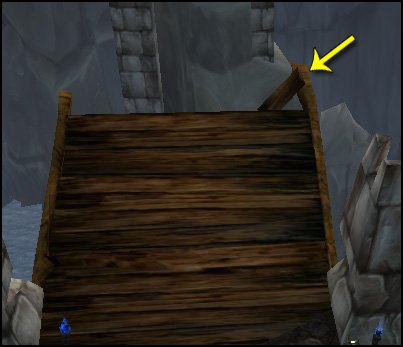
If you go splat it’s not a big deal, because you can ressurect immediately and try again.
If you don’t have a 100% speed mount or just don’t want to risk dying, there’s a path going down to the same spot at (43,35), easy to spot thanks to the blue torches.
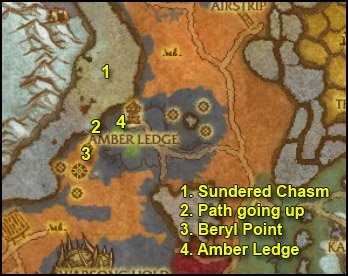
1. Swim north until (44,29). At this spot, dive down, all the way down to the rift.
Right-click the Arcanometer.
2. Swim back to the surface.
Swim south to the path lit by blue torches at (43,35).
3. Go up the path and you should be at Beryl Point. Find a Beryl Sorcerer, beat him down to below 25%HP.
 Right-click the Arcane Binder.
This should capture the Beryl Sorcerer.
4. Mount up, go back to Amber Ledge. Turn in:
- [71] Abduction, get [71] The Borean Inquisition
- [71] Monitoring the Rift: Sundered Chasm, get [71] Monitoring the Rift: Winterfin Cavern
Go inside the mage tower and turn in [71] The Borean Inquisition, get the follow up [71] The Art of Persuasion.
 Target the Imprisoned Beryl Sorcerer and right-click the Neural Needler several times, until he speaks.
Turn in [71] The Art of Persuasion, get [71] Sharing Intelligence.
Get out of the tower, turn in [71] Sharing Intelligence, get [71] A Race Against Time.
Go back down to Beryl Point, go to the biggest of the blue circles.
 Right-click the Beryl Shield Detonator.
Kill Inquisitor Salrand. After you kill her, Salrand’s Lockbox will appear on the floor.
Right-click it and loot Salrand’s Broken Key.
Go back to Amber Ledge, turn in [71] A Race Against Time, get [71] Reforging the Key.
Turn in [71] Reforging the Key at Surristrasz, that big red dragon. Get the follow up [71] Taking Wing.
Go southeast to Warmage Anzim, turn in [71] Taking Wing. Before you get the follow up, read the following lines.
When you take the next quest, you’ll fly on a drake and help rescue Evanor. All you have to do is right-click her cage once the drake drops you on the platform, and then let Evanor teleport you, stay close to her.
That’s it, now get [71] Rescuing Evanor.
==Warning== There’s a bug currently and this quest sometimes takes a very long time to appear (sometimes hours). If that happens, skip it, go to the dragon and ask him to fly you to the Transitus Shield, then follow the guide from there. When you’re done with the Coldarra part of the guide, you can come back here and this quest should be available.
After the teleport, turn in [71] Rescuing Evanor, get [71] Dragonspeak.
Get out of the tower, go to Surristrasz, turn in [71] Dragonspeak, get [71] Traversing the Rift. This will make you fly to Coldarra.
After landing, turn in [71] Traversing the Rift, get all the available quests from here:
- [71] Basic Training
- [71] Nuts for Berries
- [71] Reading the Meters
- [71] Secrets of the Ancients
- [71] Have They No Shame?
==Note== While following the next steps, complete the following objectives:
- Kill 10 Coldarra Spellweaver
- Kill Glacial Ancients until you have 3 Glacial Splinters
- Kill Magic-bound Ancients until you have 3 Magic-bound Splinters
- Look for Frostberry Bushes until you have 10 Frostberries.
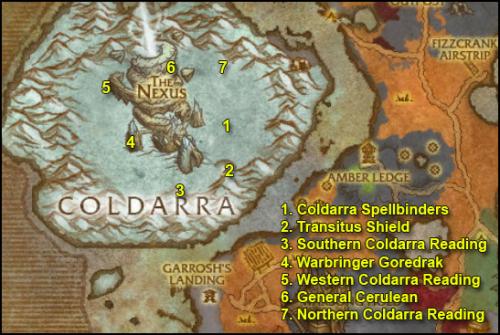
1. Go north towards the blue circle at (33,28) and kill Coldarra Spellbinders until one drops a Scintillating Fragment.
 Right-click it to start the quest [71] Puzzling…
2. Go back to Transitus Shield, turn in [71] Puzzling… and get [71] The Cell.
3. Follow the path west until (29,35), there you should find a Coldarra Geological Monitor.
Right-click it to get the Southern Coldarra Reading.
4. Go northwest to a blue circle at (24,30). Kill Warbringer Goredrak, loot the Energy Core.
5. Go further northwest to (23,24) and you’ll find another Coldarra Geologial Monitor. Right-click it to get the Western Coldarra Reading.
6. Go northeast to another blue circle (27,21), kill General Cerulean, loot the Prison Casing.
7. Go further east to (31,21), where you should find the Northern Coldarra Reading.
Go back to Transitus Shield. Turn in [71] The Cell.
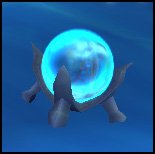
 Right-click your Augmented Arcane Prison.
Keristrasza will spawn. Get her quest [71] Keristrasza. Turn it in immediately and get the follow up [71] Bait and Switch.
Go back outside and look for Crystalyzed Mana.
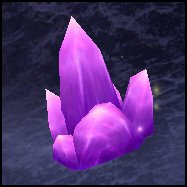
They can be found all around the Nexus.
Keep doing laps around the Nexus until you have 10 Crystalyzed Mana Shards and finish the 4 other objectives mentioned in the note above.
Go back to Transitus Shield, turn in all quests:
- [71] Basic Training, get [71] Hatching a Plan
- [71] Nuts for Berries, get [71] Keep the Secret Safe
- [71] Secrets of the Ancients, get [71] Quickening
Right-click your Augmented Arcane Prison to summon Keristrasza. Turn in [71] Bait and Switch, get [71] Saragosa’s End.
Get back to full HP/mana, talk to Keristrasza, tell her that you’re prepared to face Saragosa.
 Right-click the Arcane Power Focus.
Saragosa will come and get weakened. Kill her and loot Saragosa’s Corpse.
Right-click your Augmented Arcane Prison to summon Keristrasza. Turn in [71] Saragosa’s End, get [71] Mustering the Reds.
Talk to Keristrasza and ask her to return you to the Transitus Shield.
Turn in [71] Mustering the Reds at Raelorasz, get [71] Springing the Trap.
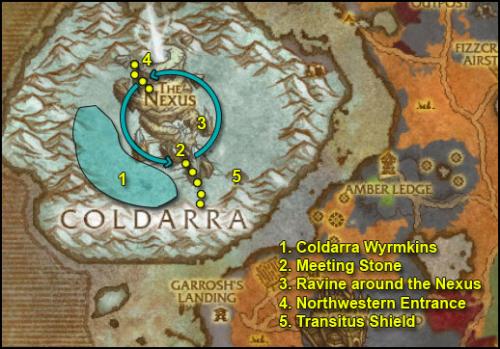
1. Go westwards killing Coldarra Wyrmkins until you have 5 Frozen Axes.
2. Once you have 5 Frozen Axes, go to the crack at (29,33).
==Note== From now on kill Arcane Serpents on your way until you have looted 5 Nexus Mana Essence.
Follow the crack going down north until you reach the Meeting Stone for the Nexus (28,29).
Right next to it you should find another Coldarra Geological Monitor. Right-click it to get the Nexus Geological Reading.
3. Stay down the crack and go around the Nexus, killing Arcane Serpents and looking for Blue Dragon Eggs.
Right-click them to destroy them. Keep doing laps around the nexus until you finish both quests.
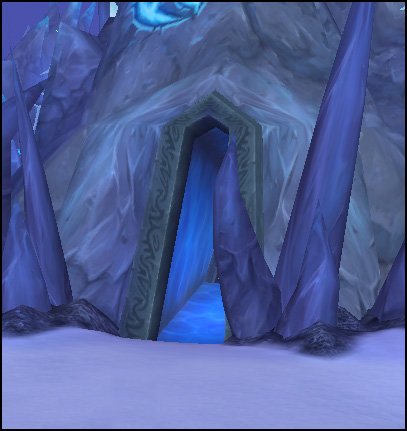
4. Once you’re done, get out of the ravine at (26,26) and go northeast until you reach the Nexus’s Northwestern Entrance (26,23).
==Note== You must unmount before the next step, and druids must not be shapeshifted.
 Stand infront of the doorway and right-click Raelorasz’s Spark.
Keristrasza will come. All you have to do is stay close to her until she takes off and quickly run to her when she lands, or you won’t get the quest update and will have to restart.
==Note== If it fails, I suggest relogging before going back to the northwest gate and using the flare.
5. Ride back to the Transitus Shield and turn in all quests:
- [71] Keep the Secret Safe
- [71] Hatching a Plan, get [71] Drake Hunt
- [71] Springing the Trap, get [71] Prisoner of War
- [71] Reading the Meters, get [71] Postponing the Inevitable
Instance: The Nexus
You have all the quests for the first instance of the Nexus, called “The Nexus“.
- [71] Have They No Shame?
- [71] Postponing the Inevitable
- [71] Prisoner of War
- [71] Quickening
So from now on, if you feel like it, you should look for a group for The Nexus. It’s a very quick instance for level 71-73 players, I recommend it.
If you don’t feel like it or if you don’t find a group, you can abandon the above 4 quests. They can easily be picked up in the future anyway, if you change your mind.
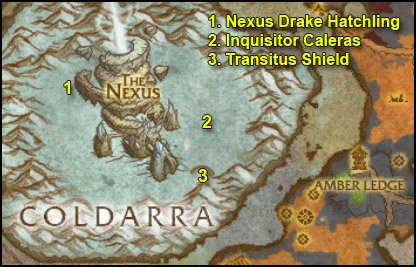
1. Ride to the area northwest of the Nexus (23,26).
 Put Raelorasz’s Spear on a hotkey.
Look up in the skies and find a Nexus Drake Hatchling.
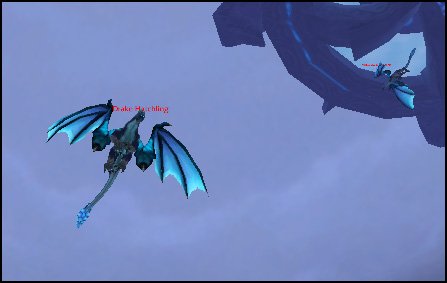
Target it and use Raelorasz’s Spear when you’re in range (the range is quite big though).
Then just “tank” the drake until it becomes friendly. You can use stuns or heal yourself or simply just take the beating. It takes about 10 seconds.
Mount up and ride back to the Transitus Shield as fast as you can. You have 3 minutes.
Turn in [71] Drake Hunt, get [71] Cracking the Code.
Also get [71] Drake Hunt again, it’s a daily quest and it gives another 20K exp.
2. Go north to the blue circle at (33,28).
Kill Inquisitor Caleras, loot the Azure Codex.
Kill Coldarra Spellbinders, loot 3 Shimmering Runes.
3. Go catch a drake, you know how it works. Bring the drake back to Transitus Shield.
Turn in [71] Cracking the Code and [71] Drake Hunt.
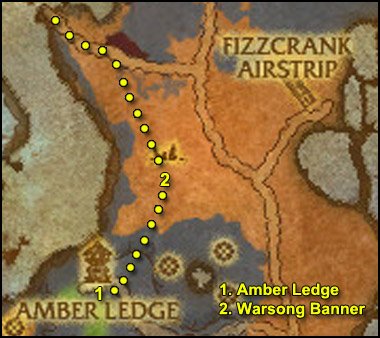
1. Fly to Amber Ledge.
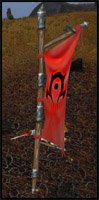
2. Ride northeast to Steeljaw’s Caravan and loot the Warsong Banner (49.5,27).
Now go northwards while looking for Dead Caravan Guards/Workers, they are bodies with green smoke around them.
Right-click them and click the text to loot 10 Warsong Outfits. You can stay mounted while doing this, but be careful not to run through too many mobs.
1. Go further north until you hit the road.
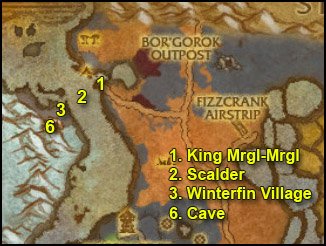
From there follow the road west, all the way to Winterfin Retreat, where you should find King Mrgl-Mrgl (43,13).
Turn in [71] King Mrgl-Mrgl, get [71] Learning to Communicate.
2. Dive down in the water west of King Mrgl-Mrgl. Go to the bottom of the sea and look for a water elemental called Scalder (42,16). He roams up and down the bottom of the sea. Kill it.
 Target Scalder’s corpse and right-click the King’s Empty Conch.
==Note== Scalder is immune to frost.
Go back to King Mrgl-Mrgl, turn in [71] Learning to Communicate, get [71] Winterfin Commerce.
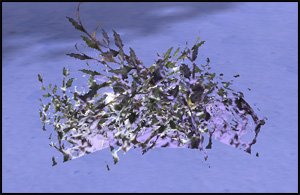
3. Swim west across the water to Winterfin Village (41,16).
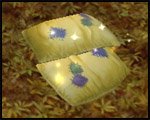
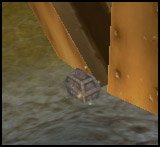
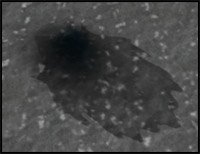
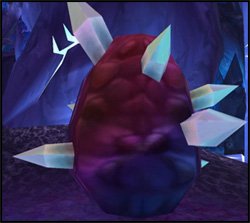
Look for Winterfin Clams, they are quite small and look like this:
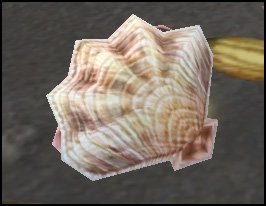
They can also drop from murlocs in the area, so feel free to kill some while you’re here.
Loot 5 Winterfin Clams.
4. Go back to the Winterfin Retreat, turn in [71] Winterfin Commerce at Ahlurglgr. Get the two new quests:
- [71] Oh Noes, the Tadpoles! from King Mrgl-Mrgl
- [71] Them! from Brglmurgl
5. Go back to Winterfin Village, this time look around for cages.
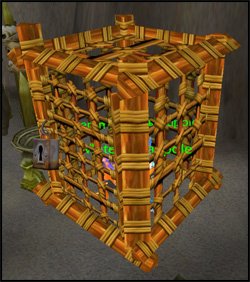
Right-click them to free the Murloc Tadpoles. Keep freeing tadpoles while doing the next steps.
6. Go southwest to the cave at (40,20).
Right-click the Arcanometer while standing inside the cave.
7. Go further inside the cave, always follow the wall on your left-hand side and you will eventually find two caged murlocs, Glrglrglr and Lurgglbr at (38,23).
Don’t get the quest from Lurgglbr for now.
Only get the quest [71] Keymaster Urmgrgl from Glrglrglr.
8. Get out of this room, and jump down on the left to the slope going down. Further down this path you’ll find Keymaster Urmgrgl. Kill him, loot Urmgrgl’s Key.
Go back to the previous room with the two caged murlocs. Turn in [71] Keymaster Urmgrgl.
Now get [71] Escape from the Winterfin Caverns from Lurgglbr. Escort him out.
After the escort, just kill stuff in the area until you finish [71] Them! and [71] Oh Noes, the Tadpoles!
Go back to King Mrgl-Mrgl. Turn in:
- [71] Oh Noes, the Tadpoles! get [71] I’m Being Blackmailed By My Cleaner
- [71] Escape from the Winterfin Caverns
- [71] Them!
Go a little northwest, turn in [71] I’m Being Blackmailed By My Cleaner, get [71] Grmmurggll Mrllggrl Glrggl!!!
Also get [71] Succulent Orca Stew from Cleaver Bmurglbrm.
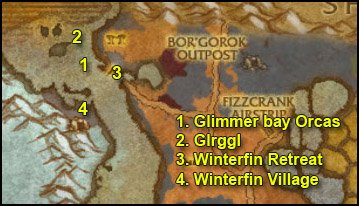
1. Swim northwest while killing Glimmer Bay Orcas on your way, loot Succulent Orca Blubbers off them.
2. Further north you should find a bigger orca called Glrggl. He swims in circles around the iceberg at (39,9)
Kill him and loot Glrggl’s Head.
Now just kill orcas until you finish [71] Succulent Orca Stew.
3. Go back to Winterfin Retreat, turn in
- [71] Grmmurggll Mrllggrl Glrggl!!!, get [71] The Spare Suit
- [71] Succulent Orca Stew
Go southeast to King Mrgl-Mrgl, turn in [71] The Spare Suit, get [72] Surrender… Not!
4. Swim over to the Winterfin Village again.
 Right-click King Mrgl-Mrgl’s Spare Suit.
Take a look at yourself while running around in the suit. I also recommend trying the /dance. When you’re done laughing you can go on with the guide 😛
Go inside the cave. This time keep hugging the wall to your right-hand side until you reach the end of the cave, where you’ll find Claximus.
Kill him and loot the Claw of Claximus.
Put your murloc suit back on and get out of the cave.
Go back to Winterfin Retreat. Turn in [72] Surrender… Not!
Ride back to Fizzcrank Airstrip.
Turn in [71] Plan B, get [72] It Was The Orcs, Honest!.
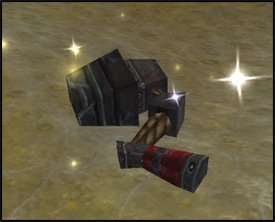
 Right-click Crafty’s Sack and loot its content.
Go north to Magmoth, go to the drop off spot I showed you in the video earlier.
 Right-click the Orc Disguise.
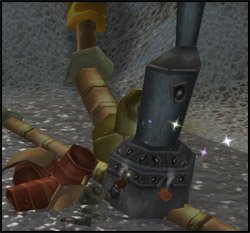
Jump down. Kill Magmothregar and loot him.
 Target his corpse and right-click the Warsong Banner.
Hearthstone back to Fizzcrank Airstrip.
Turn in [72] It Was The Orcs, Honest!.
Fly to Amber Ledge, turn in [71] Monitoring the Rift: Winterfin Cavern.
We’re done with Borean Tundra. If you still haven’t completed [72] Last Rites, you should try it a last time. If you can’t find a group, just forget it for now, you can come back to do it later. It’s just a nice quest with good rewards, but it doesn’t have a follow up, so it’s not a big deal if you don’t do it now.
Time to go to Howling Fjord!
Fly to Unu’pe, take the turtle to Moa’ki Harbor.
Once there, go turn in [72] Travel to Moa’ki Harbor, don’t get the follow up.
Get the new flight path.
From Moa’ki Harbor, take the turtle to Kamagua (go to the pier on your left-hand side).
Get the new flight path.
Follow the map below and ride to Valgarde Keep.
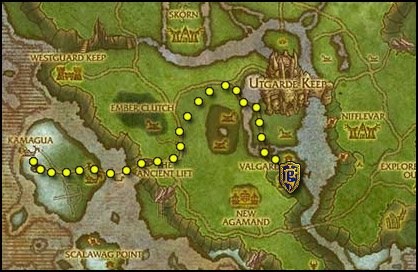
Once you’re in Valgarde Keep, go to my Howling Fjord Guide.
The guide ends here. If you’re not level 72 yet, it’s normal, don’t worry, we’ll finish it in the next chapter.
I hope you enjoyed this guide. If you want to return the favor, please try to contribute.
-Jame
© 2008 Copyrights www.wow-pro.com All Rights Reserved