
 by eric
Editor’s Note
This is a structured collection of guides on WoW-Pro, which means that I’m not the original author of most of the following. I’ve simply collected all the goldmaking tips we have here on WoW-Pro, updated them, added some of my own, and given them a common design. Check out Section 17 for credits, the original authers are mentioned there. Some of the poorer guides are not included, neither are the completely outdated ones (from an older expansion, or if the quests have been removed from the game etc., you got the point, however, a few short sections on making money before WotLK are kept). Like WoW-Pro got its own leveling guide, WoW-Pro is gonna have its own gold making guide!
So, to sum up what this guide will include:
- The early levels – We will go through the early levels, the fast methods to make gold during the low-levels.
- The Auction House – The guide will include tips on how to use the auction house, and how to gain use of it.
- Gold making at high level – The guides which gives “the most rewardful” gold outcome, reffered to level 80’s.
- Add-Ons – The best addons which is either needed, or just helping you out.
- And alot more!
Note again that most of the tips is not written by me, I’ve checked most but I’ve no particular experience with them.
Table of Contents
1.0 Useful Keywords
2.0 The Basics2.1 Gathering Professions
2.2 Crafting Professions
2.3 Secondary Professions
2.4 How to get most out of Quest Rewards3.0 The Auction House Basics
4.0 The Auction House Advanced
5.0 Low-level Gold Making5.1 Alliance
5.2 Horde
5.3 Both6.0 Alliance Daily Grinds6.1 Icecrown Circuits
6.2 Grizzle Hills Circuits7.0 Horde Daily Grinds7.1 Icecrown Circuits
7.2 Grizzle Hills Circuits8.0 Methods for a Short burst of Gold8.1 Strategy 1
8.2 Strategy 2
8.3 Strategy 3
8.4 Strategy 4
8.5 Strategy 59.0 Saronite/Titanium Mining Routes
10.0 Icethorn/Lichbloom Herbalism Routes
11.0 Eternal Farming11.1 Eternal Fire
11.2 Eternal Air
11.3 Eternal Life
11.4 Eternal Water
11.5 Eternal Shadow
11.6 Eternal Earth12.0 The Burning Crusade Money Making
13.0 World of Warcraft Original Money Making
14.0 Tips14.1 Low-level Tips
14.2 General Tips15.0 Add-Ons
16.0 Shikamaru’s Weekly Gold Posts
17.0 Credits
18.0 Comments
When reading this guide you may run into some words that you don’t understand. These words will help you through the guide, or help you understand peoples in-game tips. If there is something you didn’t find on the list, check out WoW-Pro’s World of Warcraft Dictionary.
- AH – Auction House, a place where we’re trading items for money.
- Undercutting – Undercutting happens on the Auction House. People are always trying to beat each others prices (cheaper), when many people are doing that, the prices become cheaper.
- Dailies – Daily Quests, I kind of quest which you can repeat everyday. Oftenly a quest which is not included in any quest chain, or a quest that needs to be unlocked.
- WTS – Want to sell, usually used in trade channels, when people are trying to sell something.
- WTB – Want to buy, usually used in trade channels, when people are trying to sell something.
- LW – Leatherworker, a crafting profession skill.
- BS – Blacksmith, a crafting profession skill.
- ENCH – Enchanting, a profession skill.
- DE – Disenchanting, good items can be ‘disenchanted’ into several kind of dust (which can be used in Enchanting).
Before you even start reading this guide, ask your self, do I want to spend time on getting money? The guide will show you the fast ways, but time is still needed. If the answer is yes, we can go to the next step.
Choosing Professions:
Professions is one of the most important things while making money. You can only have two professions, so you have to choose wisely. There is two kinds of professions. The first one is gathering professions, the second is crafting professions. You must have atleast one gathering profession, the gathring profession makes a benefit difference of the outcome if you wanna make money. Your second profession can be a crafting profession if you like to (some may want to create their gear in level 80), but a second gathering profession is pretty much preffered if you wanna get the best income of money.
-
- 2.1 Gathering Professions
-
-
- Skinning – Skinning allows players to gather leather and hides by skinning animals. Leather and hides are used for leatherworking. Leather is also used for some blacksmithing, engineering, and tailoring recipes. For skinning you will be needing a skinning knife, which can be bought from a merchant who sell profession-related items.
- Mining – Mining is used to extract ores, stones, and gems from mineral nodes found throughout the world. Generally, more of these nodes can be found in the underground than on the surface. In addition to gathering the raw materials, it’s up to the miners to smelt the ores taken from the ground into metal bars. These are the raw materials that artisans such as Blacksmiths and Engineers is using. For mining you will be needing a Mining Pick which can be bought from a merchant who sell profession-related items.
- Herbalism – With Herbalism you can gather herbs and plant all over the world. Herbalism is an almost necessary requirement for Alchemy. Alchemy is a great skill that allows you to generate all sorts of instant and temporary potions to improve a character’s effectiveness.
-
-
- Blacksmithing – Blacksmiths take bars of metal from miners and work them into finely crafted arms and armor. There are many unique weapons and other armaments that cannot be found on any of the vendors or monsters in the game, but can only be created by blacksmiths. Blacksmiths can create weapons, mail and plate armor for Paladins or Warriors, and trade items. Blacksmiths can construct special sharpening stones that can be used to temporarily improve weapon damage. They can also create several items that are used as ingredients for other Professions recipes, such as Enchanting. Blacksmiths can also create a few items that are needed for quests. They can put these items in the auction house to generate additional income. Blacksmithing is great for Paladins or Warriors, who can use the skill to create their own equipment. It is also good for making money by selling weapons and armor to the classes that can use them.
- Leatherworking – Leatherworking is a crafting profession that goes hand-in-hand with the gathering profession of Skinning. As a leatherworker, you will create leather and mail armor out of the skins and hides. You can also create armor kits, which are single-use items that give a permanent armor or statistic boost to any type of hand, leg, chest, and foot armor. At high levels, leatherworkers can create epic quality armor, some of which can only be created by a leatherworker of a particular specialization.
- Tailoring – Tailoring allows players to cut and weave various pieces of cloth into armor, bags, shirts, and other cloth items. Tailors can create cloth items for cloth wearing classes: Mages, Warlocks, and Priests. Tailors play an especially important role in guilds because they can create bags for the entire guild. They can also create specialty bags such as Herbalism bags that can increase gathering for the guild. They can learn powerful rare recipes as the highest levels which allow them to create powerful gear useful in raiding. Tailors can create shirts or dress-up items. Tailors do not require any special equipment to create their items, such as blacksmiths require anvils. Tailors can create items wherever they want, as long as they have the proper required ingredients. Tailoring does not require a gathering profession. Proper ingredients must be gathered from monsters or purchased from other players. If your friends know you’re a tailor they also may collect tailoring ingredients for you, provided you let them know exactly what you need.
- Inscription – the Inscription profession allows its practitioners, called “scribes,” to enhance the spells and abilities of players’ characters, such as enhancing a rogue’s Backstab ability to deal more damage to stunned targets, or allowing a priest’s Circle of Healing to heal one more target. Scribes can also aid enchanters by permitting them to sell their enchantments directly on the Auction House, or help other characters by creating enhancing scrolls like Scroll of Strength.
- Engineering – Engineering is a very fun and creative Profession. You can create all kinds of wacky things that are fun to use and also entertain and amaze other players. Engineering is used to assemble metal and stones into parts needed to make explosives, guns, scopes, bullets, mechanical dragons, aquatic helmets, and much more. More than any other Profession, engineering products require several steps to be completed. Most items created by engineers can only be used by engineers. You can sometimes create something you can sell to another engineer. Many engineering recipes require a lot of different parts before the item can be created. This will require more space in your bags than other Professions.
- Enchanting – Enchanters use their magical formulae to grant permanent augmentations to weapons, armor and other equipment. Enchanting requires the use of special ingredients that can only be gathered by disenchanting magical items. Using these ingredients, enchanters can make items more powerful. With the right methods, enchanting can produce a big amount. Enchanting is an advanced skill.
- Alchemy – The Alchemist mixes herbs in order to generate potions with a variety of effects. A player can create healing, invisibility, elemental resistance, and mana potions; oils to coat weapons; and much more.
You have to choose one gathering, and one random. You’ve maybe noticed that some professions has good combinations. To gain most gold, Mining and Skinning, or Herbalism and Skinning is the best combination in my opinion, but it’s is up to you. Things you should not choose: Engineering. Engineering is useful in other ways, but do not belong to gold making.
Beside the two main professions, you’re able to have all the Secondary Professions too! which you should make sure to have.
-
- 2.3 Secondary Professions
-
- Cooking – As you’re traveling around the world, you’ll notice that you often receive pieces of meat, which, instead of being sold to merchants, could be used to create food. If you’re a player that relies on food, such as a non-healing player or a player that solos, food should become very important to you. You can buy food from merchants, but the food gained through cooking is nearly free and it is actually much more effective.
- Fishing – As a secondary skill, fishing occupies its own unique space in World of Warcraft. Although it is essentially a gathering skill akin to skinning, herbalism, or mining, the mechanics of the skill make it almost like a mini-game. Just like the real-life equivalent, to become a master fisherman you’ll have to spend considerable time standing next to bodies of water while holding a fishing pole. Catching a fish will be a test of your reaction time, as you have to right-click the bobber immediately after you see it dip into the water indicating you’ve caught something. Along with the requisite marine life such as fish, eels, and squid, you also might haul up some odds and ends from time to time – including even valuable items, some of which may only be caught by fishing. The fish you catch can be eaten on their own to regain health, or they can be used in cooking recipes. The cooked fish will often provide useful effects when eaten. You will be needing a Fishing Pole which can be bought from a merchant who sells Profession-related items.
- Archaeology (supposted to be added in patch 4.0) – Archaeology is the new secondary profession that will be joining the ranks of cooking, fishing, and first aid in World of Warcraft: Cataclysm. Archaeology allows the player to unlock new abilities and rewards by discovering ancient treasures throughout the world. Each archaeologist uses the profession to uncover clues hidden in the world around them, such as troll relics or map fragments, and decipher their meaning, enabling the clever archaeologist to manipulate pieces of the past, learning the location of a treasure cache or valuable artifact. Such artifacts are highly sought after by the Archaeology Society, and they pay in gold and items for their return. Those who have mastered archaeology can find Titan artifacts, earning special currency used to unlock character paths and allowing the player to further customize their character.
2.4 How to get most out of Quest Rewards
-
- Make sure you’re getting upgrades. Using Rating Buster, you should compare the stats on the gear usable to you, to check for upgrades. If none are found, you continue onto step two..
- When using gear better than a quest reward, mouse over each of them, and select the one that has the greatest number after the gold symbol. If they give the same amount, look at the number after the silver symbol, and so on. This may be after “Sells For:” instead, depending on your version of Sellfish.
- To save yourself some time, you could look up some quest rewards corresponding to quests in the zone you’re in, or corresponding to Jame’s guide, while you’re unable to play. Preferably use WoWhead or Thottbot, in my opinion, I’ve gotten spyware from Allakhazam before!
The Auction House is a place where players can trade things between each other, or sell almost every kind of stuff that you like to. It’s very important to understand the Auction House, so you can gain use of it. Everything we are farming such as herbs, skins, ores etc. are we going to sell on the Auction House, however it sounds strange that people are willing to buy it from high prices, it’s true, I gurantee you.
How do you use the Auction House?
The Auction House can be found in every racial capital city, NOT in Dalaran or Shatrath City. If you can’t find it, ask a guard that will give you a waypoint to where it is. The Auction House got three different options:
- Browse
- Bids
- Auctions

“Browse”, is the place where all the Auctions that other players has made is. You can either search at the search option, or if you’re searching for something specific (like two-hand axes), in the column to the left. If you want buy something, you can either bid, or buyout. If you buyout, you will get the item directly in a mail (in the mailbox).
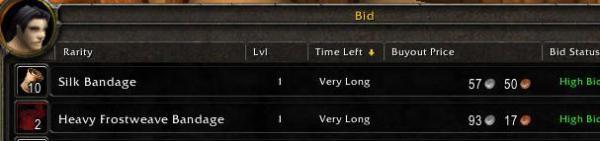
“Bids” is the place where you can view your own bids on other players Auctions. If you’ve bid on a item, you can see in the bed window how long time there is before the Auction runs out. If you were the highest, you will recive the item in a mail.
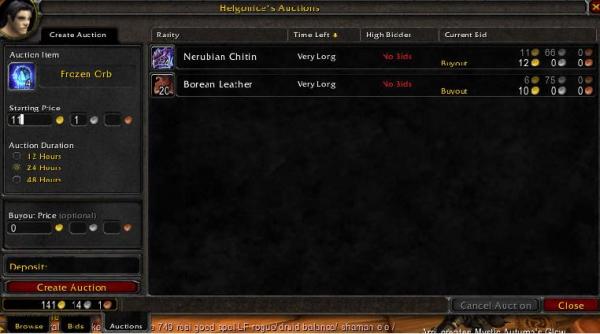
“Auctions” is the place where you view your own Auctions. The box on the left side allow you to create the Auction, drag your item into the little item box, and then write a bed price, and a buyout price. You can also see if anyone has bid on your Auctions or how long time they stay on the Auction House, before the time runs out and you get the Auction back in a mail.
==NOTE==You will need to pay a fee to set an Auction up. If someone buy aout one of your Auctions, you will get a mail with the money the played payed.
[Back to the top]
4.0 The Auction House Advanced (requires Auctioneer Add-on)
I assume you know the basics of using the Auction House now, then, let’s go further!
The Auction House is Your Friend
-
- This is something that can’t be ignored. The Auction House is the place where you can make bulks of gold, if you know what you are doing.
-
- You think you can make more money farming? Dream on and get real, I’d even take a bet on that (and I don’t take bets easily). With Auctioneer, you will be scanning the AH two/three times a day.
-
- Do this for 3-4 weeks and you’ll have a pretty accurate spreadsheet of how you server’s economy is set up.
Knowing what sells
-
- That is no idea in trying to sell a rare weapon at the fee of 25g if you keep getting that mail: Auction has Expired? One of the important things when using the Auction House is to know what sells, and what doesn’t. Things such as cloth, ores, herbs, skins and hides etc. almost sell every time.
Scan your Auction House Frequently
-
- Scan your Auction House frequently – atleast the first weeks so you can get an overview of your server economics, “what sells, what do not”, “at what time of the day”, “when do I have to sell it”, “what is undercutted”, “will the price rise”, all these question needs to be answered before you will get succes by selling on the Auction House.
Patch Notes
-
- People like me are always, always happy when new (PTR) patch notes are released. Don’t know what I’m talking about? Shame on you! You have no idea what you are missing, or already have missed. These are the current PTR patch notes, they are updated frequently.
You should always read them and keep track of any changes that occur. For those who didn’t know: Patch Notes are a gold mine.
Don’t flood the Market
Like the real economy WoW’s has a Demand: Price ratio, wherein the more an item is readily available the less it is worth. So, if you flood the market using the same method you will lose out on gold. Put up a maximum of 5 stacks each time you’re trying to sell dust, skin or anything else that sells. If things has been very cheap, that is typical a player(s) who have overflood the market. Wait a few days and check again, the price may have gone up with the demand.
Earning money is like in the real World
-
- Earning money in World of Warcraft is like in real life. It’s about getting a great idea, what about Blizzard? Great Idea creating World of Warcraft, huh? Yes, in my opinion, you have to do “the same” in-game. Be smart and buy Silk Cloth for 50 silver, sell it later on same day for 1 gold… you got the point. It’s all about being a bit creative and try to figure out what is selling good, and what is not.
Differrent prices at Different times of the Day
-
- Yes, believe it or not, but prices vary, very much to be exactly. You can earn alot of money if you buy things earlier on the day (10:00 – 13:00) and sell it later on(17:00-22:00), sometimes for the double, or even more. In the weekends, much more people will get online (no school or work), of course more activiness on the Auction House too! If you’re smart, you buy plenty of stuff at the end of the weekend (things you’re going to sell the following week) so all the prices has been undercutted very low. The prices will surely grow again at the end of the workdays.
5.0 Gold making at low Level (requires Auctioneer)
The best ways of making money as a low level, through skinning, mining or herbing.
-
- At level 5 you should have enough money to buy your professions, whatever race you are, you need to have mining and skinning (skinning is optional). Mining can be trained two different locations:
-
- Gorum Stonebeard – Ironforge, Great Forge
- Dane Lindgren – Stormwind, Dwarven District
-
First off, get to Stormwind, if you’re a human this is easy, just check your map.
If you’re a dwarf or a gnome take the Deeprun Tram from Ironforge and you’re there!
If you’re a Draenei or a Night Elf, take the boat to Auberdine and then take the boat to Stormwind Harbor.
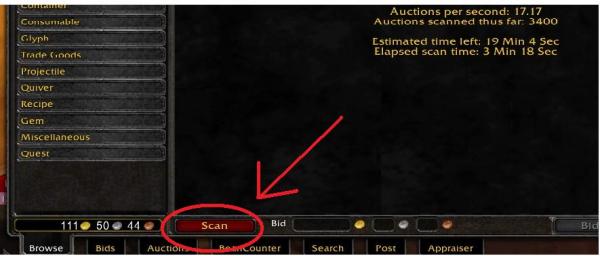
In Stormwind, scan the Auction House using the Auctioneer AddOn. Do this by talking to one of the auctioneers and pressing the ‘scan’ button. Go do something for 10 minutes (call your girlfriend/boyfriend/mother for a change ) and then return when it’s done scanning. Buy a Mining Pick and a Skinning Knife (optional), and make sure your bag(s) are empty.
Here is the route we’re going to follow

Start off by heading to the south and then follow the red line I drew on the map above! Easy right? While walking kill everything that gets in the way and don’t forget to skin them! If you’re still around level 10 you can actually get quite a nice amount of experience from this too.
When you get to the the Fargodeep Mine (the first one) just enter one of the entrances and walk through the cave all the way to the other entrance.
South of Eastvale Logging Camp is one node, you can choose to take this one if you feel like you don’t have enough yet, but I usually leave it there, since you won’t really miss it.
The Jasperlode Mine only has one entrance/exit so just walk all the way to the end of the cave and then just head back out.
The end is right where you’ve started, at Stormwind. I suggest taking a break since it can be quite boring and the mining veins need time to respawn. Time to cash in! Go to the Auction House and see what price your Auctioneer Add-on advices you to set for a stack! If you have a stack with less then 20 ores, don’t be afraid to dump it there too, the add-on will automatically set the right price comparing to a full stack. Do not remeber to sell your Linen Cloth if you got any (use Auctioneer AddOn).
At level 5 you should have enough money to buy your professions, whatever race you are, you need to have mining and skinning (skinning is optional). Mining can be trained four different locations:
-
- Ug’thok – Orgrimmar, Valley of Honor
- Guillaume Sarowy- Silverpine Forest, The Sepulcher
- Thrag Stonehoof – Thunder Bluff, Elevation 1
- Brasil Frye – Undercity, War Quarter
First, move to Orgrimmar. Then just follow the black line on the map. While walking the route, kill everything that attacks, don’t forget to skin them! If you’re still around lvl 10 you can actually get quite a nice amount of experience from this too.

The route ends and start at Orgrimmar. I suggest taking a break since it can be quite boring and the mining veins need time to respawn. Time to cash in! Go to the Auction House and see what price your Auctioneer Add-on advices you to set for a stack! If you have a stack with less then 20 ores, don’t be afraid to dump it there too, the add-on will automatically set the right price comparing to a full stack. Do not remeber to sell your Linen Cloth if you got any (use Auctioneer AddOn).
-
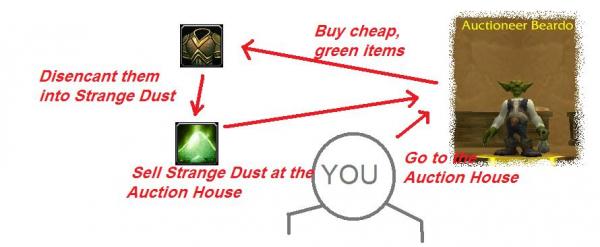
- First thing’s first, go train enchanting (or have your bank/AH-alt train it if you have one and don’t want to give up your precious professions, trust me I know that feeling).
- Next, go straight to the auction house and look up Strange Dust. This stuff sells for surprisingly well on most servers, the average being about 7-10 gold per stack of 20. (If this isn’t the case, and they are cheaper this method isn’t really worth the time and money spent).
- Click on either the armor or weapons tab and hit search (without typing anything into the box), click on the “current bid” tab on the top row of options and make sure the arrow is pointing downward, now you will have the lowest current bid on all items. Buy GREEN items (needs to be greens, can’t DE greys or whites and blues will be too expensive) which buyout prices are around 1-50 silver (any higher and you are paying to much). Do this for about 10 items, you will have spent about 3 gold by now (hopefully you’ll have picked a few cheap 11 silver greenies) If you have spent more that’s fine, but try not to spend more than 5 gold on this.==Note== I’ve found armor is generally cheaper than weapons for some reason.
- Go get them in the mail and disenchant. Most of these super cheap greens will require only 1 skill point in enchanting, and most of them will drop about 2-3 Strange Dust’s. (Note: if you don’t have twenty of them when all of the items are DE’ed you can buy a few (normally about 2-4) of them from the enchanting supplier in your city. But be aware that there is a limited stock).
- Anyway, sell your Strange Dust at the lowest price on your auction house. This should be around 10 gold, but can be as high as 20 gold if you are supremely lucky.==Note== Lesser Magical Essence’s may also drop from the disenchanced items, though Strange Dust is more common, if so these also sell fairly well on the auction house.
The most optimal quest circuits for the Alliance (Only level 80). Original guide here by Hairbo.
Requirements:
- I am level 80
- I have a regular flying mount
- I have purchased cold weather flying training
- I have completed most of the quests in Icecrown
If you do not meet these requirements don’t panic, I have some solutions. First of all, if you aren’t level 80 I suggest following Jame’s Guides thoroughly until you reach 80. If you do not have the money (approximately 2100 gold) to purchase your basic flying mount and cold weather flying training, you probably haven’t finished all of the regular quests in Northrend. I suggest completing each zone in Northrend because regular quests give almost the same amount of gold as 80 daily quests do. Finally, If you haven’t completed quests in Icecrown yet, do them. Doing these quests will not only open up much needed daily quests, but will also provide you with extra gold.
-
- Head to Dalaran, then to Krasus Landing [68,43]. Once there talk to Officer Van Rossem, who is located to the immediate right as you walk in, with four body guards. Click the “Take me to the ship.” option.
When you land get the quest [80] Blood of the Chosen behind you. Take the left staircase down and get the following quests from Thrassarian:
[80] That’s Abominable!
[80] Drag and Drop
[80] Not a Bug
Find Absalan the Pious patting around the ship, he is a dwarf with blackish hair. When you find him get his quest: [80] Slaves to Saronite.
In the middle of the deck of the ship, you should see a sloped indent in the floor, if you go around it you should see a staircase, go down it. Head down one of the two staircases leading down to the final floor of the ship, and get the quests [80] The Solution Solution and [80] Retest Now.
-
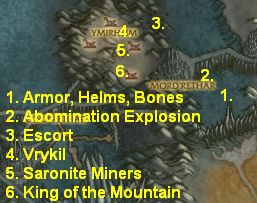
- Mount up and get out of the ship. Head South-Southeast to the Broken Front [68,62]. Once you’ve arrived here we’re going to do two things:-Look for Pile of Bones, Abandoned Armor, and Abandoned Helm’s which are scattered all over the ground.-Kill Hulking Abominations until they drop Chilled Abomination Guts.Once you have collected a pile of bones, an abandoned armor, and an abandoned helm, use your Smuggled Solution on the ground and watch a Skytalon take it and explode. Do this three times to complete [80] The Solution Solution.
- After you get a Chilled Abomination Guts head to [66,63] and use your Abomination Reanimation Kit. This will allow you to control an Abomination pet for a little while. You have two abilities: Faltulate and Burst at the Seams. Faltulate stuns all the targets around the Abomination, and Burst at the Seams makes your pet explode, killing all targets near him. When you pet is summoned, send him into the pile of undead right in front of the Death Gate [66,33]. Stun adds as you pull more then explode when you have a decent amount of adds. Remember to be close to your abomination when he explodes, or you won’t get credit for the kills. Rinse and Repeat until [80] That’s Abominable! is completed.==Note== Remember each time your Abomination dies you have to kill more Hulking Abominations to get Chilled Abomination Guts to resummon your pet.==Note== from now on keep any Vrykul Bones you get.
-
- Mount up and head north to a pit with alliance soldiers in it [62,51]. You should see two daily quests, but we’re only doing one. Pick up [80] Assault by Ground and start the escort. You’ll be escorting 4 Skybreaker Infantry and a Skybreaker Squad Leader through Vrykul assaults on the way to Ymirheim. You’ll get 2-3 ambushes of about 4-5 Vrykul, all of which are ranged. Let the NPCs tank the adds as you kill one add at a time. DO NOT let the NPCs die however, or you’ll need to restart. After the escort is finished proceed to step 4.
- Continue west through Ymirheim [59,53]. Slay the rest of the Vrykul you need for [80] Blood of the Chosen as you head up the slope going north.
- Once you get to the top of the slope take a left and enter the cave. In the mine you’ll see NPC’s called Saronite Mine Slaves. Approach one and click the option “Go on, you’re free. Get out of here!” The NPC will either run free and you’ll get credit for your quest, or will attack you. He might also just run away, doing neither. Talk to these until [80] Slaves to Saronite is completed.
- Get out of the mine and head south to a little gnome called Frazzle Geargrinder [56,62]. Now before you get her quest [80] King of the Mountain, watch this short video in high quality.After you turn in the quest (as instructed on the video) mount up and head back to the pit [62,51] where [80] Assault by Ground was and turn the quest in.

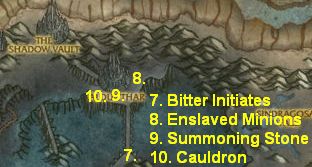
- Head to the north of Ymirheim where you’ll find a cultist camp [55,46]. Start killing Bitter Initiate’s. WARNING: Do not kill Dark Subjugator. When an Initiate drops an Orb of Illusion, find a Dark Subjugator and target it, use the orb on them. Do this three times until [80] Drag and Drop is completed.
- Mount up and head north to Aldur’thar [54,31]. Drink your Diluted Cult Tonic and start to kill everything around here. Focus on killing Void Summoner’s and their Enslaved Minions. Use your Rod of Siphoning on the corpses of Enslaved Minions to get dark matter. Keep clearing around here until you have 10 Tainted Essence’s and 5 Dark Matter.
==Note== Remember to refresh your Diluted Cult Tonic buff every 10 minutes, or the Tainted Essence won’t drop. - After you have 10 Tainted Essence’s and 5 Dark Matter, head to a cultist camp about 200 yards away from where the summoner’s were [53,33]. Dismount in the center of the camp and click the Summoning Stone. When your done channeling, re mount and head west [48,34].
- In this cultist camp you should see three cauldrons. Combine your Tainted Essence’s by clicking the Tainted Essence in your bag (similar to motes/eternals} to form a Writhing Mass. Stand near a cauldron and click the Writhing Mass in your bag.
- Mount up and head northwest to The Shadow Vault [43,24]. Sell your junk, but remember not to sell Vrykul Bones yet. Get the following quests at The Shadow Vault:[80] Leave Our Mark
[80] Vile Like Fire!Do not get [80]Shoot Em’ Up. This quest has been bugged since the PTR and is extremely hard to do, thus a waste of time. - Mount up and head southwest to Jotunheim [32,42]. You might notice we are outside a cave, go inside and turn in 15 Vrykul Bones for a Fate Rune of your choice. Eat this and it gives you 30 minute buff to help you out with your quests.
- Start killing Vrykul while heading north through Jotunheim. Remember to use your Ebon Blade Banner on the corpses of dead Vrykul. Keep any Vrykul Bones you get here.
- Clear until you get to a ledge with many Proto-Drakes on it [27,39]. Don’t worry if you haven’t finished your 15 Vrykul kills yet. Get close to one of the Photo-Drake’s and right click it to mount it. Use your Burst of Speed spell to move quickly, and use your Strafe Jotunheim Building spell to light the roofs of buildings here on fire. Go around and light 8 roofs on fire until [80] Vile Like Fire! is completed.
- Once you’ve gotten your 8 roofs lit, demount by clicking the red drop arrow on the right hand side of your custom bar. Keep killing Vrykul until you have [80] Leave Our Mark completed.==Note== If you have 15 more Vrykul Bones at this point, you can head back to the cave to get another Fate Rune buff [32,42]. If you don’t care for a buff, move on to the next step.
- Mount up and head west along the cliff line to Death’s Rise [20,47]. Sell junk. Get the following quests here:
[80] No Fly Zone
[80] From Their Corpses, Rise!
[80] Intelligence Gathering
- Head northwest to Onslaught Harbor. Once you get there make sure Bone Gryphon is on your bar. Start killing Gryphon Rider’s while on your Bone Gryphon, and use your Darkmender’s Tincture on them. Also if they drop a key you should use the key on the chest’s lying around the ground and on the towers.Tip: Once you’ve gotten all your Gryphon Rider’s slain, go to the beaches on the northern side of the island [6,39] and clear here for the rest of your intel documents, lots of Scarlet mobs around here.Do this until you complete [80] No Fly Zone, [80] From Their Corpses, Rise!, and [80] Intelligence Gathering.
- Fly back to Death’s Rise [20,47] and turn in everything. Take the flight path, which is a bat on the ridge of the Death’s Rise and fly to The Shadow Vault. Turn in everything.
- Mount up and head back to the ship, turn in everything here.
Icecrown Complete – 14/25 Daily’s Complete – 225+ Gold Earned.
-
- From the ship head southeast to Crusaders’ Pinnacle [79,72] and take the flight to Amberpine Lodge.
Mount up and head northeast to Blue Sky Logging Grounds [39,43]. At this location pick up the following quests:
[74]Shredder Repair
[74] Life or Death
[74] Pieces Parts
[74] Kick ‘Em While They’re Down
Head into the Logging Grounds [34,40] and complete the following objectives:
1.Kill 15 horde units
2.Use your Renewing Bandage on 10 Alliance Infantry (only counts if the person is kneeling or lying down)
3.Gather the parts needed for [74] Pieces Parts which are scattered all over the ground.
Once these three objectives are complete, find a Broken-Down Shredder.
Hop in it and run it back to the camp [39,43] click the spell “Shredder Delivery. Do this three times. Turn in:
[74] Shredder Repair
[74] Life or Death
[74] Pieces Parts
[74] Kick ‘Em While They’re Down
Mount up and fly south-southwest to Venture Bay [21,80]. At this camp pick up the following quests:
[74]Smoke ‘Em Out
[74] Down With Captain Zorna
[74] Keep Them at Bay!
Go across the river to the west and you should see a Lumber mill [18,79]. Use your Smoke Bomb on the Venture Company Stragglers. Clear horde while working your way toward the other Lumber mill [16,76] and smoke the Venture Company Stragglers out here. Finally clear horde up to the house on the hill at [14,76] and smoke the rest of the Venture Company Stragglers you need. Get out of the house and jump off the mini cliff and clear the horde on the dock [14,78]. You should see a tent on the dock near here, kill Captain Zorna under this tent. Finish killing horde until [74] Keep Them at Bay! is complete.
Mount up and go back to the camp in Venture Bay. Turn in all the quests.
Grizzly Hills Complete – 21/25 Dailies Complete – 325+g Earned.
The most optimal quest circuits for hordes (only level 80). Original guide here by Hairbo.
Requirements:
- I am level 80
- I have a regular flying mount
- I have purchased cold weather flying training
- I have completed most of the quests in Icecrown
If you do not meet these requirements don’t panic, I have some solutions. First of all, if you aren’t level 80 I suggest following Jame’s Guides thoroughly until you reach 80. If you do not have the money (approximately 2100 gold) to purchase your basic flying mount and cold weather flying training, you probably haven’t finished all of the regular quests in Northrend. I suggest completing each zone in Northrend because regular quests give almost the same amount of gold as 80 daily quests do. Finally, If you haven’t completed quests in Icecrown yet, do them. Doing these quests will not only open up much needed daily quests, but will also provide you with extra gold.
-
- Head to Dalaran, then to Krasus Landing [68,43]. Once there talk to Sky-Reaver Klum, who is located to the immediate right as you walk in, with four body guards. Click the “Take me to the ship.” option.
When you land get the quest [80] Blood of the Chosen from a wandering orc named Warbringer Davos Rioht. After finding the orc, find the room on the deck with a horde flag outside it. Inside get the following quests from Koltira Deathweaver:
[80]That’s Abominable!
[80]Drag and Drop
[80]Not a Bug
Find Brother Keltan patting around the ship, blood elf with blue-green hair. When you find him get his quest: [80] Slaves to Saronite. Head down one of the two staircases leading down to the center of the ship. Go to the very back of the center of the ship and you should see a goblin,get the quests [80] Volatility and [80] Retest Now from him.
-
- 1.Mount up and get out of the ship. Head South-Southeast to the Broken Front [68,62]. Once you’ve arrived here we’re going to do two things:
-Look for Pile of Bones, Abandoned Armor, and Abandoned Helm’s which are scattered all over the ground.
-Kill Hulking Abominations until they drop Chilled Abomination Guts.
Once you have collected a pile of bones, an abandoned armor, and an abandoned helm, use your Copperclaw’s Volatile Oil on the ground and watch a Skytalon take it and explode. Do this three times to complete [80] Volatility.
- After you get a Chilled Abomination Guts head to [66,63] and use your Abomination Reanimation Kit. This will allow you to control an Abomination pet for a little while. You have two abilities: Faltulate and Burst at the Seams. Faltulate stuns all the targets around the Abomination, and Burst at the Seams makes your pet explode, killing all targets near him. When you pet is summoned, send him into the pile of undead right in front of the Death Gate [66,33]. Stun adds as you pull more then explode when you have a decent amount of adds. Remember to be close to your abomination when he explodes, or you won’t get credit for the kills. Rinse and Repeat until [80] That’s Abominable! is completed.==Note== Remember each time your Abomination dies you have to kill more Hulking Abominations to get Chilled Abomination Guts to resummon your pet.==Note== from now on keep any Vrykul Bones you get.
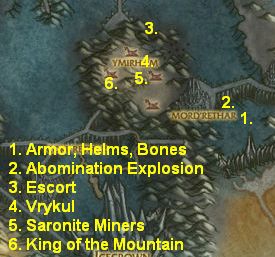
- Mount up and head north to a pit with horde soldiers in it [58,46]. You should see two daily quests, but we’re only doing one. Pick up [80]Assault by Ground and start the escort. You’ll be escorting 4 Korkron Infantry and a Kor’Kron Squad Leader through Vrykul assaults on the way to Ymirheim. You’ll get 2-3 ambushes of about 4-5 Vrykul, all of which are ranged. Let the NPCs tank the adds as you kill one add at a time. DO NOT let the NPCs die however, or you’ll need to restart. After the escort is finished proceed to step 4.
- Continue west through Ymirheim [59,53]. Slay the rest of the Vrykul you need for [80] Blood of the Chosen as you head up the slope going north.
- Once you get to the top of the slope take a left and enter the cave. In the mine you’ll see NPC’s called Saronite Mine Slaves. Approach one and click the option “Go on, you’re free. Get out of here!” The NPC will either run free and you’ll get credit for your quest, or will attack you. He might also just run away, doing neither. Talk to these until [80] Slaves to Saronite is completed.
- Get out of the mine and head west to a goblin called Blast Thunderbomb [51,57]. Now before you get his quest [80] King of the Mountain, watch this short video in high quality.After you turn in the quest (as instructed on the video) mount up and head back to the pit [58,46] where [80] Assault by Ground was and turn the quest in.
- .Head to the north of Ymirheim where you’ll find a cultist camp [55,46]. Start killing Bitter Initiate’s. WARNING: Do not kill Dark Subjugator. When an Initiate drops an Orb of Illusion, find a Dark Subjugator and target it, use the orb on them. Do this three times until [80] Drag and Drop is completed.
- Mount up and head north to Aldur’thar [54,31]. Drink your Diluted Cult Tonic and start to kill everything around here. Focus on killing Void Summoner’s and their Enslaved Minions. Use your Rod of Siphoning on the corpses of Enslaved Minions to get dark matter. Keep clearing around here until you have 10 Tainted Essence’s and 5 Dark Matter.==Note== Remember to refresh your Diluted Cult Tonic buff every 10 minutes, or the Tainted Essence won’t drop.
- After you have 10 Tainted Essence’s and 5 Dark Matter, head to a cultist camp about 200 yards away from where the summoner’s were [53,33]. Dismount in the center of the camp and click the Summoning Stone. When your done channeling, re mount and head west [48,34].
- In this cultist camp you should see three cauldrons. Combine your Tainted Essence’s by clicking the Tainted Essence in your bag (similar to motes/eternals} to form a Writhing Mass. Stand near a cauldron and click the Writhing Mass in your bag.
- Mount up and head northwest to The Shadow Vault [43,24]. Sell your junk, but remember not to sell Vrykul Bones yet. Get the following quests at The Shadow Vault:[80] Leave Our Mark
[80] Vile Like Fire!Do not get [80]Shoot Em’ Up. This quest has been bugged since the PTR and is extremely hard to do, thus a waste of time. - Mount up and head southwest to Jotunheim [32,42]. You might notice we are outside a cave, go inside and turn in 15 Vrykul Bones for a Fate Rune of your choice. Eat this and it gives you 30 minute buff to help you out with your quests.
- Start killing Vrykul while heading north through Jotunheim. Remember to use your Ebon Blade Banner on the corpses of dead Vrykul. Keep any Vrykul Bones you get here.
- Clear until you get to a ledge with many Proto-Drakes on it [27,39]. Don’t worry if you haven’t finished your 15 Vrykul kills yet. Get close to one of the Photo-Drake’s and right click it to mount it. Use your Burst of Speed spell to move quickly, and use your Strafe Jotunheim Building spell to light the roofs of buildings here on fire. Go around and light 8 roofs on fire until [80] Vile Like Fire! is completed.
- Once you’ve gotten your 8 roofs lit, demount by clicking the red drop arrow on the right hand side of your custom bar. Keep killing Vrykul until you have [80] Leave Our Mark completed.==Note== If you have 15 more Vrykul Bones at this point, you can head back to the cave to get another Fate Rune buff [32,42]. If you don’t care for a buff, move on to the next step.
- Mount up and head west along the cliff line to Death’s Rise [20,47]. Sell junk. Get the following quests here:[80] No Fly Zone
[80] From Their Corpses, Rise!
[80] Intelligence Gathering
- Head northwest to Onslaught Harbor. Once you get there make sure Bone Gryphon is on your bar. Start killing Gryphon Rider’s while on your Bone Gryphon, and use your Darkmender’s Tincture on them. Also if they drop a key you should use the key on the chest’s lying around the ground and on the towers.Tip: Once you’ve gotten all your Gryphon Rider’s slain, go to the beaches on the northern side of the island [6,39] and clear here for the rest of your intel documents, lots of Scarlet mobs around here.Do this until you complete [80] No Fly Zone, [80] From Their Corpses, Rise!, and [80] Intelligence Gathering.
- Fly back to Death’s Rise [20,47] and turn in everything. Take the flight path, which is a bat on the ridge of the Death’s Rise and fly to The Shadow Vault. Turn in everything.
- Mount up and head back to the ship, turn in everything here.Icecrown Complete – 14/25 Daily’s Complete – 225+ Gold Earned.
-
- From the ship head southeast to Crusaders’ Pinnacle [79,72] and take the flight to Conquest Hold.
Mount up and head northeast to Blue Sky Logging Grounds [34,32]. At this location pick up the following quests:
[74] Making Repair
[74] Shred the Alliance
[74] Keep ‘Em on Their Heels
[74] Overwhelmed!
Head into the Logging Grounds [34,40] and complete the following objectives:
1.Kill 15 alliance units
2.Use your Renewing Bandage on 10 Wounded Skirmishers (only counts if the person is kneeling or lying down)
3.Gather the parts needed for [74] Making Repair which are scattered all over the ground.
Once these three objectives are complete, find a Broken-Down Shredder.
Hop in it and run it back to the camp [34,32] click the spell “Shredder Delivery. Do this three times. Turn in:
[74] Making Repair
[74] Shred the Alliance
[74] Keep ‘Em on Their Heels
[74] Overwhelmed!
Mount up and fly south-southwest to Venture Bay [10,76]. At this camp pick up the following quests:
[74] Smoke ‘Em Out
[74] Crush Captain Brightwater!
[74] Keep Them at Bay
Go across the river to the east and you should see a house [14,76]. Use your Smoke Bomb on the Venture Company Stragglers. Clear alliance while working your way toward the Lumbermill [16,76] and smoke the Venture Company Stragglers out here. Finally clear alliance to the second Lumbermill at [17,79] and smoke the rest of the Venture Company Stragglers you need. Get out of the lumber mill and clear the alliance on the dock [14,78]. You should see a ship on the dock, similar to the ones that carry you to Northrend. On the main deck you should see Captain Brightwater, kill him. Finish killing alliance until [74] Keep Them at Bay! is complete.
Mount up and go back to the camp in Venture Bay. Turn in all the quests.
Grizzly Hills Complete – 21/25 Dailies Complete – 325+g Earned.
8.0 Methods for a Short Burst of Gold
Requirements:
-
-
-
- 375 Herbalism.
- A character level 68 or above (in order to gain access to Northrend).
- No specific mount required.
- 5 minutes.
-
Disclaimer: Prices are very server dependant!
-
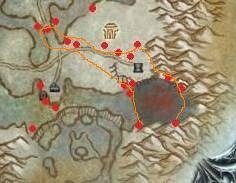
First head over to Borean Tundra. The place where we are going to be farming is a little lake in the middle of the map called . Here is a map of Borean with the lake circled.
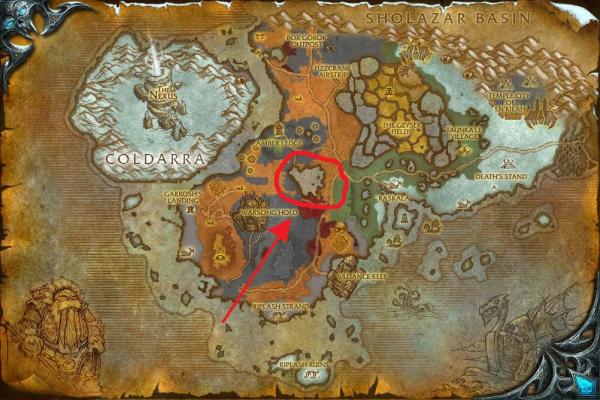
Ok, now to the route. As you can see on the map below there are quite a few spawns of Tiger Lily here. If you use a route like one on the map below you can cover the whole of the area in mere minutes.
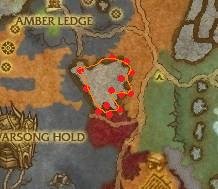
This usually nets me about 1/2 a stack of Tiger Lily, which on my server is worth around 12g50s; all that for just 5 minutes of work. However that is not the only money source. Occasionally you will get Crystallized Life drop with the herbs, gather it up; it’s worth about 10g minimum for one Eternal Life (which is 10 Crystallized Life). However, the drops keep on coming, you will also get some Deadnettle drops. This sells for about 25g a stack. Finally if you are lucky you will get some Frost Lotus dropping. These beautys are worth around 25g each!
So to sum up you will be gathering:
-
-
-
- Tiger Lily (25g a stack)
- Deadnettle (25g a stack)
- Eternal Life (10g each)
- Frost Lotus (25g each)
-
Continue to do this until your bags are full, this will take a while, be patient. It is best to fill your bags, then go back back to the Auction House and put them on. Do not put all the ones that you have farmed on the Auction House at once. This will crash the market, put a maximum of about 3 on at a time.
-
If you aggro one of the Loot Crazed Divers around the edge of the lake, dont worry, just kill it and collect the loot; you can get greens drop and Fur Clothing Scraps sell for 10s each, which is pretty nice for a grey drop.
If you collect Nesingwary Lackey Ears which drop off the Loot Crazed Divers then you can also hand in Ears of Our Enemies for 9g86s, 20300 XP and 250 reputation with the Cenarion Expedition!
The repeatable version of the quest is called Can’t Get Ear-nough and the reward is 150 reputation with the Cenarion Expedition.
Requirements:
-
-
- Able to enter Wintergrasp.
- Time = 10-15 minutes.
- Part 2 requires Engineering (minimum 305 to use Zapthrottle Mote Extractor).
- Part 3 requires Mining (450 recommended, 400 minimum; but you will only be able to mine the normal Saronite Deposits).
- Additionally you can use a Herbalism route instead of Part 3.
-
There are 3 parts to this following guide, and some can be used in conjunction so you can make as much gold per hour as possible.
Part 1
All characters can do this, but with varying success (it requires grinding level 80s with a fair bit of health). The location is the Cauldron of Flames in South-Eastern Wintergrasp.
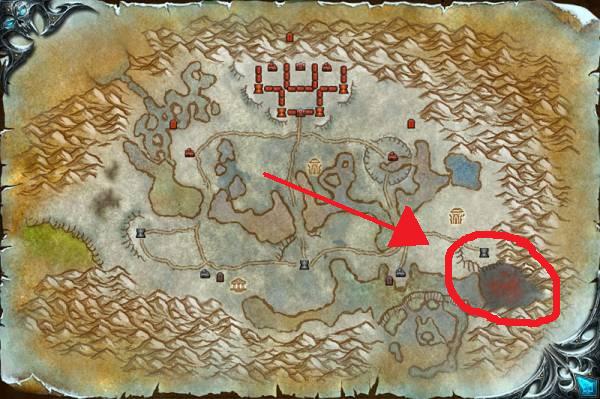
Here you will be farming Crystallized Fire. I would advise that you only kill the Flame Revenants, although you can kill the smaller ones if you want or your faction does not control Wintergrasp. This tactic works best if your faction controls Wintergrasp, as Flame Revenants do not appear if your faction is not in control. Flame Revenants have a 100% drop chance for Crystallized Fire, usually dropping around 3. If your faction is in control and you can see these then I recommmend that you do not kill the smaller elementals because they do not drop Crystallized Fire as often as Revenants, and in this guide I am trying to maximise the amount you get in the time taken. However they will still drop the occasional Crystallized Fire so if you have the time every little helps .
After having killed the Flame Revenants that have spawned you will have a little bit of time before they spawn again, in which I suggest doing Part 2 or Part 3.
Part 2
For this part you will require 305 Engineering.
While you are killing Flame Revenants (and elementals) look out for Cinder Clouds which spawn around the cauldron (as shown on the map below), these can be ‘mined’ using the Zapthrottle Mote Extractor, and yield 3 or 4 Crystallised Fire.
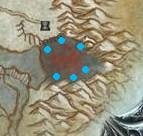
The Cinder Clouds look like this:

Part 3
For this part you will require at least 400 mining (preferable 450).
You will be looking for nodes of Saronite, Rich Saronite or Titanium nodes. I suggest you use a route similar to the one shown on the map below, it usually yields one or two nodes, more if you are lucky.
Once you have completed the circuit you will be back in the Cauldron of Flames, and ready to begin again. If they have not spawned yet then you can log off and do other things and come back later.
==Note== It is possible to do a similar thing with herbalism, however I do not have herbalism on the character that I do this with and as such have no routes established. But you can easily construct your own little circuit around the Cauldron of Flames using an addon such as Cartographer, Gathermate or Gatherer.
- Enchanting skill level 150.
- Level 60+.
- Epic Grund Mount (optional).
- 10-30 minutes.First of all, get to Zul’farrack. While in there, mount up and run past as many mobs as possible without getting aggro of them (it is impossible to NOT get aggro of anyone, just ignore them, in the case you get dazed, stop and kill them). Only kill the bosses (after you’ve killed them you may have to kill some mobs who did followed you). Loot them, and disenchant their loots.
Here is a video of Tommyhales doing it:
So bassically, all you have to do is running through the instance and kill the bosses. The disenchanted loot will pretty much be Small Radiant Shard’s, and Large Radiant Shard’s.
- Enchanting skill level 125.
- Level 60+.
- Epic Grund Mount (optional).
- 6-8 minutes.
- The scarlet key.Go to Scarlet Monastry Armory in Tirisfal Glades. Here you will be doing the same as in Strategy 3, but here you can’t mount. Run instead, and try to avoid aggro. Run to Herald (which is the only boss in Scarlet Monastry Armory), kill him and disenchant his loot.
Here is a video of Tommyhales doing it:
The drops in Scarlet Monastry Armory, will disenchant into Small Radiant Shard’s.
Both large and small shards sells pretty good on the Auction House, so mail them to your banker, or use your Hearthstone to get to a capital city.
Requirements:
- Level 30+ characther
- You need to be Alliance
Part 1

Buy cats. It may sound crazy, but it can make up to 200-600g a week! First, you got to buy the cats. The catseller is located in a cottage in Elwynn Forest. If you go from Goldshire to Norshire Abbey, you will find the cottage at your left side in the woods. The cats cost about 50s but you can sell them in Booty Bay for 10g! Another catseller is Lil´Timmy in Stormwind. He is a rare spawn and sell only 1 white kitten per spawn. It to cost around 50s. So far I´ve got it twice and I sold it the first time for 100g and the second time for 150g.
Part 2
Now you bought your bags full of cats and maybe your where lucky and bought the white kitten. Now it´s time to go to Booty Bay or Gadgetzan and put them on the AH. Why you should put them on the neutral AH, because the pets can only be bought by Alliance players. That means, that you can make a profit out of Horde players. Put the cats up for sale at about 10g and the white kitten for about 100g.
9.0 Saronite/Titanium Mining Routes
Basically the most common routes for Mining. (Requires 350+skill).
Sholazar Basin
-
- Highly recommend Sholazar, may face some competition from others, but plenty of ore here for you to mine.
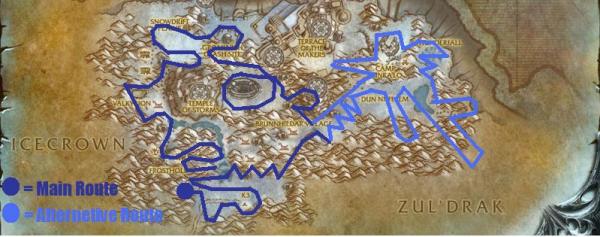
Icecrown
-
- Great area to get some mining done, be wary of stiff competition and mobs getting inbetween you and your ores.
The Storm Peaks
-
- Really large area, prepare to spend lots of time in here mining.
10.0 Icethron/Lichbloom Herbalism Routes
Basically the most common routes for Herbalism if you wanna farm Icethron/Lichbloom. (Requires 350+ skill).
Icecrown
-
- Great area to get some mining done, be wary of stiff competition and mobs getting inbetween you and your ores.
The Storm Peaks
-
- Really large area, prepare to spend lots of time in here gathering herbs.
Maps on where to farm Eternals. Original Guide here by Shikamaru.
There are 6 Eternals: Air, Water, Shadow, Fire, Earth and Life.
Eternal Air, average AH price is 50G.
Eternal Water, average AH price is 10G.
Eternal Shadow, average AH price is 10G.
Eternal Fire, average AH price is 50G.
Eternal Earth, average AH price is 5G.
Eternal Life, average AH price is 50G.
Eternals are used in almost every high-end crafting profession, from Alchemy to Enchanting. In most cases it is better to farm Eternals than normal gold grinding, it will give you a higher gold/hour ratio.
As you can see, Eternal Life Fire, Air, are worth far more than Eternal Water, Shadow and Earth. This is based on WoWhead and on my own server economics. Note that the prices may vary per server!
Notices:
- You can do Eternal farming alongside Daily circuits or gathering materials for Alchemy as an example.
- Wintergrasp is a place where almost all Eternals can be farmed, but be careful: Wintergrasp is a PvP area.
- Example: You need 10x Crystallized Fire to create Eternal Fire. This applies to any of the Eternals we talked about before.
- You can only farm in Wintergrasp when your faction is in control!
- Herbalists can get additional Crystallized Life from herbs, Miners can get additional Crystallized Earth from mining nodes.
There are several places to farm Crystallized Fire.
-
- Wintergrasp
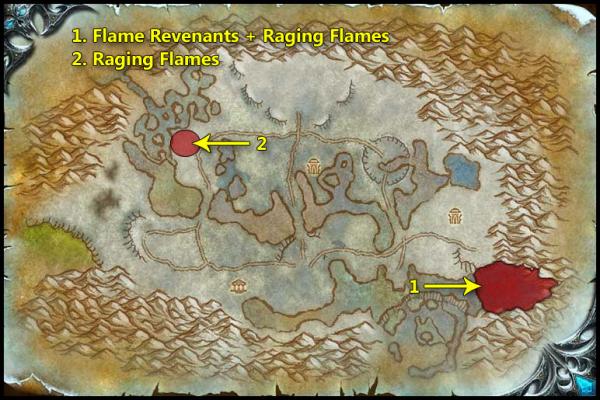
-
- Wintergrasp is a good place to go. Flaming Revenants and Raging Flames will be your targets. Look at the map above to find them. I recommend going to the bigger area where the mobs are mixed, this is by far the best place to farm them.
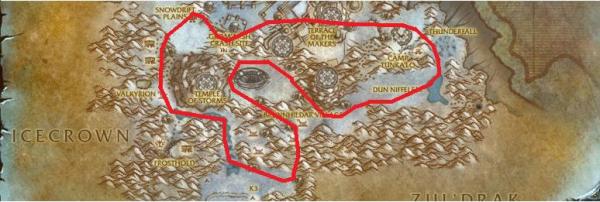
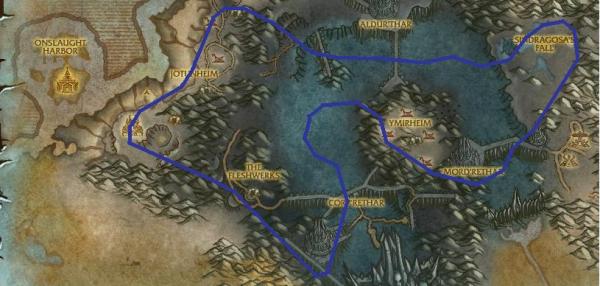
The Storm Peaks
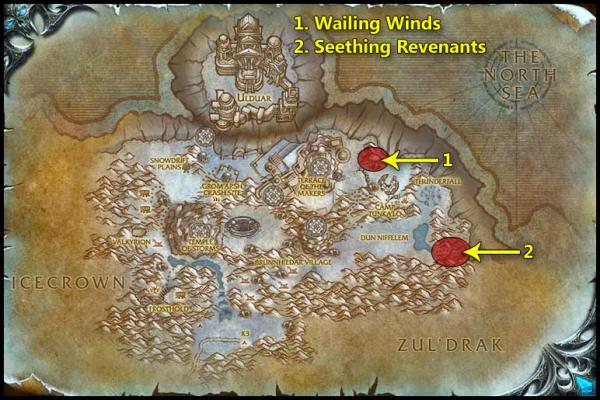
Besides Wintergrasp, The Storm Peaks is a good place to go, too. Your targets will be Seething Revenants and Wailing Winds, shown in the map above. The drop rate is lower than in Wintergrasp, but still decent.
==Note== drops Relic of Ulduar. These can be turned in for Airy Pale Ale, Worg Tooth Oatmeal Stout and much more.
There are plenty of spots to farm Crystallized Air, but I’ll give you the ones that will give you the highest drop rate.
-
- Wintergrasp
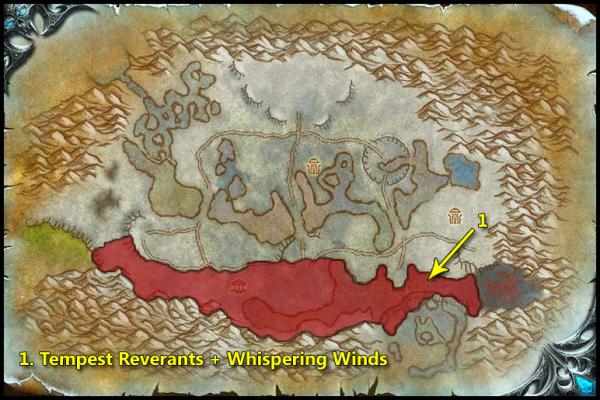
-
- And again, we are in Wintergrasp. But not for Fire , for Air this time! You will be hunting on Tempest Revenants and Whispering Winds, shown in the map about. These two have the best drop rate on Crystallized Air out there. They are spread throughout the area marked on the map.
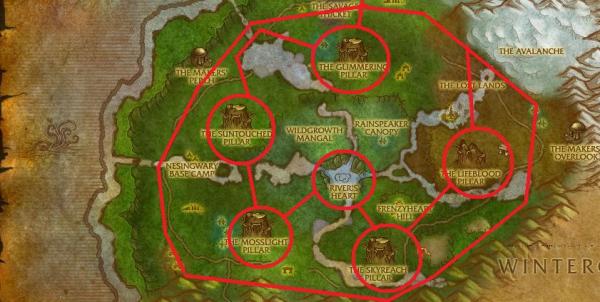
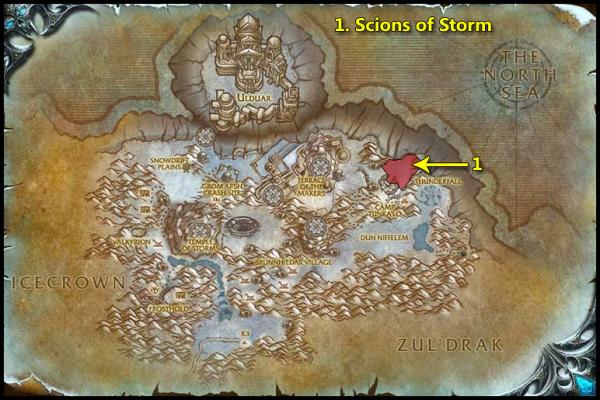
Sholazar Basin
Storm Revenants in Stormwright’s Shelf have a decent drop rate, too. There are plenty in the area, as you can see in the map above.
==Note== while you’re here, you can farm Crystallized Water, too!
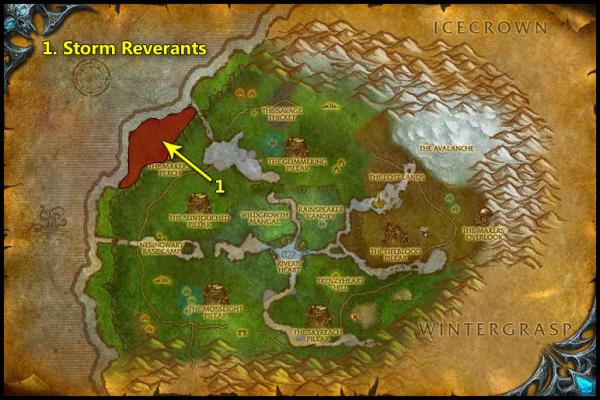
The Storm Peaks
If you don’t want your grinding to be interrupted, Howling Hollow is the place to be. Scion of Storms will be your target, as show in the map above. Here you won’t get interrupted by other mobs attacking you and they have a ~30% drop rate on Crystallized Air.
==Note== drops Relic of Ulduar.
This’ll be a bit harder to farm assuming you aren’t a Herbalist. This is because Wintergrasp doesn’t have Life Revanants – it only has Life Elementals, and they don’t have a 100% drop rate, sadly enough. I’ll give you two spots to farm Crystallized Life.
Wintergrasp
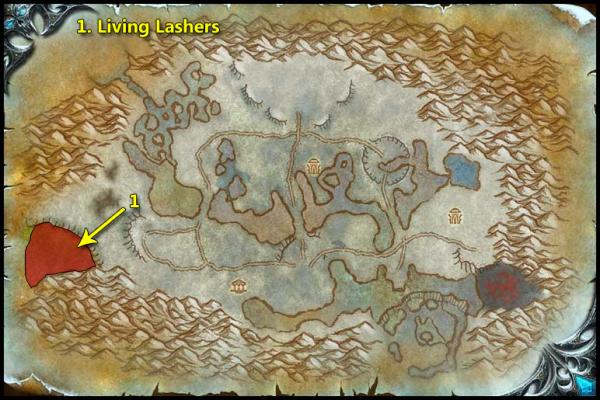
Yes, we are in Wintergrasp again. As shown in the map above, you target will be Living Lashers. They have a ~30% drop rate on Crystallized Life, but they’re tightly packed, so don’t worry.
Zul’Drak
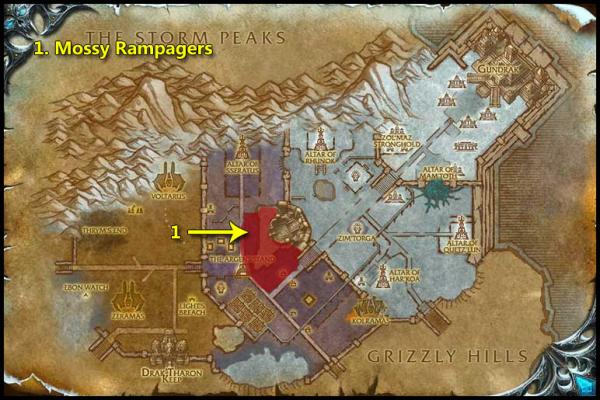
In the map above you will see that your targets are Mossy Rampagers this time. I, personally, don’t like this spot. The Rampagers are spread out and they are mixed with other mobs, which slows down your Eternal farming. These also have a ~30% drop rate.
Crystallized Water is one of the easier Eternals to get your hands on. If your fishing skill is high enough, you can fish them up and Miners can get them from Titanium and Cobalt mining nodes. Below I’ll give you 3 spots to farm for Crystallized Water and 2 spots to fish them up.
Wintergrasp
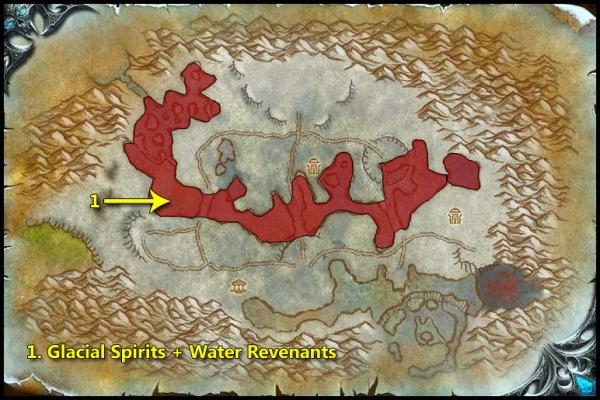
Your targets will be Water Revenants and Glacial Spirits. No further explanation needed. There are much more Glacial Spirits than Water Reverants, though.
The Storm Peaks
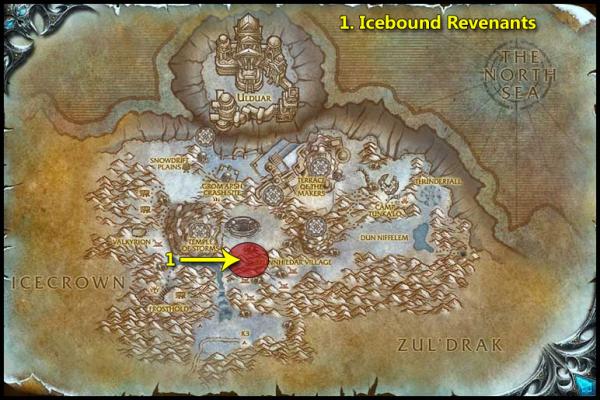
Icebound Revenants in The Storm Peaks will be your target as you can see in the map above. They’re tightly packed and have a ~25% drop rate.
Sholazar Basin
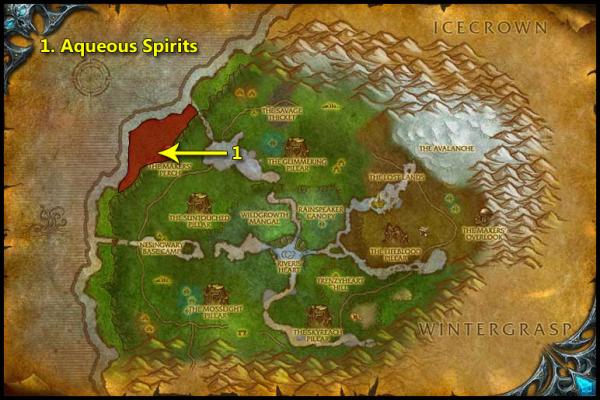
And we’re back in Sholazar Basin again. Your targets will be the Aqueous Spirits wandering around Stormwright’s Shelf. As I said before, you can farm Crystallized Air here too.
Fishing: Howling Fjord
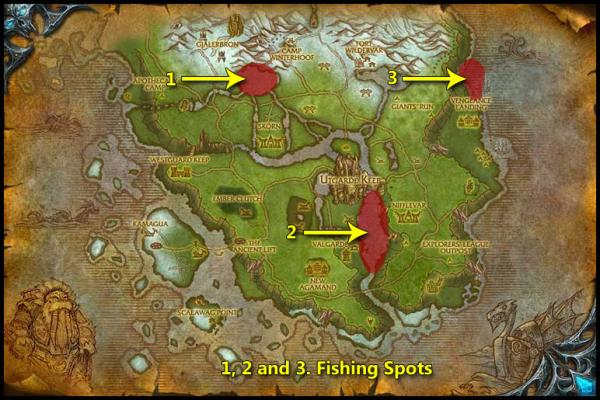
There are 2 major spots in Howling Fjord to fish up Crystallized Water, as you can see in the map above.
Happy fishing!
==Note== Crystallized Water is a random drop while fishing. You will need 385 fishing to cast in Howling Fjord and 450 to prevent fishes/Crystallized Water from getting away.
I’ll be giving you 2 spots to farm Crystallized Shadow.
-
- Wintergrasp
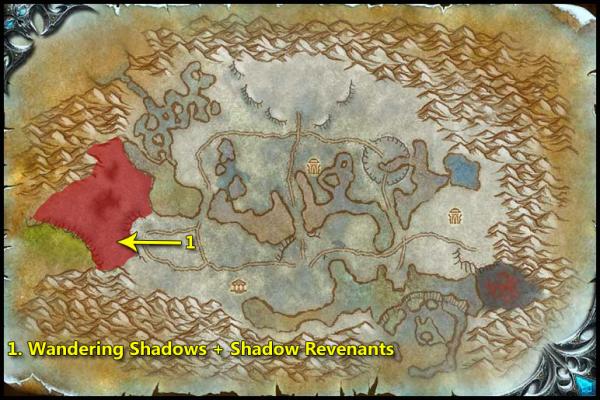
-
- If you look at the map above, you will see that your targets are Shadow Revenants and Wandering Shadows. Shadow Revenants have a drop rate of ~140%, so you’ll get atleast 1 Crystallized Shadow per kill. Wandering Shadows’ drop rate is around 30%.
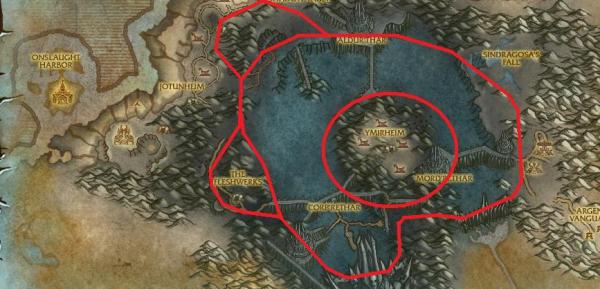
Dragonblight
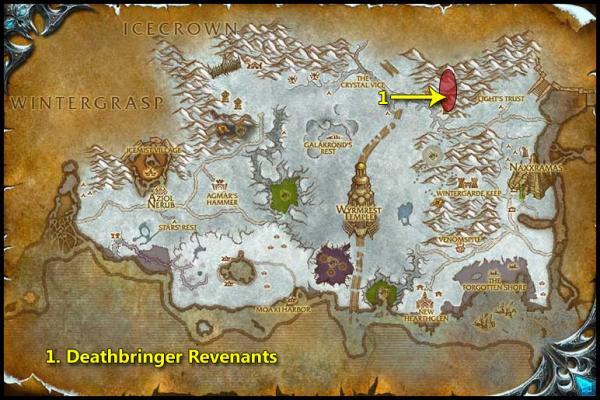
Your targets will be Deathbringer Revenants, as shown in the map above. The drop rate is around ~25%, slightly lower than Wandering Shadows.
In my point of view, it’s a waste of time to farm Crystallized Earth. The Eternals go for 5G median on the Auction House, so it’s better to use your time farming the other Eternals. But for those that really want to farm them:
Wintergrasp
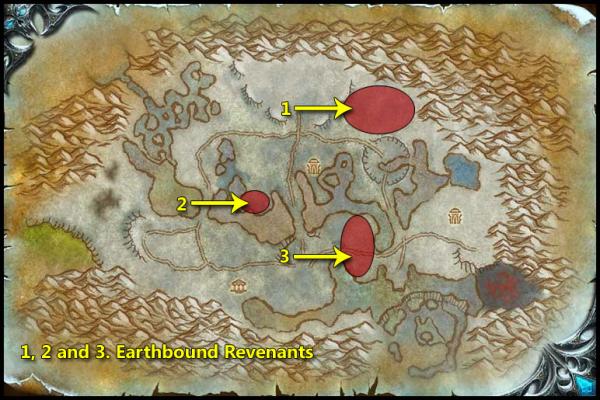
Your targets will be Earthbound Revenants, as shown in the map above. No further explanation needed.
12.0 The Burning Crusade Gold Making
In case that someone don’t have the expansion (WotLK), here is a guide on making 115g in 30 minutes.
Isle of Quel’Danas Daily Quests
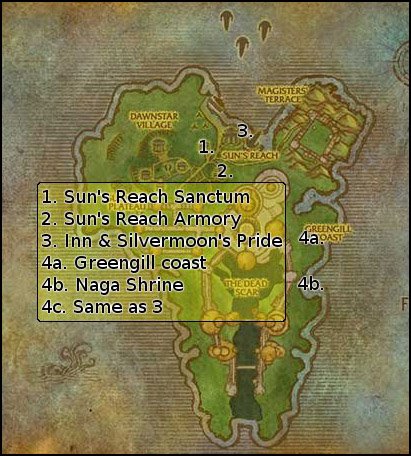
- You take the Shattrath Portal to Isle of Quel’Danas from Shattrath City and end up in the middle of Sun’s Reach Sanctum. Jump down from the tower and go inside it. Get the quests: [70] The Battle Must Go On, [70] The Air Strikes Must Continue and [70] Know Your Ley Lines
- Go southeast to Sun’s Reach Armory. Take the spiral staircase upstairs. Pickup [70] Keeping the Enemy At Bay on the way. In the top get [70] Crush the Dawnblade. Run back out to the staircase and jump down and take [70] Dont Stop Now…
- Mount up and ride north to the Inn and get [70] Open For Business and southeast to the Silvermoon’s Pride(the boat) and take [70] Disrupt the Greengill Coast. From here ride east out Greengill coast.==Note== From now on pick up any Bloodberry you happen to pass by until you have the 5 required. Theres gonna be a lot in the forest on the west side, so it will be no problem getting them, however you might as well pick them up if you happen to be next to it. If you are a herbalist you can track the Bloodberries on your minimap
- Here you go south killing all Darkspine Sirens and Darkspine Myrmidons. Make sure to loot them for Darkspine Chest Key and Orb of Murloc Control. Use the Orb of Murloc Control on the little green murlocs to free them(if they are red it means that someone else has allready freed them). Its possible to free 3-5 pr orb, so if your lucky with bundle of murlocs, you only need 2-3 orbs. The orbs are 100% drop chance.
The Darkspine Chest Keys are used for opening the small Darkspine Ore chests you find all along the coast. The keys arent 100% drop chance, so you might have to kill a few Myrmidons to get the 3 keys.
As you move south you come to the Naga shrine [61,62] where you need to use the Astromancer’s Crystal in your inventory. If you are not done with freeing murlocs and getting ore keep killing while you move north.
As soon as you are done, mount up and ride back to the Silvermoon’s Pride and turn in [70] Disrupt the Greengill Coast.
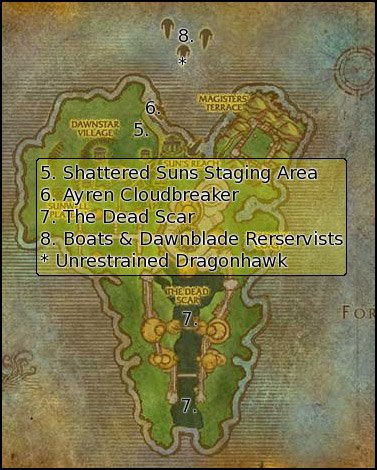
- Ride west and then northwest to Shattered Suns Staging Area. Inside the hut you get [70] Further Conversations and [70] Arm the Wards!
- From the hut ride north and find Ayren Cloudbreaker at the end of the dock. You need to dismount manually before you get on any of his missions. The order here doenst matter, so I just start with the top one which is going on an air strike for [70] The Air Strikes Must Continue. Locate Arcane Charges in your inventory and put it in a hot key spot, this can be done after talking to him as it takes some time getting to the bombing area.
- When you reach The Dead Scar you can start to bomb. You need to kill 2 Pit Overlords, 3 Eredar Sorcerers and 12 Wrath Enforcers. The Enforcers and Sorcerers should die from 1 charge, while the Pit Overlords needs to be hit twice. There are plenty of mobs and they respawn quite fast, so its easy to get it all in 1 round, I at least have never tried not getting all my kills.
- You land back at Ayren Cloudbreaker and talk to him again and accept the other mission for “intercepting the Dawnblade reinforcements” for [70] Keeping the Enemy at Bay. Here you need the Flaming Oil in your inventory. You only need to click it 3 times, but you can put it on a hotkey if you like.
You come to the Sin’Loren first, click the Flaming Oil and use it at the big mast. The bird then fly to the Dawnchaser, wait with throwing till you are on the eastside of the boat. Last the bird fly to the Bloodoath and here you throw from the west side of the boat.
The reason I say where to throw it from is that Ive experienced that its not working from certain points, and the ones mentioned works every time.
As you bomb the boats, make a note if there are horde or ally killing mobs on them as you need to slay 6 Dawnblade Rerservists next.
You land on the Sin’Loren in the middle and can stay there and kill Dawnblade Rerservists or move to another boat.
When you are done, talk to the Unrestrained Dragonhawk, which will take you back to land.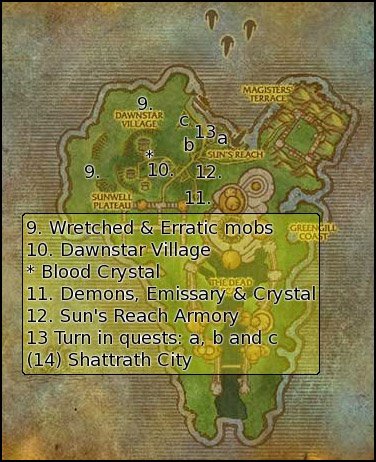
- Mount up and head west into the forest. Here you need to kill Wretched Fiends and Wretched Devourers for 4 Mana Remnants for [70] Arm The Wards!, keep picking up Bloodberries if you havent gotten 5 yet and kill Erratic Sentries. When you killed a sentry, make sure to loot it first as it usually holds a grey item and sometime Motes of Mana. Afterwards rightclick the Attuned Crystal Cores in your inventory and click the sentry. Now you converted 1 sentry out of 5 needed for [70] Further Conversations.
Stay in the forest until you gathered the 4 Mana Remnants, converted 5 sentries and looted 5 Bloodberries. - Depending on where in the forest you are when are done, ride south or east into the Dawnstar Village. Here you need to kill 6 Summoners, 6 Blood Knights and 3 Marksman. As you kill the mobs, move to the Blood Crystal [42,35] and do a reading with the Astromancer’s Crystal. Its very easy to kill Summoners in this room as they often dont have a pet, and if they do, you can kill the pet first without the Summoner aggroing.
- Continue east under the bridge and start killing Demons for [70] The Battle Must Go On. You need to slay 6 Demons and impale the Emissary of Hate with the Shattered Sun Banner. You can impale the Emissary of Hate no matter if its your kill or not, so focus on killing your 6 demons and go kill the Emissary of Hate if no one has by then. At [48,44] you do the last reading with the Astromancer’s Crystal.
- Move northwest to the Sun’s Reach Armory and get close to a Crystal Ward (those big red crystals you can find all over) and click Mana Remnants in your inventory. Now turn in [70] Dont Stop Now… While you are here, repair and sell the gray items.
Run upstairs and turn in [70] Keeping the Enemy At Bay and [70] Crush the Dawnblade. - Jump down and mount up. Ride north to the Inn and deliver [70] Open For Business. Continue southwest and deliver [70] The Battle Must Go On, [70] The Air Strikes Must Continue and [70] Know Your Ley Lines.
Ride north and deliver [70] Arm The Wards! and [70] Further Conversations.
In this hut you find Eldare Dawnrunner who is the Shattered Sun Quartermaster. Furter more, when you achieve friendly, honored, revered and exalted reputation, she will give you a care package filled with pots, elixirs and rep items you can sell for more gold. - From your inventory use the Darnarian’s Scroll of Teleportation from your inventory. You now find yourself back in the middle of Shattrath at least 115g richer done in approx 30 mins.
13.0 World of Warcraft Originial Money Making
In the case that some don’t have the expansions (WotLK and The Burning Crusade), here is one of the strategies that can be done.
==Note== This for Alliance only.
The idea is to do the reputation grind for the Wintersaber Trainers, which gives a nice mount in the end. While doing this, you should skin every slain beast, mine every node or pick every bush you come across. Of course, this guide does not guarantee 6310 gold, but I’m sure you can come close to that.
Requirements
- 58+ character
- 2-3 hours per day
- Class, skills and other recommendationsThe class can be any; it doesn’t matter as long as you enjoy the class. For skills, however, I highly recommend you get Skinning and Mining or Herbalism, because thats where the bulk of the money comes from. You need to level these 300, to be on the safe side.While not needed, I do recommend on having an alt character that has Enchanting. Which is capable of disenchanting items varying from level 51 to 58. This is not a must, because you can also sell the items you loot on the Auction House. So first, check what sells more.Also a 100% mount does help, this makes the process alot faster.
==Note== This will be done in Wintergrasp, so start heading there! - Rivern FrostwindYou’ll get to know him pretty well in the upcoming days, because he is the reason behind the grind to the gold. The mount he sells is unique, and even though the reputation grind has been made easier, this guide is still worth following. He can be found in the very north of Winterspring, at Frostsaber Rocks.As the tooltip states here: Reins of the Winterspring Frostsaber, the mount itself is a very fast mount but only requires 75 riding skill!
- The quest[60] Frostsaber Provisions is the first quest Rivern gives you, and the only one we will use in this guide. For this quest you need to get:5x Shardtooth Meat. Drops from the various bears, but you’ll mostly likely kill Elder Shardtooth bears, because they are near the chimera’s you need to kill, too.
5x. Chillwind Meat. Drops from various chimera’s, but you will most likely kill Chillwind Ravager’s.
This quest gives 250 reputation points.
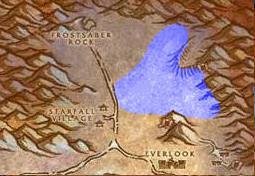
You can find Elder Shardtooth Bears and Chillwind Ravager’s in the blue marked area. - Your incomeIf you don’t have a bank character, make one now. A bank character is a character you make and is standing in a major city. All he does is picking up all the loot you send to him/her and that bank account sells it. This saves you the travel to the major city every time you want to sell stuff, at the auction house. This is the reason it’s a must for this guide.So you know that the idea is to skin every mob, mine every node and collect every bush you come across. With a bank character ready, simply visit the mailbox in Everlook once in a while and send it. The greens, blue’s or even epic’s you get, will sell nice, otherwise the materials you get from disenchanting them, will.
- Pay attention to how much money you are making for the time spent playing
At the lowest levels you shouldn’t worry about it too much but it can still apply if you want it to. With that said, it is still possible to think about gold making as a whole other game. A game within a game if you will.
If you are going to dedicate time to simply making money you should definitely consider your hourly gold rate and seek to maximize it.
Some specific examples include,- Time spent traveling is time spent not making money.
- If you are going to grind for xp or money, at least kill mobs that drop useful loot and lots of it. Some mobs have small loot tables and some have very large loot tables. We want large. Some mobs actually drop nothing a significant amount of time. Certain beast mobs are like that. Kill them when you have to but otherwise do not seek them out. What we want are mobs that drop cloth and money and items, like humanoids, or skinnable beast mobs that also drop a large numbers of other things.
- Kill mobs near large concentrations of harvestable resources.
- Combine tasks that can be done at the same time. If you have to travel on foot make a point of killing every mob between point A and point B. You get xp and gold. That’s double plus good. Gathering herbs and metal while traveling on foot is also a good idea. I should tell you that I am the Master of the Obvious.
- Think about how to use your character in ways that kills faster or more mobs at the same time. AoE farming by mages can be pretty profitable if you know what you are doing. Rogues using Blade Flurry can kill two mobs at a time every few minutes. Mo money, mo money, mo money. Killing mobs 2 to 4 levels lower than you speeds up the rate of loot drops as well as speeding up the rate of xp gain. Being uber and tackling elite mobs five levels higher than you is great and all, but it takes too damn long.
- Get your gathering Profession(s) at level 5To earn fast money, for sure the best way is to get your gathering professions as fast as possible. You need to be level 5 to get your professions – that’s why gold making start at level 5 in general.Inverst in a Mining Pick, or a Skinning Knife too (only if you got Skinning or Mining, of course).
- Shirts
This may sound weird, but you can actually buy shirts at vendors just beside the Auction House at the price of 4 silver, and sell it on the Auction House for 50+ silver. I’m gonna use Common Gray Shirts as an example. The dark color looks great on rogues, I see alot wearing them. Tailors cannot create these, so many people do not know where these shirts come from. These shirts can usually be sold from a vendor close to the Auction House, or in the same city from a Cloth Merchant. - Meat
The meat that drops from low level animals is more valuable than most people realize. Things like stringy wolf meat only sell to vender for a few copper but I don’t usually have a problem getting 50 silver out of a stack of 20 meat. The meat is handy for hunters that are too lazy to find meat for their pets or people that want to raise their cooking profession quickly. And like I mentioned before high level players normally find it a lot faster and easier to buy their way through professions. - Limited Inventory Items
Limited Inventory Items are also good. I don’t go out of my way to find these but when I see them I almost always buy them. These are usually recipes but can be other things. These are things that have a small number in the corner that indicates how many a vendor has. This means that if they just have one and you buy it, no one else can get it for a while. So you can buy a recipe for 10s off a vendor, put in the auction house for a gold and probably sell it real easy. I usually check wowhead or allakhazam before buying it just to be sure. There are a few that aren’t worth the time but a majority of the time you’ll be fine to just grab it and list it. - Building crafting professions are money sinksIf you want money, make your life easier and take two gathering professions as your primaries when you start your character. Only take up a building profession when you can afford it, after you get your mount.
Fishing is a gathering skill. Think about that for a minute. It’s a secondary skill but it’s a gathering skill just like some of the primaries. If you can stand watching a bobber and clicking on it at the exact right time than you should find a fishing guide and read up on the finer details of the profession. It can make you money but dang fishing annoys the crap out of me.
- Bags
Probably the most important thing you need to do to make money, is get big bags. I recommend you get big bags as soon as you can afford too. I usually start off with 12 slot bags. They are usually reasonably priced on most servers and will serve you well until you can move up to bigger sizes. Being able to hold more will improve your ability to make money because you won’t have to pass up on things because your bags are full and increase efficiency since you won’t have to run to town all the time to empty them back out. - Always sell Grey/white stuff and Junk at the Vendor
In general, do never forget to loot grey, or white items from dead mobs. These are actually much worth especially in the high levels, at the merchant. When I levelled my Death Knight from 70-80, I think 800/4000 gold came from white and grey items. - Create a Banker
A banker is a character that is selling all your stuff at the Auction House. If you don’t already have one, make a new character and run to a capital city. When you have been gathering all of your skins or nodes, send them to the banker and log on daily selling them on the Auction House. - Find Limited Recipes
Most recipes can be bought from a specific vendor, however some can only be bought once or maybe twice from a vendor in a certain time frame. The recipes that have limited availability and have a vendor who may not be easy to get to will usually sell very well. - Neutral Auction Houses
Keep you eye out for factional type stuff that can be sold over the neutral AH for a decent profit. Recipes, pets, items, and more can all be sold for gold if you have the patience. - Disenchant Green Gear
If you’re enchanter, go for disenchanting all green colored gear if the price is worth it (sometimes the items sells better at the vendor than the dust does on Auction House, depending on your server economy). - Be careful when you’re posting on Auction House
Be care ful about what you’re selling, when you reach the levels between 60-80 and are trying to sell rarely droppped Epics or Rares, you will mostly pay 10-30g fee just to set up the Auction on the Auction House. - Try sell in the Trade Channel
If you got some Epic or Rare items which is expensive to post on the Auction House, try yelling in the Trade channel (/2): ‘WTS “item” cheap /whisper me offers!’ or something simulair to that, just everytime you’re in a capital city. - Invest In Macro Training
If you are planning to bark out that you are doing enchants in a busy city, make sure that you can do so without needing to type a small paragraph each time. 3 lines seems to be the respectable max for a post in the trade channel. - Fishing May Be Boring, But Worth It
You would be suprised at what fisherman pull up. Yes, I know it’s boring sometimes, repetitive all the time, and most of the time you get worthless fish. But if you know where to fish, that changes the game. Fish schools of specific fish like Oily Blackmouth or Firefin Snappers and they sell well in a stack. Find yourself with some Stonescale Eels and they sell for gold. Not to mention all the junk you can get out of the water from wreckage - Gold Farmers Are People Too
This is fast becoming a time honored tradition in WoW that is simultaneously loved and hated for various reasons. If you’re good about it, farming from a gathering skill in the right areas is like panning for gold and consistently getting it. - Increase your Movement Speed
Once you have a mount, that is a tremendous speed boost in your gathering ability that can help you earn money at a faster rate. Plus, it’s nice to be able to travel at faster speeds.
- Auctioneer – Auctionner Addon is pretty much a must, alos needed in several of the sections in the guide. It will surely help you out in many ways when farming gold. Auctioneer allow you to scan the Auction House – the key to discover your server economics. The addon does also help you posting auctions at the Auction House at the right price, and allow you to see what items that are undercutted.
- Gathermate – Shows locations of Nodes on the minimap and world map, adds them to a database.
- Gathermate_Data – Contains locations of almost every Node in the game, extremely useful.
- SellJunk – “This is a really simple little addon that will make your life much easier! It adds a ‘SellJunk’ button to every Vendor window that will automatically sell all the gray items in your inventory. You can also configure it to sell all your gray items automatically when you talk to a vendor NPC. You don’t even have to click the button! In addition to gray items, you can also manually specify other items to sell automatically or items that should never be sold automatically even if they are gray.”
Quote from Loise Hand from EzineArticles.com - Rating Buster – An add-on of great significance when deciding on a quest reward. Simpler stats? Yes please! Simpler item comparison and deciding if an item is an upgrade is the biggest purpose. In the end, it alone can save you much money, since you will not waste quest rewards only to see your DPS, TPS, or HPS go down after you equip it. Much less disappointment, and much more gold; I’ll let you decide if it’s a fair trade!
- Sellfish – Another key add-on in the art of making money from vendor trash, also, not just quest rewards! At low levels, this can save you by helping you decide which piece of gray loot you throw out to get that quest item, thus losing the least money possible. This and Rating Buster go hand in hand because when none of the quest rewards are an upgrade, you get a larger amount of gold than just clicking on one and turning the quest in. It when combined with Rating Buster is an add-on of great worth in the process of making money from quest rewards.
- Vendor Bait – This is an add-on that automatically highlights the most profiting item, making it so that you don’t even have to compare prices with sellfish on your own! Rather spectacular, imo.
16.0 Shikamaru’s Weekly Gold Post
Shikamaru, which is another user on Wow-Pro has recently started a Weekly Gold Post.
So far, one is done! Shikamaru’s Weekly Gold Post.
Follow his progress here on the site!
Here is a list of the original authors of gudies tips and comments. I hope I have managed to include all:
- Shikamaru – Couldn’t have done this without Shikamaru. Most of the Auction House information comes from Shikamaru’s gold posts, as do all the Eternal routes and mapes.
- Hairbo – I only had to copy his great text into this compilation. The excellent Daily Circuits come straight from Hairbo.
- World of Warcraft Europe – Much of the information about professions, was borrowed from www.wow-europe.com. Great thanks to them.
- Crunge75/Trollvink – The section about Gold Making at Original WoW was written by Crunge75, and edited by Trollvink.
- Requim – He’s guides and tips were a great help, thanks.
- Johanneslars – He has given so many useful tips.
- Night_Hawk – His guide about methods for short bursting gold farming are just great.
- Tommyhales – These videos shows alternetive ways of gold making, going through instances, and other things. Vevy nice.
- à˜ffelbà¸v – The Quel’Danas daily quest section was copyed from à˜ffelbà¸v’s guide, thanks!
- Arkaen – Arkaen did also have some tips to share, and helped me out on how to get most out of quest rewards.
- Zerinj – His maps about Mining/Herbalism are great, I borrrowed some of those without shame.
- Thijz, Toogie, Dolin, Ishyma, Benniboy C and Athor Pel – Has contributed to the low-level guides, great thanks to them all.
- Jame – I’ve borrowed Jame’s logo to the front image, great thanks.
- And of course thanks to all of you who have been posting useful comments to improve the various guides, and everyone that has taken time to read through this guide!
I wanna make this very clear; This is not Eric’s guide. It is WoW-Pro’s. Most of the information is either researched, or copyed from WoW-Pro’s gold making section, and WoW-Pro’s WotLK daily section. All copyrights reserved to the original authors.
1 small adjustmentHi m8,
Without a doubt, this is one of the best free guides I’ve seen, although you made one small mistake, as far as I know.
You say that you can only farm Eternals in Wintergrasp when your own faction is in control, that’s not true.
You can still go inside Wintergrasp even when the other faction has it, truth is that you’ll be in slightly more danger than normally, but it is possible to mine / herb / farm, whatever in Wintergrasp, if the other faction has control.
Other than that, a great guide m8, keep up the good work =)
Cheers
my videoshey i see you have used my videos in this guide well all i can say is great its nice to see that people are still using my method well im currently writing my new guide on how to make gold with gathering skills and ill make a video so if u ever want to use it go ahead
WowI’m honored to see my guide mentioned in something like this, and it almost makes me want to start making more guides! I think you have compiled quite a great listing here, but I have a few suggestions.
First of all, you should change your ideas about inscription making money. Although this profession won’t yeild instant cash, those interested in heavy amounts of gold should use this profession. There is a guy a greedygoblin.blogspot.com that makes 20k a week selling glyphs. Here is a very informative link on how he does it, and what mods he uses:
http://greedygoblin.blogspot.com/2009/09/glyph-industry.html
I also noticed he made a part 2, in more detail:
http://greedygoblin.blogspot.com/2009/09/industry-part-2.html
I’d also considering mentioning the fact that buying raw gems and getting them cut into gems people use often (solid, runed, bold) is a great way to make money.
You also misspelled Hairbo when you put the link for my original horde guide.
Keep up the good work!!
It’s kinda like “off theIt’s kinda like “off the hook” only it’s much better because not only is it off the hook, but it’s off the chain the hook was connected to.
That’s just my interpretation.
Hahaha, I’m assuming that isHahaha, I’m assuming that is a compliment, never heard that phrase before 🙂
This guide is off theThis guide is off the chain!! :jawdrop:
Sure it’s not “The ShikamaruSure it’s not “The Shikamaru One Time Only Post”? 😛
Looks very interesting,Looks very interesting, lucretia!
I’ll sure test it, and write a short guide about it to the Short Burst of Gold section when I got the time >.<
Also, you might wanna write it down on your own if you like.
And thanks for the nice feedback 🙂
FixedFixed 🙂
Here.[url=http://www.wowhead.com/?item=48114]Here.[/url]
where do you get the deviatewhere do you get the deviate hatchlings?
Guide looks great!
WhileGuide looks great!
While the topic of gold making is almost endless, I think there are two items that you might consider adding to your guide – or perhaps just expanding on.
First is fishing. It is an extremely easy task (albeit a little time-consuming at first) to raise fishing on a very low level character to 275. Once you have this, with the aid of a vendor-purchased strong fishing pole and aquadynamic fish attractors, you can easily make 100g+ per hour on PVP servers and maybe 50-60g per hour on PVE ones – all without hunting for pools or exposing yourself to any real risks, and without the worry of flooding the AH.
Second is farming deviate hatchlings. You need to be able to solo the first room inside WC, so you’re looking at having to be just a little bit higher level – maybe 30’s or so for no worries. Better yet, take a newly minted DK in for a cake walk. 5 runs of that first room per hour will net you 400g+ per hour on average. This is the fastest gold maker in the game right now for most characters.
That must have been a lot ofThat must have been a lot of work Eric. It looks great 😉
Thanks for your input!
IThanks for your input!
I know that there are some typos
[list]
[b]1.[/b] I’m not the best speller, that might be some flaws.
[b]2.[/b] The guides which are copyed from other guides here on WoW-Pro, do probably have some errors too, and I havn’t checked the grammar in some of them.
[/list]
So I’m probably gonna check the grammar once more 😛 !
Beside that, I know that the 2 parts you mentioned is very tough, and I don’t think changing the color will remove the wall of text. I got some images from WoW-Europe.com, but the bacgrund color is kind of brown, that wouldn’t fit in on the white background we have here.
Very Very Nice guideThis seems to be exactly what a gold guide needs for me.
For Example
The layout is very clear it leads you on in a very enticing way so it is not a bore to read.
The content is thorough nearly everywhere and some of the things you include such as how to obtain a 100 percent ground mount at Level 75 riding skill is fantastic as a lot of people need to make gold to get their mounts.
The fact that it’s not based entirely on the most recent expansion makes it useable by every group of people
And most importantly for me it is not limited to 1 skill or you need to be a certain class to do this and in most guides you get one thing and that’s it.
A few improvements that I think could be made are things such the 2 sections Tips and Basics they are bit too like a wall of text as the blue is similar to the black. Just a simple change of colour would be nice there.
The spelling and grammar is off in a variety of places such as you spelt Ground mount on the Strategy runs for short bursts of Gold Grund mount. And there are a few others in there aswell.
But overall a very good guide.
Thumbs up.
Haha, well yeah I did addedHaha, well yeah 🙂 I did added it get you started writing more of them, and hopefully, that will boost your progress a bit 😉
This just looks awesome. IThis just looks awesome. I haven’t read it in detail yet, only skimmed it. Based on that, I have a few things to say, but just let me re-iterate – this is a great compilation and you clearly put a lot of hard work into it.
[list][*][b]Original guide listing.[/b] I know you link to the original guides for those that you’ve posted here, but you might also want to recognize the original author in those short, opening sentences. Basically, instead of “Original guide here” for the link, say “Original guide by so-and-so” as the link. I know you mention the authors at the bottom too, but it wouldn’t take up any more space to throw the name in at the top of each author’s guide. Just my opinion though 😉
[*][b]Grammar.[/b] I noticed a few grammar mistakes. For example, “In case you don’t [i]got[/i] the expansion” should be “In case you don’t [i]have[/i] the expansion”. I might go through and point out the others later on.
[*][b]The warning at the bottom.[/b] It’s good to have, but as it currently is it’s a very ugly and glaring way to end the guide. Perhaps leave it large and bold font, but don’t make it all caps? I’d have to see the result to judge, but I think that would still stand out but not be quite so jarring.[/list]
I’ll give more feedback if I think of it but overall this is just an excellent guide, thanks for putting the time into it! Also, bumping it to the front page.
Shikamaru’s ‘almost’ weeklyShikamaru’s ‘almost’ weekly gold post, wuhu!
I’ll write another one tomorrow I guess 😮
HOLY CRAP!!!!!HOLY CRAP!!!!!
sorry for language but wow! this guide looks amazing i havent looked at it all yet i think it will take me a couple hours 😛 but ill be sure to post any specifics once im done.
Great GuideI think this is very useful as I no longer have to check out every single guide out there to see if there is anything worth reading.
Also one spelling error under Editors Notes:
“The guides which gives “the most rewardful” gold [b]utcome[/b], reffered to level 80’s.”
Guide Puplished!Fianlly, I get done by collecting the guides into one, her it is!
If you see anything that is wrong, spelling errors, etc., please leave a comment.
Any feedback is ofcourse welcome too.