
 by Mazetar
The Snows of Northrend
Introduction
This guide is an guide on how to complete “The Snows of Northrend” Achievement,
it lists all quests and explains how to do them, I have also tried to use the same color coding and formatting as Jame uses in his leveling guide because people find it’s easier to do it the way people are familiar with.
Okay then we are almost ready to start, just one last thing:
Credit to those who deserves it.
– Brune For helping me with spelling corrections and formating of the guide.
– Jame For making this guide possible at all;) and for the help.
– All who post feedback/comments here:)
“Note: Last bits of formatiing of headlines etc. will come within the next few days, I have set the guide back to finished so it should be readable”
And here we go!:)
________________________________________
Color Code:
* Quests
* Items
* Locations
* Quest objectives to kill
* NPCs
* (Locs)/(xx,xx)
________________________________________
The Guide
1. Where in the World is Hemet Nesingwary?
Archmage Pentarus in Krasus’ Landing in Dalaran offers this quest at level 76.
Once you’ve got the quest, and are ready to leave Dalaran, talk to Archmage Pentarus and he will teleport you to Scholar Basin close to a guy named Monte Muzzleshot (39,58), Deliver the quest to him and get the follow up [Welcome to Sholazar Basin].
2. Welcome to Sholazar Basin
Travel east to Nessingwary Base Camp and deliver the quest to Hemet Nesingwary(27,58)
3. The Camp
There are three quests in the camp, get all of them:
[It Could Be Anywhere!] From Chad.
[Venture Co. Misadventure] from Debaar.
[Need an Engine, Take an Engine] from Weslex Quickwrench to the east of the camp.
Note: The ring for [It Could Be Anywhere!] the ring can drop from ANY mob in the zone so just keep the quest and hand it in when you get it.
4.Need an Engine, Take an Engine
Travel back towards where the guy in the parachute was, in the same area you should see a crashed plane, and in front of it is the [Flying Machine Engine] (38,56) loot it and return to Weslex Quickwrench
turn in the quest and get the follow-up [Have a Part, Give a Part]
5. Have a Part, Give a Part
Go to Swindlegrin’s Dig(32,47) to the north/northeast, it’s right on the north side of The Suntouched Pillar.
Go around here and kill Venture Co. Ruffians and Excavators and pick up [Venture Co. Spare Parts] from the ground,while looking for Engineer Helice(35,47) standing in the middle of the digsite, she gives the quest [Engineering a Disaster]
If she’s not here it means someone else is escorting her, she’ll probably be back in a few minutes. Take her quest and escort her to safety, after that go back to the digsite and do what you need to complete the two quests, then return to the Nesingwary Base Camp.
________________________________________
6. Back in Camp
Deliver [Engineering a Disaster].
Deliver [Venture Co. Misadventure] get the follow-up [Wipe That Grin Off His Face].
Deliver [Have a Part, Give a Part]. Now Weslex will repair/rebuild his flying machine and it becomes a Flight Master. Get the new Flight path.
Optional: Right next to Weslex is Professor Calvert, talk to her and get the quest [Aerial Surveillance], we will go to where it’s delivered later so you can just pick it up now if you want to.
7. Wipe That Grin Off His Face
Go back to Swindlegrin’s Dig(32,47)
Meatpie is a big blue guy, patrolling a Wooden ramp (35,49)
Foreman Swindlegrin is a Goblin inside a shredder machine, he’s located atop of the same ramp as Meatpie is patrolling. Kill them both and return to Nesingwary Base Camp.
8. Shoot The Apple!!!
Deliver [Wipe That Grin Off His Face] to Debaar, this will make 3 new quests available, go to Drostan first and get the quest [Kick, What Kick?]. Equip the RJR Rifle and target Lucky Wilhelm and click it to complete the quest.
Deliver the quest and get the follow-up [The Great Hunter’s Challenge].
Also get [Rhino Mastery: The Test] & [Dreadsaber Mastery: Becoming a Predator].
9.Let the Killing Begin!
Okay now we are going to kill Dreadsabers and Shardhorn Rhinos until you have got 15 kills of each.
I recommend killing them in this area marked by blue/light blue.
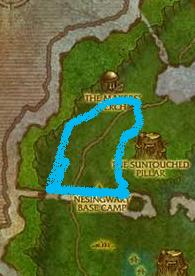
When you are done return to Nesingwary Base Camp.
10. Quests, quests and more quests
Deliver [Rhino Mastery: The Test] and get [Rhino Mastery: The Chase].
Deliver [Dreadsaber Mastery: Becoming a Predatorv] and get [Dreadsaber Mastery: Stalking the Prey].
Three new quests should be available, they are:
[Some Make Lemonade, Some Make Liquor].
[Crocolisk Mastery: The Trial].
[A Steak Fit for a Hunter].
Get the 3 quests.
From now on kill all Longneck Grazers you see until you complete [A Steak Fit for a Hunter].
Kill all Mangal Crocolisks until you have completed [Crocolisk Mastery: The Trial]
Do this while following the next few steps.
________________________________________
11: To the Oracle
Walk south from the Nesingwary Base Camp across a wood “bridge”
and continue south, on the left side you should see Oracle Soo-rahm(25,66).
He should be easy to spot by the yellow “?†on the mini map.
Deliver [Rhino Mastery: The Chase] and get [An Offering for Soo-rahm].
12. Crock’s and Ropes
Go North into the river, and follow the river’s north side eastwards while killing all crocs you find.
When you get to the river’s end then keep going east/north east towards where we found the Flying Engine and the man in the parachute earlier(39,58), while killing all crocs and Cobras you see. Now in this area walk around looking for “Sturdy Vines” they look like this:

Picture posted by: “menace” on www.wowhead.com
Right click a vine to make a random fruit drop down, loot it, keep running around killing cobras and crocs while using vines to get fruit. Also sometimes there might spawn an NPC instead of a piece of fruit, talk to him/her to get a fruit of your choice:)
Do this until you got the following quests completed:
[An Offering for Soo-rahm]
[Crocolisk Mastery: The Trial]
[Some Make Lemonade, Some Make Liquor]
Go south east to River’s Heart(50,61)
If you don’t have the Flight path there, get it now.
Optional: turn in the quest [Aerial Survillance].
Fly back to Nesingwary Base Camp.
13. Distillation
Deliver [Crocolisk Mastery: The Trial] and get the follow-up [Crocolisk Mastery: The Plan]
Deliver [Some Make Lemonade, Some Make Liquor] get the follow-up [Still At It]
Okay we are now going to do the quest [Still At It].
We need to click things,
There are 5 things to click on. There are 3 barrels: Papayas, Bananas & Oranges. Also there is a Brazier and a Pressure Valve.
Take a look around so you learn what’s where, then find a place where you can click all of them easily, I did it in front of the bananas. When you are ready talk to “Tipsy” McManus to start the event. When you are done, a barrel will spawn. Loot it, and then deliver the quest.
Get the follow-up [The Taste Test].
Go to Hemet Nesingwary and right click the [Jungle Punch Sample].
Turn around and look in the same direction as Hemet.
Haldarius is the Stable master he’s in front of you to the left, use the [Jungle Punch Sample] on him.
So then where is Tamara? She’s at River’s Heart.[/color] The place we were just before we flew back to the Camp.
Fly back there, when you land she’s to the right of you standing in front of a tent.
Use the [Jungle Punch Sample] on her. Fly back to Nesingwary Base Camp.
Deliver the [The Taste Test].
14. Grazer & Oracle steaks… Hey Wait a sec!
Then return to Oracle Soo-rahm(25,66).
When you pass the river look for Sandfern, green bushes that you can loot for the quest [Crocolisk Mastery: The Plan].
Remember to kill Longneck Grazers for [A Steak Fit for a Hunter].
Deliver [An Offering for Soo-rahm], get the follow-up [The Bones of Nozronn].
Go south to The Bones of Nozron, in front of the big skeleton there’s an Offering Bowl,
stand next to it and use the [Soo-rahm’s Incense].
Wait for the event to end and the quest to complete.
Travel back to the River, look for Sandfern, go back to the Nesingwary Base Camp.
Deliver [The Bones of Nozronn] and get [Rhino Mastery: The Kill].
15. Tracking & Killing
Go North/Northeast to Bittertide Lake(36,41).
At the beach there, you should see “Dreadsaber Tracks” in the sand.
Right click them, and looking Sandfern plants to loot.
Walk around in the area and the beach until you complete both [Crocolisk Mastery: The Plan] & [Dreadsaber Mastery: Stalking the Prey].
If you have trouble with the footsteps/finding the place this video might help:
http://www.youtube.com/watch?v=r0yJJ0MJNrQ
Anyways when you are done, travel east to the eastern end of the lake, there you should find Farunn, kill him and loot him, then return to Nesingwary Base Camp.
________________________________________
16. Ready for more Kills?
Deliver [Rhino Mastery: The Kill].
Deliver [Crocolisk Mastery: The Plan] get [Crocolisk Mastery: The Ambush].
Deliver [Dreadsaber Mastery: Stalking the Prey] get [Dreadsaber Mastery: Ready to Pounce].
Go to the flight master and fly to River’s heart.
Right across the lake from where u land(west from landing area) there’s a hug Log(46,63)
Go to it, stand on the middle of the upper part of it and use the [Sandfern Disguise] this will make
Bushwacker appear, Kill and loot him. go back to River’s Heart and fly back to the Nesingwary Base Camp.
Note: If you have trouble finding the log or the spot to sue the disguise this video might help:
http://www.youtube.com/watch?v=marpgKd4EbI
Go North/Northeast to Bittertide Lake(36,41) the place where we found the “Dreadsaber Tracks” in the sand
North West of that beach on the top of the cliffs there before the waterfall(32,35)
There you will find a Dreadsaber called Shango kill him and loot him.
And then return to Nesingwary Base Camp.
17. The Drakestalker
Deliver [Crocolisk Mastery: The Ambush]
Deliver [Dreadsaber Mastery: Ready to Pounce]
A new quest should now be available from Hemet Nesingway
get the quest [In Search of Bigger Game] from Hemet.
If you are not done with [A Steak Fit for a Hunter] yet
you might want to go south of the river and kill Longneck Grazer
until you got all 5 steaks, then go deliver the quest.
Travel northeast to Dorian’s Outpost(42,28)
Marked on the map below by a red circle:
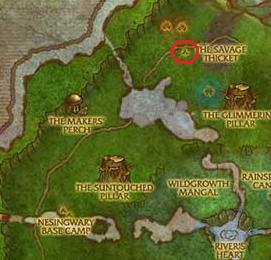
Talk to Dorian Drakestalker and
Deliver the quest [In Search of Bigger Game]
and get the two quests from Dorian Drakestalker[/color]:
[Sharpening Your Talons]
[Securing the Bait]
18. Drake Hunting
Go straight West from Dorian into The Savage Thicket
Kill Primodial Drake’s and look for Big eggs, Kill the eggs and a Hatchling will spawn, pick it up.
Walk around in this area until you have killed 6 drakes and picked up 6 hatchlings.
then return to Dorian and Deliver:
[Sharpening Your Talons]
[Securing the Bait]
New quests will be available, pick up [A Mammoth Undertaking] from Zootfizzle.
19. A Mammoth Undertaking
Okay go south of Dorian’s Outpost
and find a Shattertusk Mammoth, walk close to it and use Mammoth Harness on it, then ride it
back to Dorian’s Outpost, use ability #1 to deliver it and then talk to Zootfizzle. and deliver
[A Mammoth Undertaking]
Note: It’s the neutral Mammoth’s u need NOT the Bulls they are aggressive.
also there is reported some bugs in this quest so if one Mammoth don’t work, just try another.
20.Snows of Northrend – The final hunt!
Now we are going to kill the Real beast, along with Hemet himself, while riding a mammoth!
Go to Dorian take his quest
You will mount/enter a mammoth along with Hemet,
we are going to kill Broodmother Slivina
She’s at the red dot(47,20):

Here is how to use the abilities
#1 Standard Melee Attack ability.
#4 Target for Hemet, Makes Hemet attack that target, use it on her often.
#5 Charge, gain some distance, charge her to stun her for a few seconds.
#6 Gore – Spam use it on the dragon.
Tactics:
Go find the dragon. use charge to stun her then gore + run away, use #4 to make Hemet attack her and lead her to his traps, lead her to Dorian’s Outpost and use charge+gore and run away + make her run into traps until she dies.
Should be easy.
When she’s dead, ride to Dorian and Leave the mammoth
Deliver [Post-partum Aggression] to Dorian Drakestalker.
And there you go Snows of Nothrend achievement Completed.
– Congratulations! –
ThanksThanks a lot for all the feedback and corrections and typos:D
Brune – Amazing work you did doing all the trouble of correcting so many mistakes and typos:D Thanks a lot man.
hehe Norwegian is my first language, but I still hope my guide atleast was understandable:)
Anyways thanks to the help from you guys I feel that this guide finally is reader friendly.
my problem at the moment is two things:
1. I want to set items (and maybe even quests) as wowhead links, but
then they both will have same formating? is there anyway to insert a link without it getting the blue link looks? like keep the yellow color on the quests for example?
and 2. How should I formate the “headlines” of each of the steps?:)
any suggestions?
Thanks a lot for all help:)
I hope this guide have been of help for some at least:)
one more wee spelling errorThis one leaps out at me, but was missed by Brune. In the note at the top it should read “bear with my…”. The verb “bare” means to strip away, whereas the verb “bear” means to tolerate or carry.
A wonderful guide Mazetar, and good feedback Brune. And I agree that some links to wowhead would be good additions.
Keep going!
Paleolf
Formatting Not Withstanding…..Despite the cosmetic issues with the formatting that others have mentioned, the guide was easy to follow and allowed me to easily acquire this achievement. 8)
Therefore…my hats off to Mazetar! 🙂
Thanks for the information!
—
ClownPrince
spelling mistakeFound a mistake:
Note: [color=#ff9966][It Could Be Anywhere!][/color] the ring can drop from ANY mob in the zone so just keep the quest and hand it [b]inn[/b] when you get it.
It should be in.
Yes. This is what happens ifYes. This is what happens if you’re organised. Don’t do it.
You do everything you need to do, the house is gleaming, you’ve got no WoW…
And bam. This is just another form of grinding, honestly.
Woha That’s some extensiveWoha :O That’s some extensive feedback. Very very nice 🙂
A few things to say…Useful guide,
but I’m not too fond of your colour scheme, to be honest.
Not Entirely to blow my own trumpet, check out this. It’s a guide to colour formatting, including the ones Jame uses.
Some of the other spelling needs a little fix. ‘Orcale’ springs to mind from my quick read. I’ll go back now and try and get them all:
Oh, and more Wowhead linkage, especially to the actualy achievement, would be very helpful.
Also, I’d recommend darkening your title colours just a touch.
EDIT:
I’ve put […] when I’ve removed something that might not be obvious 😛
I’ve numbered each passage that I’m looking at, simply for ease of correction, together.
I’ve bolded what I would suggest.
I won’t talk about formatting, since you’ve said you need to go back and do more.
There are also certain sections where there’s no space between a word and a coords in brackets. You may want to fix that, purely because it looks more professional.
1. and formatting as Jame uses in his leveling guide because people find it’s easier to do it the way they are familiar with.
2. Note: This guide is not 100% finished, I will go over it and re-format it and fix bugs later, when Real Life gives me a break, meanwhile I hope you like it and bare with my half-done formatting, and please let me know what you think of it 🙂
3. Archmage Pentarus in Krasus’ Landing in Dalaran offers this quest at level 76.
Once you’ve got the quest, and are ready to leave Dalaran, […] talk to Archmage Pentarus and he will teleport you to Scholazar Basin close to a guy named Monte Muzzleshot (39,58), Deliver the quest to him and get the follow up [Welcome to Sholazar Basin].
4. Note: The ring for [It Could Be Anywhere!] […] can drop from ANY mob in the zone so just keep the quest and hand it in when you get it.
5. Travel back towards where the guy in the parachute was, in the same area you should see a crashed
plane, and in front of it is the [Flying Machine Engine] (38,56) loot it and return to Weslex Quickwrench
turn in the quest and get the follow-up [Have a Part, Give a Part].
6. Go around here and kill Venture Co. Ruffians and Excavators and pick up [Venture Co. Spare Parts] from the ground, […]while looking for Engineer Helice(35,47) standing in the middle of the digsite, she gives the quest [Engineering a Disaster].
If she’s not here it means someone else is escorting her, she’ll probably be back in a few minutes.
Take her quest and escort her to safety, after that go back to the digsite and do what you need to complete the two quests, […]then return to the Nesingwary Base Camp.
7. Deliver [Venture Co. Misadventure] get the follow-up [Wipe That Grin Off His Face][b].[/b]
Deliver [Have a Part, Give a Part]. Now Weslex will repair/rebuild his flying machine and it becomes a Flight Master.
Get the new Flight path.
Optional: Right next to Weslex is Professor Calvert, talk to her and get the quest [color=#ebbc00][Aerial Surveillance][/][Need’s to be [/color]], will go to where it’s delivered later so you can just pick it up now if [b]you[/b] want to.
8. Go back to Swindlegrin’s Dig(32,47)
Meatpie is a big blue guy, patrolling a Wooden ramp (35,49)
Foreman Swindlegrin is a Goblin inside a shredder machine, he’s located atop of the same ramp as
Meatpie is patrolling. Kill them both and return to [b]Nesingwary[/b] Base Camp.
9. Deliver [[b]Wipe[/b] That Grin Off His Face] to Debaar, this will make 3 new quests available, go to Drostan first and get the quest […][Kick, What Kick?] […]. equip the RJR Rifle and target Lucky Wilhelm and click it to complete the quest.
Deliver the quest and get the follow-up [The Great Hunter’s Challenge].
[b]Also[/b] get [Rhino Mastery: The Test] & [Dreadsaber Mastery: Becoming a Predator][b].[/b]
10. Okay now we are going to kill [b]Dreadsabers[/b] and Shardhorn [b]Rhinos[/b] until you [b]have[/b] got [b]15 kills[/b] of each.
I recommend killing them in this area marked by blue/light blue.
[Missing map?]
When you are done return to [b]Nesingwary[/b] Base Camp.
11. Deliver [Rhino Mastery: The Test] and get [Rhino Mastery: The Chase][b].[/b]
Deliver [Dreadsaber Mastery: Becoming a Predator] and get [Dreadsaber Mastery: Stalking the Prey][b].[/b]
Three new quests should be available[b],[/b] [b]they are[/b]:
[Some Make Lemonade, Some Make Liquor]
[Crocolisk Mastery: The Trial]
[A Steak Fit for a Hunter]
From now on [b]kill all Longneck Grazers[/b] you see until you [b]complete[/b] [A Steak Fit for a Hunter][b].[/b]
Kill [b]all[/b] Mangal [b]Crocolisks[/b] until you have completed [Crocolisk Mastery: The Trial][b].[/b]
Do this while following the next [b]few[/b] steps.
12. 11: To the Oracle
Walk south from the [b]Nesingwary[/b] Base Camp across a wood “bridge” […]and continue south, on the left side […] [b]Oracle Soo-rahm[/b](25,66) should be easy to spot by the yellow “?” on the mini map.
Deliver [Rhino Mastery: The Chase] and get [An Offering for Soo-rahm][b].[/b]
13. [b]Crocs[/b] and Ropes
Go North into the river, and follow the river’s north side eastwards while killing all [b]crocs[/b].
[b]When[/b] [b]you[/b] get to the [b]river’s[/b] end then keep going east/north east towards where we found the Flying Engine and the man in [b]the[/b] parachute earlier, while killing all [b]crocs[/b] and Cobras you see. [b]Now[/b] in this area walk around looking for “Sturdy [b]Vines[/b]” they look like this: [Missing Pic]
[b]Right[/b] click a [b]vine[/b] to make a random fruit drop down, loot it, keep running around killing cobras and [b]crocs[/b] while using [b]vines[/b] to get [b]fruit[/b]. Also sometimes there might spawn an NPC instead of a [b]piece of[/b] fruit, talk to him/her to get a fruit of your choice 🙂
Do this until you [b]have[/b] got the following quests completed:
14. Okay we are now going to do the quest [[b]Still[/b] At It][b]. We[/b] need to click things[b].[/b]
There are 5 things to click on[b]. There are[/b] 3 barrels: Papayas, [b]Bananas[/b] & Oranges. [b]Also[/b] there is a Brazier and a Pressure Valve.
Take a look around so you learn what’s where, then find a place where [b]you[/b] can click all of them easily, I did it in front of the [b]bananas[/b]. When you are ready talk to “Tipsy” McManus to start the event.
When you are done, [b]a[/b] barrel will spawn[b]. Loot[/b] it, and then deliver the quest.
Get the follow-up [The Taste Test][b].[/b]
[b]G[/b]o to [b]Hemet[/b] Nesingwary and right click the [Jungle Punch Sample][b].[/b]
[b]T[/b]urn around and look in the same direction as Hemet[b].[/b] […]Haldarius is the Stable master he’s in front of you to the left, use [b]the[/b] [Jungle Punch Sample] on him.
So then where is Tamara? She’s at River’s Heart. The place we [b]were[/b] just before we flew back to the Camp.
[…]Fly back there, when you land she’s to the right of you standing in front of a tent. Use [b]the[/b] [Jungle Punch Sample] on her. […][b]Fly[/b] back to Nesingwary Base Camp.
Deliver the [The Taste Test][b].[/b]
15. Grazer & [b]Oracle[/b] steaks… Hey Wait a sec!
Then return to [b]Oracle[/b] Soo-rahm(25,66)[b].[/b]
When you pass the river look for Sandfern, green bushes [b]that you[/b] can loot for the quest [Crocolisk Mastery: The Plan].
[b]Remember[/b] to kill Longneck [b]Grazers[/b] for [A Steak Fit for a Hunter][b].[/b]
Deliver [An Offering for Soo-rahm][b],[/b] get the follow-up [The Bones of Nozronn][b].[/b]
Go south to The Bones of Nozron, in front of the big skeleton there’s an Offering Bowl, stand next to it and use the [Soo-rahm’s Incense][b].[/b]
[b]Wait[/b] for the event to end and [b]the quest to complete[/b].
Travel back to the River, look for Sandfern, go back to the Base Camp.
Deliver [The Bones of Nozronn] and get [Rhino Mastery: The Kill].
16. Go North/Northeast to Bittertide Lake(36,41)[b].[/b]
[b]At[/b] the beach there, you should see “Dreadsaber Tracks” in the sand[b].[/b]
[b]Right[/b] click them, and looking [b]Sandfern[/b] plants to loot.
Walk around in the area and the beach until you complete both […][Crocolisk Mastery: The Plan] & [Dreadsaber Mastery: Stalking the Prey][b].[/b]
If you have trouble with the footsteps/finding the place this video might help:
http://www.youtube.com/watch?v=r0yJJ0MJNrQ
Anyways when you are done travel east to the eastern end of the lake, there you should find […]Farunn, [b]kill[/b] him and loot him, then return to Nesingwary Base Camp.
Will do more, and put bolds in red soon when I have time.
Hope you don’t take this too critically, just looking to improve your guide, and is English not your first language? These little mistakes are perfectly fine, since I think it is 😛
Damn, Jame beat me to sayDamn, Jame beat me to say the colors were too bright 😛
I’ll just quote something in here quick:
[quote]
[*]Optional: Right next to Weslex is Professor Calvert talk to her and get the quest [color=#ebbc00][Aerial Surveillance][/], we will go to where it’s delivered later so you can just pick it up now if u want to.
[/quote]
I think you misspelled the color or misspelled the [/] because I can see it 😉
Also instead of saying “u want to” you should say “you want to”
It’s much nicer to read for the older folks on the site. (I said older, not old!)
Just one more thing, run the guide through a spellcheck. There’s a few places here and there that I found some stuff misspelled.
Other than that, great guide! 🙂
Good job!
Suggestions forGood job!
Suggestions for improvement:
-Change the color code for NPCs and Locations. They are too bright, it makes it hard to read them.
-Make the items wowhead tooltips. Consider doing it for the quests too.