 by Aphid
Magister’s Terrace
Part I: Table of contents:
II: foreword
III: Getting a group
IV: Starting up
V: Trash before boss I
VI: Boss I
VII: Fishing
VIII: Boss II
IX: The difficult trash
X: Boss III
XI: The terrible trash
XII: Boss IV, swimming.
Part II: Foreword
Many groups of even skilled players find themselves facing a problem when trying to run heroic magister’s terrace with a pickup group. Runs with no wipes are very rare, and even runs where there is only the few mistake or bad luck wipes are few and far between. Most likely, your group is going to get stuck on a certain boss or trash pull, and needs multiple attempts to do it. Therefore, i’m posting this guide as a way to do magister’s terrace reliably, and with as little as possible to a repair bill. Thus, you may find this route to be a bit long for a guild run, where more mobs tend to be skipped (in particular before the third boss fight), or diffrent tactics might be appropriate. I will not go in-depth to all alternatives, but provide a small overview.
Many players tend to agree that Heroic Magister’s terrace absolutely requires and must-have crowd-control in your group. While crowd-control is an added benefit and an easy way to make your group pass the five-bloodelf groups, it is by no means a necessary addition to your group. Any group of a tank, a healer, and three dps-guys can, given reasonable gear and knowledge about class abilities, mob abilities, and thus the best tactic to do the trash, easily clear all of the trash.
Most trash-wipes are not because of ‘not enough CC’ but can be more pointed towards not knowing what the trash mobs actually do. Heroic MgT trash tends to have special abilities that are actually notable and thus is not a simple tank and spank affair, as these abilities need to be countered.
And, if you wish to take CC with you, the CC’s are listed here in usefulness order:
Priests’ MC (by far better than the rest because it can take two mobs out)
Mages’ Sheep, Rogues’ Sap / Hunters’ Trap (close to eachother).
Warlocks’ Fear, Seduce, Banish, and Enslave (the amount of cc’s counters the relative weakness of each compared to the other CC’s).
Note that Paladins and non-tanking Druids (though tanking ones can pull dangerously with cyclone) can also take a mob out of action for six seconds, and thus cyclone/stun can be used as a crowd-control device, particulary in combination with a rogue in the party.
DPS warriors can act as a CC because of their tendency of being able to tank a magister or warlock mob, because of their spell-reflection and fear immunity. In addition, having the mobs hit your dps warrior instead of your priest during a Mage-guard Stun can help a lot. DPS warriors tend to be rather undervalued for this instance, MS will counter the lack of CC on the healer mobs.
When your healer is a priest, having him pull with mind-control (especially if you have a hunter to MD the rest of the mobs on the tank once the MC’d mob dies), when you have a tank that can play well, will take out one mob of each pull (just let the other mobs kill it, then quickly grab them before they barbecue your priest.
Part III: Getting a group;
Make sure your group contains:
Protection warrior, protection paladin, or feral druid which can tank the second half of Karazhan as Main Tank.
Primary healer, restoration shaman/druid or holy priest/paladin, which can be primary healer in the latter situation.
Three dps, preferrably having been succesful beyond the second half of karazhan as well.
Groups with less in the way of gear can complete the instance, but will in particular have problems with bossfights two, three, and four.
Having a dps or tank in the group with a full fire resistance set and/or full arcane resistance set helps a lot.
Having a dps-specced druid, paladin, shaman, or priest in the group helps as well for the secondary tactic on the second boss (and I personally presume this is a must-have for that tactic).
Part IV: Starting the instance:
Make sure any soulstones and healthstones are in place and buffs are on players. For paladin buffs, salvation is the preferred choice for healers and dps without strong aggro dumps (mages, warlocks, warriors, shamans, shadowpriests, and so forth). Because of the large numbers of damage, healing aggro may pose a problem, thus on the healer as well unless he’s fairly confident of not pulling aggro of the MT.
Using a hunter as MA and puller (with Misdirection) can be a valid option for novice groups. The instant threat on the tank will provide a strong start for each pull. The cooldown may set off more experienced groups however, and such a method is not necessary.
Part V: Trash before first boss.
This starts with a group of two blood elves. Kill this group, proceed with killing the patrol on the bridge. Pull it back but not into the first room (you want some space, the first room is too small), then pull one (either left or right) of the four-belf pulls. Have your group rest, then ‘charge-pull’ the group near the entrance to the boss chamber. This is because there’s plenty of empty space behind it, but, having skipped one of the other 4pulls, not much before it. Make sure your healer stands within L.O.S. of all the mobs before pulling, or your tank faces a quick death.
These pulls contain the following mobs;
Magisters:
Magisters are always killed first. They are immune to most crowd-control, and the longer they cast, the higher their damage output gets (becuase they will cast faster and faster). They are also known for generally messing about with other mage abilities such as arcane explosion.
Kicks, silences, and so forth are best left for the other mobs, as the magister will just cast from another school (or start spamming arcane explosion, a very bad situation with the stacking haste buff).
If you allow the magister to stack more than 10 buffs, all his spells will be just about instant, and any healer not in full epics will be in trouble.
Magisters tend to have low armor, and a medium health pool.
Mage-Guards:
Mage guards are the second-most annoying mob in groups. Mage-guards can be crowd- and mind-controlled, and having such abilities on them can work well. They tend to melee, and thus trapping them is easy. They can also be feared, but the stuns they have tend to pose problems when trying to fear-kite them. It’s recommended not to fear against groups with a mage-guard unless that mage-guard is stunned/taken in by another CC.
Mage-guards, in addition to hitting fairly hard (1k+ on tanks, fast attack speed), will drop a 10-15 second purple ‘bubble’ on themselves. Any mobs standing in the bubble will recieve 75% less damage from all magical sources, and any players standing in it will recieve 75% less healing. The latter effect is notorious for killing tanks that stay inside.
Mage-guards also have a thrown-weapon, that has a small AE, and stuns all affected players for two seconds. This is usually thrown at the second- or third on their aggro list, but can be thrown on the tank as well. Make sure your ranged are far enough away from the fight as to not get killed when the mobs come running to the group (the stun tends to drop tank aggro when it hits him). Also, do not stand next to another person if you can help it, as you’ll both get stunned. Note that the damage from this can break mind-control.
To counter the purple bubble, move mage-guards out of it. Therefore, when a Mage-Guard is the group’s primary DPS focus target (during all belf-pulls all dps should be single-target dpsing in the dps focus or casting cc’s/stuns/interrupts on other mobs), you must NOT stun it, as when it drops a bubble, the tank won’t be able to kite it out, forcing him to take a healing hit (and the mob will take longer to take down if you have caster DPS).
Mage-guards have a low health pool and high armor.
Physicians
Physicians tend to do four things:
1: They hit their main target with melee
2: They use renew on allies, practically spamming this spell
3: They will try to put a poison DOT effect on all party members
4: They will sometimes cast a big heal when another blood elf.
Physicians tend to be harder to trap, because of the poison effect application and lots of standing around casting. Don’t try to Mind-control these, you’ll get an ‘immune’ message.
Because of being able to heal, physicians are the third on the notoriousity list. In addition, the poison DOT tends to be quite painful, and having it dispelled can help the group immensely rather than trying to heal it through. Renew can be countered by having all the dps focus on one target (see the last mob), so that you only have to out-dps one renew. Once the physician goes down, this is no problem anymore. The large heal can be countered by all kicks, silences, death coils, fear, you name it.
Physicians have both low health and low armor, and tend to go down quickly particulary if MS or similar debuffs are applied.
Warlocks
Their warlocks come with an imp pet, which can be quickly dispatched by about 3.000 damage to it. The warlocks are the highest-damage mobs, but since they do nothing but deal damage, they are the second-lowest-on priority. This mob is the best choice to Mind-control, as its very high damage output can effectively have it kill the physician, magister, or blood knight (forcing them to heal / out-dpsing them).
The warlocks mostly cast Immolate and Incinerate. If you have a magic dispeller (priests, warlock’ felhounds, paladins) in your party, having these dispel Immolate off group members is a nice way to avoid large amounts of damage, as incinerate is not very powerful on targets that haven’t been immolated.
When you cs or silence one of these mobs, they will use a weak melee.
Low hp pool, low armor.
Blood Knights
They apply debuffs to players, increasing holy damage recieved, and hit for a flurry of physical and holy damage, the output is quite high. Their most dangerous actions though, is stunning players and casting holy light. Holy light is the highest-on-priority spell to be interrupted, because it will heal most mobs to full health again, making a pull effectively much harder if you let this pass through.
When both a blood-knight and Physician are in a pull, cc-ing one of those becomes of higher priority than the mage-guard, as most pickup groups do not have the DPS to be able to out-DPS the mobs’ healing spells. This statement is not true when you have either a rogue or DPS warrior in your group (as the healing recieved debuff effectively makes those two healer mobs into one healer mob).
Blood knights tend to be easy to trap, they always melee unless casting a heal.
Due to having a medium hp pool and very high armor, Blood Knights are best killed last.
Wretched Melee & Wretched Casters.
These come in one group of two, then large groups of six. Wretched are very weak mobs, until they drink a potion. If you have a warrior or druid tank, it is best to tank them all, and once one drinks a potion, have your dps cc or stun it. They will glow green once they’re drunk, so it’s fairly easy to see.
When you have a paladin tank, it is best to just AoE these pulls, killing them quickly before too many drink their pots. Of course, cc’ing one or two before they go into consecrate range can help paladin tanks which are not-so-well geared.
To get them to stick together, just pull around the edge of the main boss’ room. You have to clear all three groups, or the boss will aggro them when running for a crystal.
Part VI: The first boss!
Selin, the first boss, is an easy fight. Before engaging him, make sure you are all in his room (past the thick line on the floor), or the closing door will separate your group, resulting in a wipe.
Selin will periodically (just like kalithresh) run for a crystal, and start draining it. On the contrary to kali though, Selin will just gain mana from draining it, and upon the drain’s completion, will not get any buffs. He will also gain mana by mana-draining players (kicking or interrupting this may help), and health by life-draining (the same goes). Because the crystals have about as much Hit-points as the tanks in SV heroic, killing them will save you maybe one or two seconds of drain, and is not worth the dps loss on the boss. Just have your healer heal through all the damage he deals, do not overaggro, and tank&spank him down.
Note that he tends to run around the room, so be sure you keep within line of sight of your healer. When your healer’s a priest, all sticking together so their AoE heals can be used is a good idea.
If your healer is facing problems (going OOM, people dying that do not have aggro), using your offhealer (note the introduction) is a good alternative. Your healer shouldn’t have problems here though.
Part VII: Fishing
The next trash consists of very large pulls of non-elite flying beast mobs (after a few solo pulls of them). They have no special abilities, and grant a +1% damage bonus after they die. This bonus is rather irrelevant though. They hit for about 400 base.
The second boss’ room contains several pulls of them. It is of high importance to pull only one group of fish, two groups will probably kill your AoEers and three your group, because of AoE damage caps.
After spending 30-60 seconds in this room, an event will occur. A blood elf will walk into the room, and feed her fish. If you attack her, all remaining fish will go for your group. Thus, just walk out of the room and wait until she leaves (/shoo!).
Using AoE to take them down works when you have a mage, hunter, or paladin tank in your group. Use frost nova, slow trap, consecration and they should be dead before they reach the dps/healer. Warlocks tend to do high AE damage, but need help from one of these three abilities to prevent getting killed.
Part VIII: Second Boss
This boss has the following Abilities:
– Chain Lightning, Deals about 3.000 arcane damage and jumps to nearby players.
There should be no nearby players, simple as that. Everyone ranged/healer should be in the A-B-C-D positions, with the yellow box’ as the boss position and the brown X (feeder loc.) as your melee dps position. Face him towards the other end of the room.
– Hit for about 2750-3250 Arcane Damage
Heal it.
– Enrage at 15-20%, AEing the group from 1.000 arcane damage, increasing every second and ticking every second.
Take him down before you all die, you should have some damage bonus on your DPS at this point.
– Spawn two adds every 15% (but not on 10%), each has one HP and does 3000 damage to everyone every 2-3 seconds starting abt. 4-5 seconds after the spawn.
When you kill an add, you recieve a debuff that lasts 30 seconds. It increases your damage output by 50%, and deals 300 arcane damage per second.
Kill them both before the first AE. Assign a priority (more on this at the tactics phase)
Now for the tactics. There are two varieties. I will focus on my favorite version first, the slow DPS fashion.
First of all, he can be tanked by any dps with high aggro generation and full arcane resistance. In fact, even a cloth user with full arcane resistance will do a better job than a traditional tank, simply because you recieve 75% less damage. Warlocks in particular tend to do well because of high hp pools and Fel Armor. Thus, the ‘best for tanking him’ is this:
Druid/Warrior/Paladin with spec and resistance gear for arcane (best)
Warlock with arcane resistance gear
Other high-aggro ranged/melee dps with resistance gear
Druid/warrior/paladin with spec.
Note that if you go with alternate dps, that there’s a 3% chance of not resisting the attack, and a 5.4% chance of him critting you. Here is the table (with 360 or more arcane resistance). Note that tanks cannot be crit, and thus your resistance gear’ guy can best have 9.5k or more hp (so he can take a chain lightning add AND a full crit:
Type Damage Chance each hit
Crit 6k 0,054%
25% resist crit 4.5k 0,162%
50% resist crit 3k 0,864%
Hit 3k 0,946%
25% resist hit 2.25k 2,838%
75% resist crit 1.5k 2,970%
50% resist hit 1.5k 15,136%
75% resist hit 750 52,030%
100% resist. 0 25,000%
Average/total 790,5 100%
His damage on tanks with full resist gear is an average of 750. His damage on tanks without any resistance is 3000. Talents may further reduce this damage, but you can clearly see that resistance gear is very, very good here.
Start off, with your tank getting some aggro on him. Depending on your tank’s TPS, you want to have him solo from 1% to 10%, so that your DPS won’t grab aggro during the enrage, although this is somewhat less of a problem with this tactic, most tanks should have an easy time keeping him on them.
Now a smart reader will have noticed, that the more dps you do to this boss, the more debuffs you’ll get and the more damage he’ll deal to the group. The solution is very simple, let the debuffs run out, or take them out with the following abilities:
Mages’ Ice block
Certain Shamans’ Totems
Rogues’ Cloak of Shadows
Paladins’ Blessings
Warlocks/Hunters pets (just let them die after picking up 2 adds).
The whole point of it is to not go insane and pewpew. As you will get swarmed by all the adds. Take him down to 85%, kill the adds ASAP, and just calm down and wait for the debuff to pass. Your healer simply heals through the debuff, or you use abilities such as drain life, potions, healthstones, bandages, and so forth. Greater or Major Arcane resistance potions are very good on this fight.
When the debuff has passed, you take him down another 15%, to 70%. Again, he summons two adds, you take them out, then stop all dps again. Your tank should have plenty of aggro generation.
At 55%, you do this again.
At 40%, the tactic changes. Because of the enrage, having no debuffs on the dps during this would kill you before you can take him down. Thus, you will now start dpsing. Do not blow any trinkets/cooldowns to increase dps yet, except for heroism (which should be used now). Keep dpsing at 40%, do not stop. Take him below 25, have one debuff on each dpser and one on the tank, and have everyone go all out after you get these debuffs. Kill the boss before the group dies, and you win. Note that it is best to save your potion/healthstone for the enrage, it will help you a lot.
This boss will probably cause wipes, most dps aren’t used to eating out of their noses, but the less damage you deal, the less damage you recieve.
Tactic II:
When you have an offhealer in your group, you can be a bit more careless with the buffs. You have to get two of them off in some way (the abilities or waiting), and the other eight can be spread out between the two DPS and tank (three on both dps, two on the tank, or all on one person that has a high hp pool (the second healer will spamheal that one person then). All of the eight debuffs together will tick for between 1600 and 2400 damage, so lots of healing is required. The offhealer can dps for the first 45%, and then will need to help the main healer. DPS as hard as you can as soon as he goes below half, and with all those debuffs, 20k crits might save you. This tactic tends to be chaotic and risky though, and is generally not recommended for novice groups. In addition, the group composition requirement makes it mostly out -of-the-way for most groups anyway.
–> an example: We went with tactic II, and had a protection warrior soak them all up from 70% onwards, me as a warlock tanking the boss with full arcane resistance. The warrior had to blow his shieldwall, and still died through the enrage, while his dps saved the day (ever seen prot warriors do 1.500 dps? I do =P).
Part IX: The difficult trash
From now on, there will be more difficult trash. Here’s the pulling sequence:
Have your group gather up at the end of the terrace. Make sure everyone’s there by readychecking (some people tend to watch the movie). Pull the droids into the upper part of the hallway one by one, then proceed down. Pull the left-hand group of five, the patrol, then the middle group all into the hallway. Depending on the group composition you might or might not want to clear the room. I’m assuming you want the earlier tactic (it’s safer as well).
Pull the right-hand group into the hallway, then pull the back-left group to the middle section of the room’s left wall, and the opposite (the middle section of the right wall) goes for the last group into the room. Fight the robot in the small subsection room, have your group stick together on him a bit.
Pull back the left group of the next room (boss III’s room) into the subsection room, then you can fight the right group where it stands, and the two groups in the room’s bottom corners as well. You now have half a clear boss room, and a fully cleared room before it as space to fight in.
In this trash, there’s four new mobs for you to deal with!
The Robot
These are solo-pulls which are immune to CC. They hit the tank for reasonable amounts of damage, and random group members for 2-3k as well (two randomly targeted members every 5-10 seconds, green beam). These tend to be the easiest pulls of the instance.
For some reason, threat generation on these mobs is lower than on other mobs. Pay attention to your aggro level as DPS or healer.
The Ethereal
The ethereal is the most annoying of the new mob’ types you see in groups. He’s known to teleport himself to a group member (it’s slightly diffrent than blink), and then quickly cast arcane explosion. If you aren’t cc’ing them, everyone must spread out. Stunning him when you fight him will also help. He tends to be quite hard to trap.
He has both high hit points and moderate armor.
The Naga
Nagas deal very large amounts of damage to your group with their AoE abilities (2.000 nature damage to everyone is not uncommon). Therefore, they’re either kill second after magister or CC. You can also designate a DPSer to tank her (she doesn’t hit very hard) and face her away from the group (which deals with her AE). Kite her away from the party and you’ve dealt with her as well. She tends to be difficult to trap, but not very hard.
She has high hp and low armor.
The Elite Succubus
If you have a warlock in the group, she’ll be more of a benefit than a problem. She has a six-second seduce spell that does 3.000 shadow damage over the course of the spell, and is not broken by damage. The cooldown of it seems to be 10-15 seconds. It’s a good advice to, when you enslave her, keep her until you find a new one to have an extra CC on all groups (well it’s more like a stun really, and a powerful one). She’s able to, with some heals, take on warlocks, physicians, and magisters. (the other types tend to be well-armored). Do not use her against mage-guards or you might find mobs stunned in bubbles.
If you do not have a warlock, it tends to be somewhat difficult but not very hard to trap/fear her. Sheep does not work however. In the mob priority, she’s about below the mage-guard and above the physician.
She has low hp and low armor.
Part X: Boss III!
All of the adds (read on) are immune to mind-control. It might be advantageous to have your priest keep a warlock or mage-guard from the last pull MC’d, and use it against one of the boss’ adds to solo it. The abilities from the NPC can work to counter a guard very well. Try to disable as many adds as you can by using crowd-control spells, stuns, or other methods at your disposal (any class can help in one way or another to keep an add busy or out of the fight). When you have problems keeping them out of the fight, a second healer (just like at boss II) can be helpful. Due to the previous room being cleared, however, with fear being able to be used as a CC, it shouldn’t be much of a problem for a well played group to keep them all feared, stunned, kited, or disabled through CC in one way or another, except for the one you’re nuking.
It might be smart to set up a MA for this fight, a player which all other DPS will assist (the tank will run around trying to get as much aggro as possible, the mobs are immune to taunt and display very erratic aggro behavior). This is to have all the dps be on a single target, to bring it down as quickly as you can while chainfearing/stunning/CCing the rest.
Note that, while the mobs do have aggro tables, most of the mobs seem to behave more like players in a 5v5 arena fight, going for the targets that they kill fast (the most notorious example is Warlord Salaris, who intercepts then oneshots clothies in the blink of an eye, and has been known to wipe groups on his own. Thus, the fight being akin to an arena fight, PVP gear might work very well here, and stacking resilience until you have a 5.4% crit reducing ratio will help your group (you’ll be crit-immune against them, thus not being oneshot but twoshot by Salaris).
The third boss is akin to the Moroes fight in Karazhan. Just like moroes Delrissa has four adds, selected at random from a pool of eight. Unfortunately, unlike the Moroes fight, you have to kill all five NPC’s to win it. Here are the mob’ abilities, and the adds in order of most painful to least.
Priestess Delrissa
Priestess Delrissa generally has low melee damage (about 800-1k base), and if your group is dps’ing is mostly busy healing the other mobs. Because she casts many spells, it’s quite hard to trap her. It’s best to have your dps focus on her or a healer add, and use stuns/interrupts to have her stop healing. Spellstealing or dispelling her buffs is also of a high priority. The ‘felhunter’ pet can help with devour as well!
She’ll do the following things;
Renew: Due to this all dps should be on Delrissa immediately. It seems to tick for upwards of 3k.
PW:S: Dispell this or dps through it, as per the priest ability.
Dispel Magic: Due to this dispelling polymorph and other similar abilities, CC on this fight is not as good as it seems to be. Be prepared for many CC breaks and unforunaties when she uses this. The only counter is really killing her first. You have to if you plan on polymorphing!
SW:P: When a warlock gets this on him he should use his Shadow ward. Anyone else should get a dispel or heal. Note that this ability will break crowd-control effects used by the NPC’s and it might be smart to leave it on, just using a HoT effect to counter it.
Flash Heal: This should be interrupted by any means neccesary to be able to kill her.
When you’re killing her, don’t worry about aggro. Go all out on her, no matter who she’s hitting. That counts for the other adds as well. Threat dumps may or may not work depending on mob behavior.
Apoko
Apoko is a Shaman. He has medium health and armor for a boss add.
While you might have guessed I put another add here, I’m not going to. Apoko is definately the most annoying add, because of his ability to heal, and to lockdown spellcasters and healers, while purging off helpful buffs. If you let apoko mess up in your group, you’re in trouble. I advise chain-fearing him, as he hasn’t got any interception or ranged abilities apart from his shocks. All other CC’s can be used as well. He does the following:
Cast Healing wave: This is a large heal. While you’re fighting the priestess, make sure Apoko isn’t behind some pillar healing her, you won’t get her down a single % like that.
Cast totems: Windfury totems will cause their melee to completely slaughter your party, earthbind totems are a nuisance, and fire nova totems mostly dispel their own CC’s while not doing many damage (thus you can ignore those). Having a /target Windfury macro can help your party a lot.
Warlord Salaris
Ah yes, this add tends to be the add that most frequently wipes groups. If you get him, you’re in for a tough fight. He must, I repeat must be always feared, stunned, or cc’d. If he’s not, he’ll charge a cloth person and kill it. He can wipe groups on his own, literally.
He does:
Mortal Strike: Does huge amounts of damage.
Intimidating shout: Increases his damage even more
Rushing charge: Makes mages hate him because he can pop out of polymorph and kill the hapless mage.
AE fear; Salaris can use the standard AE warrior fear (this has been known to run groups into mob packs and wipe them).
To CC him, it’s best to not use polymorph as the priestess can dispel it while the mage gets killed. An unlucky resist also results in a death. He runs quite fast so fearing is not very smart either. The best option would be a trap or sap & blind. If you can’t do one of those, you still have polymorph and seduce, although those two are a bit unreliable here. The first being a bit tricky to pull off (your hunter must pull him so he’s the only one on his aggro table, he’ll charge right into the trap), the latter being the safest method of CCing him. If you don’t have a rogue to chainstun him while you kill him, a combination of cyclones and stuns from other classes will also work. You can set up a rotation like this:
0:00; paladin stuns him for 6 seconds
0:06; he breaks from the stun, and moves towards a clothie or leather user
0:09; druid cyclones him for another 6 seconds, the party backs off
0:15: Druid goes into bear form, and charges him, locking him in place for let’s say 3 seconds tops.
0:18: The druid now uses his bear form stun
0:23; The mage uses frost nova or the hunter uses concussion shot or the priest fears him for another 5-10 seconds of being stuck
basically, you must make sure you fight him alone or perhaps with one other add, or he’ll most likely kill your group. Especially in combination with the rogue he’s nasty.
Salaris has the highest health and armor of all the adds.
Kagani Nightstrike
Another very annoying add, Kagani is known to use shadowstep, and vanishes when he hits a low hp%, to stun someone else. Make sure you’re fighting at most one more add when you fight Kagani.
Kagani will hit fast and kick, going for spellcasters and will take one of your spellcasters out while you fight him. He will kick then chain-stun this spellcaster. Kagani has a moderately high damage output so be sure to heal his damage through.
Kagani has two stuns, and can keep a player stunned for approx. 10 seconds.
When he doesn’t stun he will reduce your movement speed with his damage. This, combined with apoko’s totem, reduces movement speed by 120%, causing you to be effectively locked down in place. The party must try to position the adds in such a way that this does not occur at the same time (because melee that’s locked in place can’t do much).
Kagani has average health and armor.
Eramas Brightblaze
Eramas Brightblaze is a fury warrior. While he hasn’t got half the damage output salaris has, he hits very quickly, meaning that the spellcaster he’s hitting on won’t get much off, unless that’s an arcane mage. Eramas will slowly increase his damage on the target he’s hitting with his arcane debuff.
He can also Disarm and Kick targets.
It’s best to cycle Eramas a bit between your party, forcing him to hit other people by locking him in place or using fear spells on him (when you crowdcontrol, stun, or otherwisely impair an add, he will likely reaquire targets, going for someone else). If he can’t attack the same target for a long time, he won’t do much damage. Eramas has high health and medium armor.
— Interruption — Those were the four ‘hard adds’, the adds with high CC priority, and bad abilities. The next four adds do not need to be cc’ed, and thus ccing them is just a small benefit. Use your cc’s on the top four if you get them, in the listed order, and then move on to the bottom four (of course, cc’ing something always helps, but the priority is the above four! Use fear if you can, anything to keep those four out of the fight while you pummel delrissa).
Garaxxas & Silver
Garaxxas & Silver are a hunter & pet, and the worst of the lesser adds. The reason being that garaxxas tends to stun people. Garaxxas can be banished though, and Silver can be feared by ‘scare beast’ or sleeped with ‘hibernate’. Silver also seems to follow a standard aggro pattern, so if you ain’t got those two abilities, keeping him on the tank the whole fight is a piece ‘o’ cake.
When garaxxas is loose, he will sometimes put down traps. If you memorize where he has moved, nobody should ever get trapped (don’t stand where he once stood), unless feared into one. A quick dispel of it would help tremendously. Kiting apoko or the priestess to a trapped player helps as well, because the random damage will break the trap. Blessing of Sacrifice can do this as well (little use for salvation here anyway).
Garaxxas has low health and medium armor, and so does silver. Note that silver ain’t elite.
Ellrys Darkhollow & his imp.
Before the group starts dpsing the priestess, if you see ellrys, oneshot his imp. The priestess can do nothing to prevent it from dying, and it saves your healer another 400 fire damage to heal every couple seconds. Ellrys is second on the minor add list. His melee is very small, and while he’s cs’ed, silenced, or whatever he’s practically useless.
When he’s not, he does the following things that can be easily countered. If you have spare cc you can use it on him but it needn’t be used.
Shadow Bolt; does a moderate amount of shadow damage, can be healed through.
Fear: It’s very easy to counter fear with tremor totems, fear wards, or a pvp trinket (which you should put on for this fight if you have it).
And last but not least a Seed of Corruption. Just be sure you ain’t near other people and it won’t do much. Ellrys can be damaging, but at least you can counter everything he does with relative ease.
Low to medium hp and low armor.
Zelfan
Zelfan is more of a funny thingy than a real add. Move away from the dragon gun, and have someone focus on targetting (macro!) the explosive sheep and kill them before they get to the group while you kill him. A banish on him is never too bad, but he’s more of a nuisance than a real problem. He does not do any significantly hampering effects aside from the damage.
Zelfan’s damage tends to be mostly ae. It can be reduced by not standing in a bunch but spreading out.
Uses exploding animals, grenades, a cone-fire attack, and a fire-bomb with DoT. Pure damage, and not very much of it when the positioning is okay.
Zelfan has low hp and medium armor.
Yazzai
When a mage is played well, he can be devastating to opponents (see vurtne’s or charade’s movies for more details). However, Yazzai is played poorly.
Yazzai, just like ellrys has a minor melee. Once he’s meleeing you can ignore him. He’s the lowest priority add so ignoring him is a good idea if you ain’t got millions of cc.
Yazzai will cast the following, from most- to least- cast.
1- He really likes using ‘blizzard’. If you don’t stand in it, he’s practically wasting time. That makes him the eigth on the list.
2- When he’s not casting blizzard, he’ll frostbolt people at random. It does less damage than the shadowbolts, but slows you a bit. It’s not much of a deal though because you should see only a few of these bolts.
3- He’ll very occasionally polymorph someone. This is his most noteworthy ability, and it’s best dispelled by a felhunter, priest, or paladin. It doesn’t last very long on players though (10 seconds).
4- He will also use frost nova. It has a long cd, and because yazzai is usually at range, the most it will do is FN a person that has already been feared by another add, actually helping your group more than it hampers you. He’ll only frost nova when people move close to him.
Very low hp, low armor.
When you kill the adds, it’s best to go with the following killing order:
Priestess Delrissa
Apoko (take out of CC if necessary)
Any non-CC’ed adds except for Yazzai (which can be ignored)
Warlord Salaris (again, take out of CC, when he breaks CC earlier and you can’t reapply, kill ASAP!!!)
Kagani Nightstrike
The rest, one by one if you can.
Part XI: The terrible trash
Skip the other pulls in the third boss’ room, and proceed to go into the cramped hallway.
You only need to do one trash pull, but this time, you seem to have little space to do it. This trash pull goes like this:
Everyone stands on the stairs, if you have a trapping hunter, make sure he can see his trapped mob. The tank AND the healer run into kael’s room (he can’t be aggroed, don’t worry about kael), and you use an AE fear if you have it. Then you CC the mobs if you have CC’s and proceed as per normal on a 5pull (mob information in previous section).
It might cause one or two wipes, it tends to be the most difficult part of the instance this trash pull.
Part XII: Kael’Thas
Kael’Thas is the only two-phase fight in five-man dungeons. Phase one lasts from 100 to 50%, and phase two from 50% to 0.
To start, position your healer on top of the stairs (so he can see everything), your tank where kael is, and your ranged dps to the left and right of the healer, but better downstairs, so they can kite a phoenix away).
Kael, on heroic, has the following abilities:
Summon phoenix:
Seems to start at a random time after engaging him and has a 20-25sec cd. It’s a phoenix that has a high-damage fire aura and melees for a lot. This phoenix should either be kited by a designated kiter while the other ranged focus on him (melee stay on kael), or tanked by someone with fire resistance (shamans, DPS warriors, DPS druids, warlocks, and rogues shouldn’t face much problems when they have enough resistance to overcome the aura (350 is recommended)). The phoenixes don’t have very high hp, and should be focused by ranged. When they die, the egg they spawn must also be killed or it starts all over.
Note that having a phoenix or egg up when kael goes below 50 makes the second phase a lot harder, as the phoenix’ damage must also be healed through.
Having Fire resistance on your Kael’ tank helps a good deal as well, as his melee is only about 2k, while his fireballs hit for 6k on heroic. He can be kicked, silenced, and cs’ed like a normal boss, and thus his fireballs can be interrupted. If you have a lock tank him, you can best not interrupt the fireballs, as they do less damage to a fire-resistant ‘lock than a melee. (i.e. you can go with your normal tank on the phoenix if you have no kiter (hunter/frost mage), and a lock tank on kael).
His third ability is to ‘flamestrike’ an area in the room. He’ll indicate this area of the room beforehand (you’ll remember this from the ‘real’ kael fight), and afterwards it does 9.000 fire damage if you don’t move out. Needless to say, you move.
After 60 seconds, Kael’Thas will pyroblast the main target for up to 55.000 damage. It’s possible to take him below 50% before 60 seconds have passed, thus he won’t pyro. That’s the first way of avoiding it. The second way of avoiding it is to do 10.000 damage to kael (take down the shock barrier), and interrupt the pyroblast cast. The third way to avoid it is to have a rogue tank him with Fire resistance gear and use ‘cheat death’. A warrior with more than 13.750 hp left can shieldwall to live through pyroblast as well (can’t be reflected). A paladin can do it with a bubble. If your warrior is close to 13.75k hp, a priests’ shield can also do it.
If your tank dies from the pyroblast, it’s usually not a wipe, as he’ll enter phase two, in which he stops hitting the tank.
When he hits 55%, make sure there ain’t a phoenix up, and take him below 50 fast to avoid any pyro’s if you can. Kael won’t use any more fireballs, melee, or phoenixes. Thus, you can dps on him all you want. However, he’ll periodically kick everyone into the air with gravity lapse (as per the Kael’ fight in TK), which does about 300 damage per second to everyone, and you must swim away from the purple bubbles that move towards random players that deal up to 2k damage if you get close. Not hugging eachother helps to keep them away from everyone. Paladins can use their bubble to prevent getting kicked up in the first place and be able to heal people from out of the bubble. Druids and priests can use their hots. Warlocks can drain kael’thas with drain life, reducing their damage suffered. Potions and healthstones help. It’s basically thirty seconds of staying alive.
After those thirty seconds, you have a brief ten-second window in which you can do 150% of normal damage to kael. It’s best to not be too high up when the lapse ends, because you get falling damage when you do. Keep alive during gravity lapse, and a win is assured. A restoration druid can technically solo phase II, so the main point of the encounter is to get to this phase. Don’t give up if one or two people die, it’s easily doable. Don’t go releasing, just watch the show.
Note: if you can help it, go with a strategy without equipping resistance sets. The more DPS you can do to kael in phase I (well unless you’re aggrocapped, then some resist is okay I guess), the easier the whole fight becomes. There’s a large diffrence between two phoenixes and a pyroblast and only one phoenix.
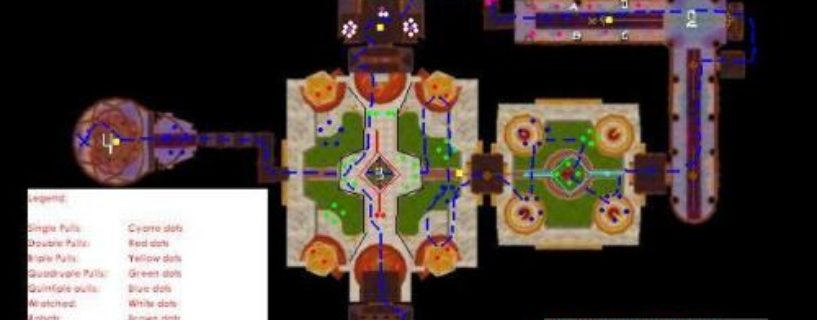
http://img170.imageshack.us/my.php?image=650pxmagisterterracemapcf1.jpg
Contains all locations of all the mobs within Magister’s Terrace that are usually fought or skipped. Note that the fish groups tend to wander a bit in 3D. Careful pulling, and:
Enjoy your epic items!
Magisters’ Terrace noteworthy loot:
Needs an updateWe are recently working on improving the quality of content here on WoW-Pro.com, both by limiting low ranked guides and by moving out of date guides into archives. For more information, see [url=https://www.wow-pro.com/node/3016]the full news post detailing this process[/url].
This guide needs an update to make sure it is current with patch 4.0. However it still has enough useful information that it will be left in it’s proper section as-is.
If someone else would like to adopt the guide, or if you have any questions about this process, feel free to comment here.
Nice job!But you should’eve put in some screenshots to easy up the “Wall of text” feeling, but an awsome guide indeed.
I mostly just skipped over it, but i still noticed this typo you made under the Boss add Apoko, You wrote
“and fire nova totems mostly dispel their own CC’s while not doing many damage (thus you can ignore those)”
But Typos are Typos, and now when WoTLK is out, This guide might not be as useful. But i Really hope you write some WoTLK guides. They sure are helpfull.
-Blubzor
Awesome job, you’ve put aAwesome job, you’ve put a lot of work into that guide and it shows.
What would rock though would be some colors and a few images to make it less “wall of text” 😛