
 by Jame
Upper Blackrock Spire guide
Introduction
The Upper citadel of blackrock spire is the first mini-raid zone to get you started before big raid instances such as Molten Core and Onyxia’s Lair, but it is nonetheless important as you will have to go through UBRS if you want to access Onyxia’s Lair, as the key quest requires many trips to UBRS. It is also involved in the main Molten Core quest, so it is one of the instances you cannot avoid. And why should you, it is a great place! Upper blackrock spire is designed for 3 groups, and no more than 15 players can be in the same UBRS instance at a time.
After reading this guide you will know how to clear UBRS from bottom to top without any problems 🙂
The raid:
Some of the fights in UBRS can be nasty, especially General Drakkisath, so you might as well go in there with as much people as possible. Try to recruit 10 people with a balanced mix of class and you shouldn’t have any problem.
Ideally you need:
- 3 Healers or more (try to have at least 1 priest 1 Druid 1 Paladin so you get all the existing buffs)
- 2 Tanks or more (can be a prot spec paladin or a feral druid, but try to have at least one warrrior)
- 2 AEing classes or more (Mages are the best choice here, but warlocks are good too, provided you also have a mage)
- You can fill up the rest of your raid with anything you want then, try to get more DPS (Rogues, Hunters, etc). Try to have at least one of each class so the class specific loot isn’t wasted also.
Addons:
Make sure all your raid has the latest version of CT_Raidassist, you can work without it but it is really a BIG help for raids. Would be a waste to not use it.
Quests:
Horde:
Quests you should get before entering UBRS:
- [63] For the horde
This is the most important quest to have when going to UBRS. It is part of the quest chain to get Onyxia’s Lair key. To unlock this quest you must complete the main quest in Lower BRS: warlord’s command; if you have any problem with this part you should go read my guide on Lower BRS. - [60] Eye of the Emberseer
Another very important quest, its part of the chain quests that take you into Molten core, and the end reward is being able to summon Majordomo Executus, your only way to reach Ragnaros himself. To get this quest, seek Duke Hydraxis in Azshara, he’s on a little island on the east/south part of the map. Do the quests he gives you and then you’ll get Eye of the Emberseer as a follow-up. - [60] The Darkstone tablet
An optional quest, easy to complete as it is on the way to the important stuff in UBRS, and just one click needed. - [60] Blackhand’s Command
A very important quest as it grants you access to Blackwing Lair. To get the quest, kill the Quartermaster outside of BRS entrance to the left.
Quest you obtain inside UBRS:
- [60] The matron protectorate
That quest only interests Warriors, rangers, shamans and arguably paladins. More about that quest in the walkthrough. - [62] Finkle Einhorn, At Your Service!
That quest only interests Rogues, Druids, Priests, Mages and Warlocks. More about that quest in the walkthrough.
Alliance:
Quests you should get before entering UBRS:
- [63] General Drakkisath’s Demise
This is the most important quest to have when going to UBRS. It is part of the quest chain to get Onyxia’s Lair key. To get this quest you must kill Overlolrd Wyrmthalak in Lower BRS, on his corpse you will find a note, this note starts the quest. - [60] Eye of the Emberseer
Another very important quest, its part of the chain quests that take you into Molten core, and the end reward is being able to summon Majordomo Executus, your only way to reach Ragnaros himself. To get this quest, seek Duke Hydraxis in Azshara, he’s on a little island on the east/south part of the map. Do the quests he gives you and then you’ll get Eye of the Emberseer as a follow-up. - [60] Blackhand’s Command
A very important quest as it grants you access to Blackwing Lair. To get the quest, kill the Quartermaster outside of BRS entrance to the left. - [60] Doomrigger’s Clasp
Starts in morgan’s vigil. You are supposed to pick up something from the rookery and bring it back, then deliver to another guy in stormwind. After defeating Drakkisath, go out of this room by the left exit and you will be facing the Rookery again. You will now be above rookery room on a ledge, move right on this ledge until you reach a big pillar. Jump down, the box you need is just at the side of this pillar. You can take it without aggroing the eggs, if done correctly. Also, the box respawns after a few seconds if you have multiple questers. There is no really easy way to get back up, so bring a mage down with you for the portal home.
Quest you obtain inside UBRS:
- [60] The matron protectorate
That quest only interests Warriors, rangers, shamans and arguably paladins. More about that quest in the walkthrough. - [62] Finkle Einhorn, At Your Service!
That quest only interests Rogues, Druids, Priests, Mages and Warlocks. More about that quest in the walkthrough.
Walkthrough
Before you even get started, make sure you have at least one person with the Seal of Ascension, and make sure this person has the Seal on him or in his bags, or your UBRS raid will stop at the first door. 🙄
If you have no idea what a Seal of ascension is, I suggest you go read my guide to Lower BRS about that part, there is a detailed explanation on how to get a Seal of Ascension.
Go to Blackrock spire, just as if you were going to Lower blackrock spire, and zone in. When inside, go up the stairs to the left and the sealed door to Upper BRS will open as soon as the person who carries the seal will approach. Make sure everyone stays on the bridge, and have one person pull the Dragons inside the room, all of them.
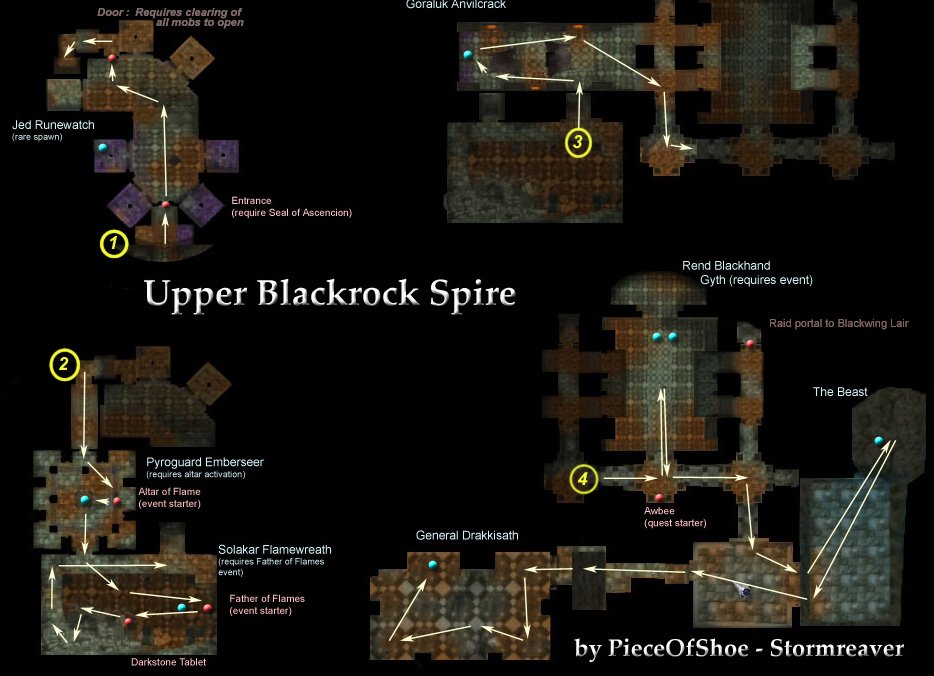
1. The first room:
The first room can quickly become a mess if you just rush in there mindlessly. The first room is divided in 7 little chambers, in each of these chambers 4 orcs which you must defeat to unlock the runes. Once the seven runes are unlit, the door to the next room opens. Now here are the dangers of this room:
- Blackhand Summoners: they must be killed first and they must be interrupted and stunned when they start summoning. If they are let free, they will start summoning more orcs, and those are lvl 60+ elite annoying orcs, and you end up overwhelmed in no time.
- Blackhand Veterans: use knockback, and it very often happens that they knockback someone in one of the opposite rooms, and you end up having to deal with 2 rooms (or more) at the same time. So once your puller cleared the whole room of dragons, call the move and have everyone rush in one of the rooms, get inside and with their backs facing a wall. Everyone must do that, including healers, casters, hunters, or you can be sure someone will get knocked in the wrong direction.
Clear all the rooms in the same manner and the door to the next room will open. If it doesn’t, you are extremely unlucky, once in a while it happens that one of the runes doesn’t unlit and bugs the door, your only option is to zone out, reset and re-clear. This happened to me twice, and I cleared UBRS a hundred of times approximately.
The same rules about Blackhand summoners and veterans apply for the whole dungeon. Summoners must be taken care of quickly, and when dealing with Blackhand veterans, make sure everyone minds what their backs are facing.
Move on to the next room, the chamber of summoning.
2. The chamber of summoning:
Make sure everyone is inside the room before people start messing with the clickable stone at the left wall. Once everyone is in, have several people click the stone, after a while all the orcs in the room will become aggressive.
The best way to deal with them is to just AE the hell out of them. So have everyone stand close to the altar, keep your mages / warlocks healed and make a quick work of them.
As soon as all the orcs are dead, have a tank get ready infront of the altar, where a big fire elemental is. That elemental will become agressive in a few seconds, he’s one of the easy minibosses, you shouldn’t have any problems.
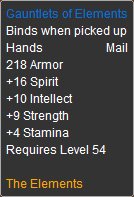
Pyroguard Emberseer mostly drops so-so green loot but sometimes a few decent blue drops, especially the shaman set gloves:
Don’t forget to loot the Eye of the emberseer from the corpse, and complete [60] Eye of the Emberseer quest.
On to the next room!
3. The Rookery:
The rookery’s floor is full of dragon eggs. If you go straight ahead, avoid walking on the eggs, and up the ramp you can avoid messing with any of the dragon eggs, and go straight toward rend blackhand. But if you go left inside the room, you will reach a little red obelisk shaped stone. If one person clicks this stone an optional script will start. But first, let me describe how to reach that obelisk safely, so nobody pulls a LEEROY~!
Have your puller bring the 3 Dragonkin in the emberseer room and kill them. Once that is done, have your puller go inside the room toward the obelisk and walk on some eggs, awake some dragon whelps and bring them to the emberseer room where they will be AE’d to death. Needless to say this is pointless if you don’t have at least a mage with instant arcane explosion in your raid. Have your puller repeat this step until he judges it is safe enough to move the whole raid straight to the obelisk. This must be done quickly, because those dragon eggs respawn quite fast. And needless to say your healers need to be quick on healing the mages / warlocks when they AE.
Once your whole raid is positioned at the obelisk and that your casters finish their drinks, start the script. Rookery Hatchers will start spawning by pairs, have your whole raid focus on kiling them besides your Mages/warlocks who will deal with the whelps. The rookery hatchers will go and break eggs, so it is good to stun them and kill them fast before they awake too many eggs. With luck, if you are fast enough, your casters will have time to drink quickly in between waves, but don’t count on it.
After a certain amount of waves, a miniboss will spawn, make sure your main tank is prepared to intercept it.
Solakar Flamewrath is an easy miniboss, hits harder than the average Dragonkin, but the main difficulty is that you might already be dealing with a bunch of whelps and whatnot when he spawns. Let your maintank deal with the miniboss alone while the rest of the raid finishes the other dragons, then kill miniboss while the mages take care of possible remaining whelps.
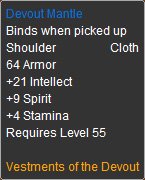
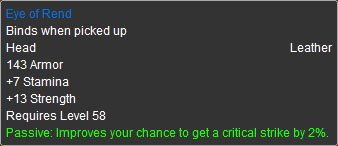
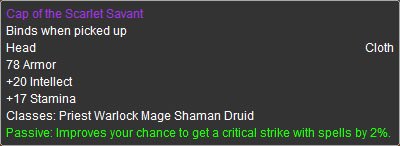
Solakar almost always drop a blue item, including the very rare Priest set Mantle:
Horde: In the middle of the room you can also find the Darkstone tablet and complete another quest in the process.
Time to move your raid up the ramp, on the oposite side of the obelisk. Tell everyone to avoid walking on the eggs (or close to them), but odds are one person will not manage it (*sigh* 😛 ), so just have everyone run to the first corner on the ramp and AE the few whelps there.
4. The Armory:
Clear the first 2 dragons up the ramp, then have your raid move up to the corner and stay there. Ignore the first path to the left, and just pull straight ahead until you reach the opposite corner. (The reason why we ignore this gate on the left is because pulling through it is extremely buggy, mobs tend to run away and bring a lot of friends before they actually reach you).
Have your raid with their backs against the wall and pull the next room to this spot, as it is shown by the arrows on the map #3. That is only if you want to kill Goraluk anvilcrack, he is optional but he can drop decent items and smithing plans, so it’s all up to you. If you don’t want to kill him, just pull up the stairs and to the right. There are a lot of roamers in those rooms so make sure your puller takes his time and only calls the move to up the stairs when it feels safe enough.
Go up the next flight of stairs after clearing the few dragons and orcs there, and you will be looking over a small arena. (Yes, that means do not follow the arrows on the map this time). This is a shortcut, you can have everyone directly jump off to the arena, instead of clearing through the gate on the right. You will be skipping about 4-6 orcs that way, it’s doesn’t seem much but after clearing UBRS dozens of time it seems to be ‘vital’ 😯 . Plus, it’s fun to have the whole raid ninja jump all at the same time. It IS important that everyone jumps down at the same time because a script starts and Orc spectators spawn rigth where you jumped from. Make sure hunters and warlocks dismiss their pet, and make sure there is no totem left up there, that could create a huge train.
No time to chit-chat anyway, as soon as you jump inside the arena a very cool script starts, so let’s get to that!
5. The Arena and Rend Blackhand:
Waves of orcs and dragons will start attacking you, they are kinda easy, fight them off the way you like it, AE them or kill them one by one. After a while, you will hear Rend and Lord Nefarius talk and rend will walk off, saying he will take care of it himself.
After a while Rend will appear, mounting a great dragon, Gyth. You will have to first bring Gyth down to low health (about 20%) to knock Rend off his mount, and then you will have to fight rend while finishing Gyth as well.
Gyth has a frontal breath, so make sure the main tank makes Gyth face away from the raid. Have another tank be ready to taunt Rend as soon as he’s knocked off his mount. Finish Gyth and then deal with Rend. Nothing special to say about Rend besides he hits hard, and can kill a caster fairly quickly, so make sure your tanks are on their toes ready to taunt him off.
Optional cool stuff: To the wearer of the Seal of Ascension, make sure you have the ring equiped before jumping into the arena, and use it while fighting Gyth/Rend for a little surprise. (including a full heal for your raid in the middle of the fight)
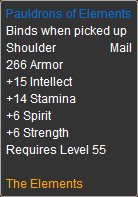
Gyth can drop a few decent Green items, and more rarely a shaman set Pauldrons, and if you are really lucky he can drop a Chromatic carapace, needed to craft some really cool items, through questing (more about that later)

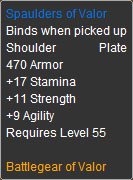
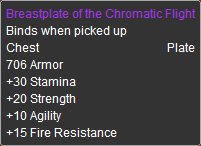
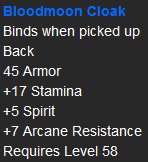
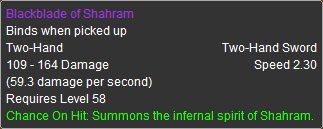
Rend also drops some nifty stuff, including warrior’s set pauldrons:
And many other great items including a dual-wield weapon set. But the real prize is rogue’s favorite drop (and a very rare drop it is):
Once the script sucessfully completed, the gate behind you will open, go there and clear the room, straight ahead on the oposite side of the room you will find a little dragon on the floor, whimpering. Awbee is the quest giver of the [60] Matron protectorate quest, whose final rewards are one of the following:
So only Warriors, hunters, shamans and arguably paladins should bother taking that quest. Actually, don’t bother taking that quest as long as you don’t have a chromatic carapace, which is the rarest drop of all the components needed for those crafts. ( about 1,50% chance to drop from Gyth)
Anyway, time to head towards the real bosses, go left, follow the arrows on map #4. From now on, the pulls are getting a bit more rough. The orcs are lvl 60-61. The dragons as well, and using druids to hibernate them is too risky, they are mostly immune to it now, or too resistant. So kill the dragons first and sheep the humanoids from now on.
Head to the beast room and set your raid against the wall opposite to the beast.
6. The Beast:
The beast is ‘medium’ difficulty fight for a raid new to UBRS. Here is what you should know about the beast:
- Randomly charges a randomly selected person and then goes back to the person with highest aggro. There is nothing you can do about this besides healing the person who just got charged.
- Casts AE fear every now and then on everyone besides the person on top of the aggro list (luckily), warriors may use berserker rage to break from it, undeads may use will of the forsaken.
- Also cast some AE damage spell, make sure every group has a healer assigned.
Set up everyone against the wall opposite to where the beast is, assign a couple of healers to a main tank and then send your main tank to pull the beast and then make sure everyone in the raid gives a good 10 second head start to the main tank for him to build aggro before anyone starts attacking.
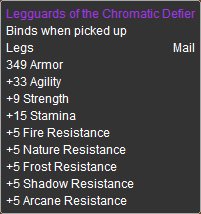
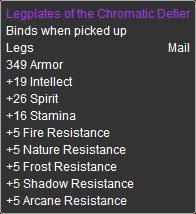
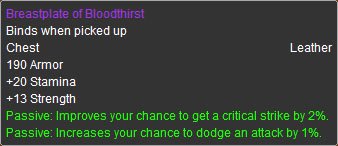
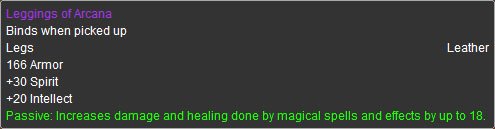
Other than being a simple fight, the beast can drop nifty items, and it always drops 2 blue items, out of a loot table of 9 blue items, including the Paladin set pauldrons:
And also sometimes:

This should be given to someone with a skinning skill of 300, and this person should be able to skin the beast after equiping the skinner. Why is this important? Because when skinning the beast, there is a very small chance that it might yield a:
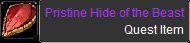
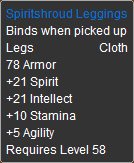
Before I tell you what this pristine hide is about, you must know that when skinning the beast, you free a gnome that was trapped inside the beast’s belly. Finkle einhorn, after you free him, gives you a quest. Similar to the Chromatic carapace quest, besides this time the rewards are for leather and cloth classes:
Needless to say, don’t bother startng with these quests unless you have a Pristine hide.
Now, time to thead to the last room and the last fight!
7. General Drakkisath:
Pull the orcs on the bridge before crossing it, then head inside drakkisath room and set camp on the first corner to the right.
The general’s room has 5 packs of mobs, and 2 patrols. You must be very careful with those patrols, just read the following instructions carefully and you will have no problem.
Each pack of mob includes 1 Dragon captain and 4 other mobs, which can be 4 orcs or 3 orcs and 1 Dragon flamescale. Kill the Dragon Flamescale first, they are casters and do AEs, then kill the captain, then the humanoids, which should be sheeped anyway. If you lack mages (or warlock with succubus), assign offtanks to those orcs: warrior, paladin, shaman, druid bear form, anything will do, just organize yourself and make sure none of these mobs is loose and beats on healers, because if they do, your healers will die quickly.
Also, make sure everyone fights with their backs against some wall, because some of these mobs knockback. There is a big chance you will wipe completely if someone gets knocked into an additionnal pack of mobs.
Kill order:
1. Kill the first pack right infront of you when entering Drakkisath’s room.
2. WAIT on the first patrol, it WILL come. Just wait in this corner and pull it there.
3. Kill the pack of mob straight ahead in the middle of the lair, and then pull the pack on the left.
4. WAIT on the second patrol, pull and kill it.
5. Kill the last 2 packs in any order you like, you should be safe now.
Now remains the hardest fight of Upper blackrock spire, General Drakkisath:
Mob analysis:
- Flame breath: Direct 800ish damage frontal cone breath. Solution: Make sure your main tank is positioning the general so it’s facing only him.
- Hits hard in Melee.
- Have your main tank positioned somewhere where only him gets flame breath.
- The rest of the raid should position themselves to the other side of the general if they need to melee it. Casters should just stay away.
Battle plan:
1 General and 2 Guards to deal with.
There is two way of dealing with it:
1) The kite tactic:
This makes the encounter really easy if you have a hunter confident enough to do it, here is what you should do. Make sure the previous room and the beast room are totally empty. The hunter should be buffed with aspect of the pack, then from max shooting range pull general drakkisath with Aimed shot followed by distract shot and run away with Drakkisath on his tail, taking him for a walk to the beast’s lair while the rest of the raid kills the 2 guards quickly. As soon as the 2 guards are dead, warn the hunter, who should Feign death. General Drakkisath will run back to the raid, he’s not so hard to deal with when his guards are both dead! In short, the hunter’s role will be to keep running and stay alive as long as possible while the rest of the raid deals with the two guards.
2) The normal tactic:
Assign one tank to the first guard, and another tank to the other. The guards hit hard, 500ish+ on plate classes. And you better assign a class who can quickly build aggro to the 1st guard (warrior is best choice in this case), so rogues and mages can go full damage without overaggroing the tank and getting owned.
Plan the kill order beforehand, mark one of the guards and start killing that one, then kill the other guard, then kill the general.
Assign one healer per tank for the guards, One healer or two if possible for the General tank. Minimum numbers of healers I did this with were 2 priests. One kept the maintank alive, one kept the two other tanks alive on the guards. One of the guard tanks was a paladin though, and he helped with the heals after the guard he was supposed to tank died.
Once the guards are dead, some healers should be free to heal around where it’s needed, that’s where CTRaidassist is so useful. Communication is key as well, if the main tank healer goes low on mana, the other healer(s) should take over.
If you are short on tanks, you can also have a warlock chain fear one of the guards while killing the other. There is a risk your warlock gets bad luck on resists and goes splat, but if you are short on tanks (or healers), thats’s the only alternative you have.
If you follow these insctructions carefully, General Drakkisath should become a trivial fight very quickly for your raid. Anyway, the room respawns are very slow, so if you wipe, soulstone / reincarnate and go at it again, adjust a few things, and you will manage it!
Behind General Drakkisath is a pillar, click it to complete your Attunement to Blackwing Lair quest.
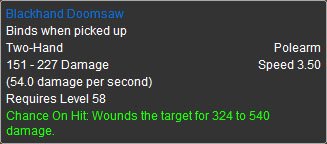
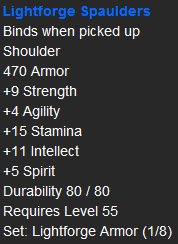
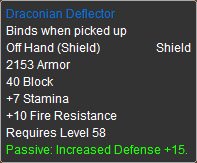
Now you can reap your rewards, and good rewards they are. Drakkisath can drop any of the Class set BPs, and he always drops one, in addition he drops another blue item out of 4 items, one of the them is a great shield, which you will still use against mobs such as Ragnaros:
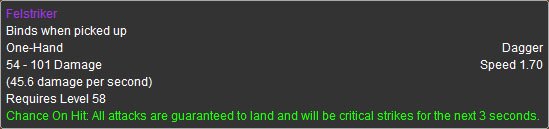
And the very rare drop, if you are lucky enough:
I hope this guide will provide enough information for you to go through UBRS without much troubles, but keep in mind this is just half the job, the rest is up to you to make your raid work together, as one person not paying attention can wipe your whole raid in no time. 🙄
If you see any errors in the guide, or if you feel I should elaborate more some parts of it, please say so, and I’ll do my best to help! 🙂
-Jame
© Copyrights www.wow-pro.com All right reserved
Yes, there is no need to goYes, there is no need to go to LBRS for the Onyxia key. You do Jail Break! and then the Stormwind Escort, go talk to the dragon atop a mountain in Winterspring, and then you kill Drakkis for his blood.
Onyxia Attune ChainJamie,
First of all, great guides!! Thx a million.
I have a question, I thought the Onyxia attune quest starts from Dragonkin [54] Menace in Burning Steppes, which leads to a chain that involves Jail Break, etc.
The final kill needed is still General Drakkisath for the Blood of the Black Dragon champion, and get the Drakefiew amulet from Haleh in Winterspring.
Thank you!!
Xedi