
 by Jame
Blackrock Depths guide
Introduction:
Blackrock Depths is to this day the biggest instance you can find in Azeroth, it is a huge zone, and this guide will help you to find your way in it. This zone has also the biggest amount of quests ever seen in an instance. So I will try to keep everything to the minimum in the walkthrough.
I highly recommend you read the quest gathering section carefully before anything, because many quests are linked to each other, many have pre-requisites, some start outside the instanced area even. Be aware that BRD (BlackRock Depths), has been designed for a solid 5-man group, and that it also has been designed to clear the instances a few times before you get to complete every quest (especially the most rewarding ones). You can be sure you will at the very least do 3 BRD runs before you have all the quests done. Anyways, when you will be feeling at home with this place, you will realize it is a goldmine, and you will probably want to go back to it a few more times. (You will have to one day or another anyways, because the portal to Molten Core is there 🙄 )
Gathering the quests:
Horde & Alliance:
NOTE (Important): The quests marked in Orange are the ones you must have up (or already completed) before you enter the instance for the first time. Try doing the Disharmony of Flame (Horde) / Overmaster Pyron (Alliance) quest as soon as possible, so you can get access to all the Orange quests listed. If there is still a quest you can’t access, don’t worry, come back later after your first BRD run and check again, it should get unlocked at some point.
- [60] Attunement to the Core (Elite) , given by Lothos Riftwaker, an elf outside the instance. You need to do this quest to be able to teleport easily into The Molten Core by jumping out of the window next to Lothos Riftwaker. A must do for when you are level 60.
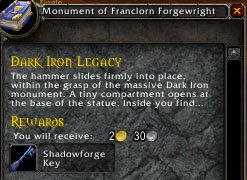
- [52]Dark Iron Legacy (Elite) , given by Franclorn Forgewright, outside the instance (see map). Franclorn is a ghost, so in order to talk to him, you must be in ghost form (die pls!). It’s important that you get the quest from him before entering the instance, because it’s the only way to get the Shadowforge key, which unlocks the doors to the interesting areas of BRD. Don’t bother with any quest not marked in orange for now, and follow this guide blindly.
- [53]Ribbly Screwspigot (Elite) , given by Yuka Screwspigot in Flame Crest, Burning Steppes.Pre-req for this quest is to complete the quest Yuka Screwspigot, given by Yorba Screwspigot in Tanaris.
- [54]The Love Potion (Elite), given by Mistress Nagmara inside BRD, at the Grim Guzzler Tavern. This quest requires you to gather different components in different places of Azeroth. Completing it is worth it, besides the item reward, Mistress Nagmara has another function. When you have completed the Love Potion quest, on your next runs to BRD, she will open the backdoor of the Tavern for you if you talk to her. That way you won’t need to kill Phalanx everytime you go through the Grim Guzzler.
- [58]The Heart of the Mountain (Elite) , given by Maxwort Uberglint, at the Flame Crest, Burning Steppes. This quest’s objective is to open every coffer in the BRD Vault. For that you need your group to have gathered 12 Vault Coffer Keys. They can drop from any Iron Dwarf in BRD.
- [58]A Taste of Flame (Elite) , given by Cyrus Therepentous. Objective is to kill Bael’Gar in BRD (see map) and to capture his fiery essence with the help of an Altered Black Dragonflight Molt. How to get the Dragonflight Molt:
A long serie of quests starting with Kalaran Windblade, in Searing Gorge, you can find him North of the area called ‘The Cauldron’ (loc 39,39). He will have you do a bunch of quests, starting with [48] The Flawless Flame, until you get to the point where you get the Torth of Retribution, and then he will send you to Squire Maltrake. Squire Maltrake will give you the quest [52]Set Them Ablaze!, you will have to use the Torch on the braziers in each of the 4 towers. After you finish the quest, Kalaran will turn into a dragon (not an aggressive one, don’t worry) and talk to you, and a chest will appear on the ground. Opening it gives you a quest, complete it and you will get a box. Inside this box is the Black Dragonflight Molt. Now that you have the Black Dragonflight Molt, go talk to Cyrus Therepentous, he is in the Eastern part of Burning Steppes, in a cave (loc 39,39).
Horde:
- [52]Disharmony of Flame (Elite), given by Thunderheart, in Kargath Outpost, Badlands. Objective of this quest is to kill Overmaster Pyron, who can be found outside of the BRD instance, he roams around the bridge leading you to the instance portal.
- [56]Disharmony of Fire (Elite), given by Thunderheart as well. This quest is the follow up of Disharmony of Flame.
Objective is to kill Lord Incendius (details about this can be found in the walkthrough) and to loot a tablet from him. - [52]KILL ON SIGHT: Dark Iron Dwarves (Elite) , given by the WANTED poster in Kargath, Badlands. Anvilrage Footmen, Warden and Guardsmen can be found in the first areas of BRD, you can hardly miss them. This quest leads to the following:
- [54]KILL ON SIGHT: High Ranking Dark Iron Officials (Elite), given by the same WANTED poster after you completed the previous quest. You can find those Dark Iron Officials mostly on the Dark Iron Highroad (close to Bael’Gar, check map).When you have both KILL ON SIGHT quests done, a new quest will unlock:
- [58]Grark Lorkrub (Elite), given by Lexlort in Kargath, Badlands. This quest will send you to Burning Steppes, you can find Grark Lorkrub inside the Blackrock Orc fortress, east of blackrock moutain. Finishing this quest unlocks a last one:
- [58]Operation: Death to Angerforge (Elite), given by Warlord Goretooth in Kargath, Badlands. (See above for pre-requisites). Will describe later on how to get to General Angerforge and how to kill him.
- [52]Commander Gor’Shak (Elite) , given by Galamav the Marksman in Kargath, Badlands (he is on top of the Guard Tower). If you don’t get this quest, then try doing Disharmony of Flame to unlock it. After you complete the Commander Gor’Shak script sucessfully (Commander survives), go talk to Kharan Mighthammer. He is in the opposite jail. Listen to his story and then you will be sent to Thrall.
- [59]The Royal Rescue (Elite), given by Thrall in Orgrimmar, the pre-req for this quest is to complete the Commander Gor’Shak quest. The objective is to Kill Emperor Dagran Thaurissan and to rescue Princess Moira Bronzebeard. (Will be described later)
- [55]Lost Thunderbrew Reciepe (Elite) , given by Vivian Lagrave in Kargath, Badlands. Will describe how to get that reciepe later in the guide.
- [55]The Last Element (Elite), given by Shadowmage Vivian Lagrave in Kargath, Badlands. Pre-req for this quest is to complete Disharmony of Flame. Objective is to gather 10x Essence of the Elements, which can be dropped by Golems and Elementals inside BRD.
- [58]The Rise of the Machines (Elite),given by Lotwil Veriatus, East of Kargath, Badlands. Pre-requisite for that quest is to complete [54]The Rise of the Machines, given by Hierophant Theodora Mulvadania in Kargath, Badlands. The pre-req quest can be done solo at lvl 54+.
Alliance:
- [52]Overmaster Pyron (Elite), given by Jalinda Sprig, at the Alliance outpost in Burning Steppes. Overmaster Pyron is a Fire Elemental, you can find him right before the intance portal to BRD.
- [56]Incendius! (Elite), given by Jalinda Sprig as well. This quest is the follow up of [52]Overmaster Pyron.
- [55]Hurley Blackbreath (Elite), given by Ragnar Thunderbrew at the Tavern in Kharanos, Dun Morogh.
- [56]The Good Stuff (Elite), given by Oralius, at the Alliance outpost, Burning Steppes. Any humanoid type inside BRD can drop Dark Iron Fanny pack. You will complete this quest on your way through the instance.
- [54]Marshal Windsor (Elite) , given by Marshal Maxwell, at the Alliance Outpost, Burning Steppes. Objective is to find Marshal Windsor in BRD. (see map)
- [54]Abandoned Hope (Elite), given by Marshal Windsor in BRD as a follow-up from previous quest.
- [58]A crumpled up note (Elite), found on any mob in BRD. Right-Clicking the note starts the quest, which requires you to go and talk to Marshal Windsor again. The note only starts to drop AFTER you’ve turned in [54]Abandoned Hope (Elite) at Marshall Maxwell in Morgan’s Vigil.
- [58]A shred of Hope (Elite), given by Marshal Windsor after bringing the Crumpled up note to him. Objectives of that quest is to gather the marshal’s lost information. For that you have to kill General Anvilrage and Golem Lord Argelmach (details about this in the walkthrough). After you complete this quest and turn it in at Marshal Windsor, he will give you the follow up below:
- [58] Jail Break! (Elite) This is the dreaded escort quest, you will have to escort Marshal Windsor out of BRD. And you MUST do it, it’s a very important quest as it’s your onyxia key quest line. Details about this will be given in the guide at the proper moment.
- [59]Kharan Mighthammer (Elite), given by King Magni Bronzebeard himself, in Ironforge. Kharan Mighthammer is in one of the jails in BRD. (see map) The pre-req for this quest is to complete [54]The Smoldering Ruins of Thaurissan given by Royal Historian Archesonus, in Ironforge. That quest is easy to complete solo, go to the Ruins of Thaurissan in the Burning Steppes and look around for little stones and click them.After finishing the previous quest (talking to Kharan Mighthammer), he will give you the quest The Bearer of bad news ,go back to King Magni Bronzebeard who will give you the follow-up quest:
- [59]The Fate of the Kingdom (Elite), objectives are to kill Emperor Thaurissan while letting Princess Moira Bronzebeard alive (even though she will be beating on your group). Details about this later in the walkthrough.
Where:
The entrance to the Blackrock Mountain can be accessed either from Searing Gorge or Burning Steppes. It doesn’t matter what side you come from. You will appear in a large cave, with a floating rock over the lava pit, bound by huge iron chains to the inner walls of the moutain. This area appears on the map, this is where Franclorn Forgewright is marked. You aren’t in the Instance part yet, but the guide will start here…
Walkthrough:
I am assuming you followed my directions so far and have all the Orange quests up (or completed). Starting from that, let’s move to the first step:
Group composition:
Note: I strongly recommend NOT going there unless your group average is 55+ at least.
- 1. Healer: Priest or Restauration-heavy Druid
- 2. Tank: Warrior or Prot spec Paladin
- 3. Mage or Warlock: TRY to get a mage (with Improved Arcane Explosion talent), you can still do the instance without a mage, but your life is gonna be much easier if you got one with you. Not only for the usual benefit of having a mage (Polymorph and DPS), but more because when you will get to the Lyceum you will need to use AEs (Area Effect attacks) a lot.
If you don’t get a mage, try hard to get a warlock. Hellfire is a nice replacement for Arcane Explosion. But also, Warlocks are really great to have in BRD. Because they can banish elementals, and you will see how hard those elemental pulls are. Having Both Mage and Warlock is great as well. - 4. Support:Backup healer, tank and buffer such as Shaman or Paladin is very nice to have.
- 5. DPS: A Rogue is the primary choice here, improved sap helps a lot and their DPS is most welcome. Can also go with a Hunter which is really nice dps plus some offtanking power.
PS: This was just a list of classes that make your life easier in BRD, it’s basically your ‘ideal’ group setup for this zone. BUT you can still (if playing with skill) clear BRD with weird group compositions, it will just be harder.
1. The Jail Area:
If you don’t have a rogue with a high enough Lockpicking skill, you will have to hunt for the Prison Cell key. It’s dropped by High Interrogator Gerstahn, 50% drop rate. You can find Gerstahn in the middle of the jail area. Once that is done, you can open the cells and talk to NPCs trapped in there.
Alliance: Go talk to Kharan Mighthammer and Marshal Windsor. (Both marked on the map) You will normally get the follow-up quests: [54]Abandoned Hope and The Bearer of Bad News. Don’t forget to turn those quests in before your next BRD run. Or, if your group is ok with it, warp to Ironforge, turn in The Bearer of Bad News and get the follow up, then fly to Morgan’s Vigil and turn in [54]Abandoned Hope, get the follow up, also turn in [52]Overmaster Pyron (Elite) and get the follow up [56]Incendius! (Elite).
Go back to BRD, kill mobs until a “Crumpled Note” drops, right click it to get the quest [58] A Crumpled Up Note, go to Marshal Windsor and turn in it, get the follow up A Shred of Hope.
Horde: Go to Commander Gor’Shak, and clear the camps of mobs around his cell before talking to him. When you will talk to Commander Gor’Shak and activate the rescue quest, a huge bunch of mobs will storm the cell and try to kill Gor’Shak. You must protect him at all cost. This fight is surprisingly one of the hardest to accomplish in the zone, there is a lot of Elite mobs in the pack, you are fighting them in a very small area, so targeting is a bitch, and on top of that, Commander Gor’Shak doesn’t have much Hit points.
Hints: Warrior, spam that Demorilizing Shout and then try to build solid aggro on everything. (having Thorns or Warlock Imp DS helps)
Everybody else, assist on the same target, take them down one by one and fast. Watch the Health of Gor’Shak permanently and try to see if something is hitting him (use ” V ” Targets). If it’s the case, try to draw aggro from that mob, even if you aren’t a tank type. If you fail, you have two choices, either you reset the instance and try it again right now (you are still close to the entrance), either you decide to try your luck on your next BRD run.
If you suceed, congratulations, go talk to Kharan Mighthammer in the opposite cell, listen to his story, and then you can get the follow-up quest from Thrall ([59]The Royal Rescue), after turning that quest in Kargath. Don’t forget to do it before your next BRD run.
2. The Ring of Law
Get out of the jail area, head to the next tunnel to the east, and enter the Arena where you will have to defeat the Ring of Law (Check map). The ring of Law is a script, it is started when someone steps on the circle in the middle of the arena.
After about 20 seconds, waves of mobs will start to attack you.
There is 3 waves, which consist of a few Elite mobs for the first two, and a Boss mob for the last wave.
The mobs you will have to face are randomly generated from a set list. As far as I can tell, I fought 5 different type mobs / bosses in this script.
The boss mobs have a chance to drop decent blue items. But the main reason why you are doing this script, is that it’s the only way for you to access the Shadowforge city and to get your key done, and it also puts every arena spectator in non-agressive mode, which is handy because you will have to cross the upper part of the arena.
Once you have completed sucessfully the Ring of Law script, the gates on each side will open, the one that interest you is the West gate, take it and go up a small corridor, you will end up in a room which we will named the ”Shadowforge Lock” room, you will see later why. After clearing a few mobs in this room, take a Hairpin turn on the right, and up the stairs. You will then be on the Upper part of the arena, where the spectators are. Go all around it to the opposite side, then start clearing your way North, toward the Vault room area, through the Domicile. Pulls can be tricky here, so pull with caution. Once you reach the Vault room, skip it, you most likely don’t have 12 Vault coffer keys yet, so no need to bother with that room for now. Keep going forward and go down the slopes toward Fineous Darkvire, the Architect. Pull the golems carefully until you can get Fineous Darkvire solo. (he roams up the slopes at some point, just wait until he does). After you kill Fineous, look the hammer from him, Ironfel. Now go back the way you came from until you reach the entrance of the arena, but this time go further south, to the Shrine of Franclorn Forgewright, and get your Shadowforge Key done.
Note: (Horde) I would now recommend that you finish your first KILL ON SIGHT quest and then go turn it in and get the follow up KILL ON SIGHT quest from Kargath. Because on the way to bael gar you will find all the Dwarves you need to kill to finish this quest.
3. Bael’Gar
Use the map to find your way to Bael’Gar, you can easily access him now that you have the Shadowforge Key. He is a LVL 57 Elite magma-giant looking monster, is pretty straight forward battle, he hits hard and has a lot of HP, every once in a while he summons a mini bael’gar and does a 1500DMG area effect attack at the same time. So when you see him starting to summon, go out of range (unless you are the warrior). The adds he summons can be killed very quickly, they have low hit points.
When you take him down, don’t forget to use the Altered Black Dragonflight Molt on his corpse to get the Encased Fiery essence. [58]A Taste of Flame Completed!
4. Lord Incendius
Follow the Dark Iron highway east until you reach the lair of Lord Incendius. Lord Incendius is an easy fight, he is a level 56 Elite fire elemental boss, hits reasonably hard, nothing too hard about him. Kill him and don’t forget to loot the Tablet of Kurniya from his remains. Congratulations, you just finished [56] Disharmony of Fire (Horde) / Incendius! (Alliance).
5. General Angerforge
To get access to General Angerforge, you must first go to the ”Shadowforge Lock” Room, it is now easily accessable to you because you have the key, and the door to this room is actually quite close to the entrance.
Up the stairs and on the left is a little passage toward General Angerforge, but you can’t access it yet because you need to unlock a gate. To unlock it you need to click a giant trigger:
This huge lock is located downstairs in the room, and it requires the Shadowforge Key to be activated.
Now that you unlocked the gate to shadowforge city, go upstairs and take the little passage toward General Angerforge.
General Angerforge is your first ‘real’ fight in BRD. So prepare it well and clear everything in his room before you engage him. Getting adds while fighting him would probably mean total wipeout.
How to: The General has 4 guards, but they are non elite and have about 1000 Hit points. They die extremely fast, so take them out while your Warrior tanks the general. The General himself has a lot of HP and hits reasonably hard, but the real difficulty in this fight is that when he gets low on health, he will call for help. About a dozen of dwarves will come to his aid, don’t panic though, most of them are the wuss type (1000 HP). Finish the General as fast as possible first, then use your AE attacks to kill the weak mobs quickly. Some of them are Elite AND Healer types though, make sure your tank taunts those well. Once the 1K HP adds are dead, stop AEing, just Assist each other on the same targets, and interupt their heals.
Congratulations on winning your first big fight in BRD!
Note: (Horde) Try to complete the WANTED quests as fast as possible and the [58]Grark Lorkrub (Elite) quest so you get [58]Operation: Death to Angerforge (Elite). Don’t hesitate to go out of your way and kill the remaining Dwarves you miss to complete the WANTED quests. If you do it well, you should have the last quest up for your 3rd BRD run. And the quest reward for killing Angerforge is then very interesting:
 and 7750 XP.
Note: (Alliance) “Loot Marshal Windsor’s Lost information“.
6. Golem Lord Angelmach
After killing the General, go back up the stairs and then across the room down a few stairs. You will enter a large room, full of little engineers (non elite) and a few Golems (Elites). Pull very carefully in this room, and don’t charge, PULL, way back to somewhere safe. You need to clear the whole room, because Lord Argelmach will call for help and the whole golems + little engineers will aggro.
Once you have the whole room clear, prepare for Argelmach, which is not an easy fight.
How to: Golem Lord Argelmach himself hits fairly hard. He procs quite often a 500dmg DD. He has good amount of Hit points, and on top of that, has 2 Golem guards, which both hit quite hard.
It’s gonna be hard fight. So prepare beforehand.
The warrior will be focusing on Argelmach himself and one of the two golems if needed (if lacking offtanks), and make sure to have solid aggro. The rest of the group will be taking out the adds one by one. Decide before hand who will be offtanking one of the adds. A hunter pet, a warlock pet, a druid in bear form, a paladin or a shaman, you have multiple choices… You decide who will be offtanking what before engaging. And you also decide in what order you will kill the golems.
Stick to the plan, focus, and you should make it.
Note: (Horde) “Loot Argelmach’s Head“.
Note: (Alliance) “Loot Marshal Windsor’s Lost information“.
7. The Grim Guzzler
There is one thing preventing you to reach the next room, the grim guzzler: 2 pulls of 3 Fire Elementals.
They are maybe harder than many boss fights in BRD, so don’t take them lightly. They hit for 400+ on average, and have some nasty damage hield. Whoever stands close to them gets damaged.
If you have a warlock, one can be banished, which is a huge relief. If you don’t, you gonna have one hell of a fun fight.
Basically you have to face 3 of those fire elementals at a time.
Use every ability you have to win. You can’t have a warrior tank all 3 at the same time, he will most likely die too fast, or the healer will get jumped after the first heal. So have the warrior tank just one, and kill that one first. About the 2 remaining elementals, you have several options:
Hunter freeze trap (even if it’s only a 20 second duration, it buys you time, its a big help), sacrifice a hunter or warlock pet on one of the elementals, it has a high chance to die but it will buy your group enough time to finish the first elemental. Have a mage kite one of the elementals around (lots of space in this big room) while you deal with the others.
You can also use a paladin / shaman / druid to offtank one of the elementals.
You must try at all cost to take the first elemental down fast, then the warrior will be free to tank the 2nd one. Also, try to space those elementals, so you don’t get hit by the 3 damage shield auras they have at the same time.
Set up a plan depending on what classes you have in your group, and stick to it. It WILL be a hard fight. You have been warned 😉
After those 2 hard pulls are behind you, you can enter the Grim Guzzler.
The grim guzzler is a tavern, full of non agressive mobs, you can talk to all of them BUT one: Ribbly Screwspigot, as he becomes agressive if you talk to him, so save that for later.
Get the quest [54]The Love Potion (Elite) from Mistress Nagmara.
Lost Thunderbrew Reciepe:
Move your group to the side room (filled up with kegs), and start destroying the kegs there. A bunch of elite mobs will come for you, pretty standard fight, once they are dead, loot them, one of them has the item you need to complete [55] Lost thunderbrew recipe (Horde) / [55] Hurley Blackbreath (Alliance).
Stay in this room for the next fight:
Ribbly Screwspigot:
Send your warrior to talk to Ribbly Screwspigot, he will turn agressive, and so will his cronies. Have the warrior run then back to the keg room and fight them there. Loot ribbly’s head, congratulations on yet another completed quest.
Phalanx:
Set up your group right next to where Phalanx stands, up the stairs in the corner. Have one person of your group (preferably not the warrior or the priest) go talk to the barkeeper and buy the beer he has (6 should normally be enough).
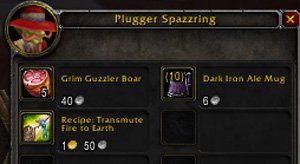
(Note: He sells alchemy Recipe: Transmute Fire to Earth)
Then look around for Private Rocknot, he will be ASKING for beer. So give him beer a few times, until he gets into a drunken rage and starts to mess around in the tavern.
When he does, Phalanx will become aggressive, acting as a bouncer, and destroy the backdoor of the Tavern (right next to where your group is positioned). Right after the door is shattered, engage Phalanx and fight him in the corner. He is an easy fight, just hits hard. He also just opened the door to the last areas of Blackrock Depths 🙂
Note: If you have completed the Love Potion quest, in your further BRD runs you won’t have to activate Phalanx to break the door anymore, you will just have to talk to Mistress Nagmara and ask her to go get a room with Private Rocknot. And she will do that, and open the backdoor in the process 😉

8. Ambassador Flamelash
Check the map and start working your way to Ambassador Flamelash, once you get to him, pull him. He is a DPS fight, the faster you kill him the better it is. As long as he is alive he spawns little fire elemental adds, which can become quite dangerous if they live too long.
If it’s getting ugly and your healer is getting swarmed by adds, don’t hesitate to use Challenging shout or Intimidating shout.
9. The Seven Dwarves
Work your way towards the chamber of the Seven.
When your group is fully buffed and ready, talk to Doom’Rel, he will start the Script.
The script consists of 7 Boss mobs, they will come one by one on a set timer. So the faster you kill them, the better it is. If you are too slow in killing one, you will end up having two of them on you at once, etc.
They are all different classes (Priest, warlock, warrior, rogue, etc) with all the abilities it implies.
Note: They can be Stunned and Interrupted. And also Shackled!
If you are quick enough, you will overcome this tough battle, and the chest of the seven will appear on the floor. (Good items) and the door to the lyceum will open.
Also, if you are a miner, you can learn Smelt: Dark Iron from Gloom’Rel in this room, talk to him before you start the script. He asks 10 Truesilver Bars, 20 Gold bars and 2 star rubies just to teach you the skill.
- To smelt dark iron ore into dark iron bars, you need to get to the Dark iron forge. After the Seven Chamber, go down the stairs and take a right, clear a few fire elementals and you will find the forge.
- To Create dark iron items (such as Dark Iron Pulverizer), you need to use the Dark Iron anvil, which is located in the lair of Lord Incendius).
Once you are done with this room, move down the stairs toward the Lyceum, a fun area! 🙄
Straight ahead will be a big gate, to the Lyceum, to the right though is a path guarded by two groups of fire elementals, if you want to complete your quest [60] Attunement to the Core, that’s where you must go. Right next to the green instance portal (to the raid instance: The Molten Core), the core fragment can be obtained from a stalagmite that is to the left of the entrance. Loot the core fragment to complete the quest.
10. The Lyceum
Goal: Light up the two braziers in two corner of the Lyceum. It will open up the door to the Emperor area.
How to: Scattered around the room are Shadowforge Flame Keepers, they have a 75% chance to dorp the Torch you need to light up a Brazier. So you will have to kill those twice AT LEAST if you are lucky.
Now the problem is that room is FULL of bunches of mobs (packs of 20 mobs or so). And the second problem is that they are on a 2min or so respawn timer.
The good news is that they are those weak 1K hp mobs, and die in about four Arcane Explosions from a mage. Or Hellfire from a warlock.
Now all you have to do is charge those bunches of mobs, AE them quickly, drink, move on to next bunch, while hugging the wall as much as possible. Be careful about the patrols, and try to find the Torch keepers. Once you got a torch, work your way toward a brazier and light it.
This is where having no mage or no warlock becomes a real pain. It is NOT impossible, but it is really a lot harder.
Key to win in this area is to be fast, to all move as one, and to beat the respawn rate.
Once you manage to light both brazier, the door to the Emperor area will open. Work your way there, congratulations if you manage it!
11. Magmus
The last guardian before the Emperor stands before you. Magmus isn’t hard once you know the only surprise feature of this battle. The statues on each side of the corridor actually are Flamethrowing devices, they activate when you engage Magmus.
So the key to this fight is to position your group at a spot with no statue on the side. Magmus hits hard and has a lot of HP, but besides this, he isn’t hard.
11. Emperor Dagran Thaurissan:
Finally the big boss!
Step 1: Clear the whole room (including the side floors)
Step 2: Engage the Emperor, have your warrior tank him. The princess will help him, but she doesn’t hurt nearly as much as the emperor. Best would be to have a Voidwalker or a Hunter pet tank her while the rest of the group deals with the emperor.
Note: If you have the final quest up [59]The Royal Rescue (Elite) (Horde) / [59]The Fate of the Kingdom (Elite) (Alliance), you must NOT kill the princess. If you do the quest fails. You must kill Emperor Thaurissan and then the princess will be non-agressive. You can then talk to her and finish the quest.
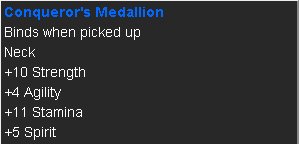
Emperor Thaurissan has a large loot list, and some of them are great. On top of that, finishing the princess rescue quest nets you 8000 XP and one of the following rewards:

Note: (Alliance) There is still one quest we haven’t done: [58] Jail Break! (Elite). You actually don’t have to do it during this BRD run, you can come back later and do it. That’s what most people do, they shout “LFG Jail Break” in the LFG channel. People see it as a very difficult quest, but it’s actually quite easy if you do the following before accepting the quest:
- Clear the whole Jail area, including the cells. Marshal Windsor will go through the whole ring to retrieve his gear.
- Clear the Ring of Law
If you have the whole path cleared, it will be quite easy, there will still be a few mobs that spawn to ambush Marshall Windsor, but nothing too hard.
Now that those preparations are made, go to Marshall Windsor, have everyone turn in [58] A Shred of Hope (Elite). Once everyone has done that, one person should start Jail Break! and everyone will get the quest. Marshall Windsor can’t be healed, so just watch out for his health and taunt things off him asap, that’s the only risk. Good luck!
I hope you enjoyed this guide into the Blackrock Depths. I tried to keep it as short as possible due to the size of the content of this zone. So if you lack information on any part of the zone, or think I should give more details somewhere. Please say so, and I’ll complete it asap.
Thanks for reading!
-Jame
Copyrights WoW-Pro All rights reserved.
Needs an updateWe are recently working on improving the quality of content here on WoW-Pro.com, both by limiting low ranked guides and by moving out of date guides into archives. For more information, see [url=https://www.wow-pro.com/node/3016]the full news post detailing this process[/url].
This guide needs an update to make sure it is current with patch 4.0. However it still has enough useful information that it will be left in it’s proper section as-is.
If someone else would like to adopt the guide, or if you have any questions about this process, feel free to comment here.
Extra Vault KeyActually, viewing the portrait spawns one of six Dark Keepers. For the most part each is in a specific location, and they tend to have a couple elite cohorts. They don’t fight the same either, like the guy who can appear in the bar is a caster.
You have to READ the portrait though, to see which Keeper is named and where to look for him. It won’t always be the same one every time you run BRD.
So far I’ve found the one near General Angerforge (in that cluster of NPCs that most groups ignore), the one in the bar, and the one in the arena among the spectators. The three I haven’t seen yet are the one in the Hall of Crafters, the one in the Domicile, and the one who appears right there in the vault (which is why you don’t view the portrait during a fight).
Door in Grim GuzzlerI didn’t see this mentioned, but noticed it today and thought I should probably share.
Another way for the back door to be opened seems to be if any patrons are attacked; either that, or it’s something new. Whatever the reason, at some point, a Fireguard Destroyer enters the bar with three dwarf guards, and states that they’re there to investigate a disturbance.
The thing is, if you don’t pull Ribbly carefully, and/or find a Dark Keeper in the bar (spawned by viewing the portrait in the Vault, and carries the key for that extra safe), or for any other reason end up fighting the patrons, it appears that these guys arrive shortly afterwards.
Our guild ran BRD today and accidentally aggro’d a couple patrons while fighting Ribbly and his cronies, then while standing near the door as we checked on how to open it, were suddenly attacked by four hostile mobs. Things got all ugly after that, and we nearly wiped, but basically the door got opened.
Later, I ran through solo, and while pulling out Dark Keeper Vorfalk I ended up fighting several of the patrons as well. Same thing — the Destroyer and some dwarves came in, only this time I was on the other side of the room, and better able to see what was going on. I was also better able to control my aggro, and not accidentally piss off the rest of the bar while fighting them…unlike what I’d done earlier in the day 🙁
So, basically to get that door open, you can buy drinks for Private Rocknot, speak to the succubus, or (apparently) fight a patron and wait for the po-po. Just wanted to warn others that if they’ve fought patrons, don’t stand near the door afterwards.
i know im 2 years late withi know im 2 years late with comment, but the packs in the Lyceum DO respawn, trust me i was just there and they did respawn. there are sever packs roaming, I think thats what this guy was thinking about.
anyway, years later still a great guide! especially thanks for shadowforge key picture, i swear I had the hardest time finding the entrance to the next part. instance was a good learning experience, very nice one as well. only downside is that the spirit healer is like a mile away from the damn instance, so if you do happen to eat it here, me being noob i did, then it sucks hard time.
replyNever went after Incendius on vanilla wow but I managed to clean up most of the instance with my bro (both 80 pala+priest). We wanted to get the trinket from taurisan but server crashed… and when it came back online we went naxx 25 hehe.
Marshall Windsor questI’m having a really difficult time getting this quest. I’ve looked on thottbot, the wiki, wowhead, etc. and I’m getting conflicting information on how to start this quest. Apparently it was part of a longer chain that got deleted, but I’m not sure if this part of the chain can still be used and where it starts now. If anyone can set me straight on this I’d really appreciate it.
The VaultThe Golems standing in the center of the Vault room activate when you open AND loot ALL of the 12 surrounding coffers (not the center one). I have done this several times, so I’ll explain in detail my current knowledge of the script (and the order I do it).
Kill everything in the vault room, do not open the portrait. After you open all of the coffers and loot each box in succession, the last one triggers a mob to appear saying something along the lines of “You shall not live that you’ve stolen from us” (since I solo this instance it’s more like “I’m an idiot for running in here”…but whatever). He also awakens the golems. After the battle has ended, another box appears underneath the last lock (secret panel). I then open the portrait and read the plaque (I believe reading the plaque is the script starter). The guy (can’t recall his name) appears with 3 or so henchmen and drops the key to the last coffer.
The guy (who’s name I can’t remember) sometimes has a broken spawn script, so you may have to back track to the last domicile (possibly the pantry area) to find him (probably stuck in a line-of-sight or pathfinding pause).
I have tried reading the plaque prior to the golems and he has not appeared, so I believe the golems must die first.
Interesting, so they mustInteresting, so they must have changed it. It used to be respawns, 100% positive. I cleared that place (and wiped there) more than I can count back in the days 😉
The LyceumThe packs in these rooms don’t actually respawn, it seems. What happens is they’re replaced as soon as you kill them from a ‘reserve’ on the west side of the room, and it only takes approx 30 secs for them to get to the same spot. So if you try to advance west through the middle of the room, you’ll quickly find you can’t get anywhere because you keep encountering replacement groups before you can move very far. Couple that with the groups coming quicker and quicker the closer you get to their origin point, and it becomes overwhelming. Several groups also pat around the room, so find some way to keep track of them, or you’ll be dead. My group never completed this part, for that very reason.
Coffer Room Last BoxTo open that last box you’ll need the key. The key is on one of the spectators in the Ring of the Law. Don’t worry, he and his cohorts will agro once they realize you’ve looted the vault. Then head back with the key and open it.
Ribly Screwspigot.This quest actually does not have a pre-quest (anymore). I sure as hell have not done the pre-q but have got the quest now.
Marshal Windsor questThe Marshal Windsor quest has many prerequisites that are not listed in this guide. More info: http://www.thottbot.com/q4241 Also, it seems the Ring of the Law script has been changed to be easier. It’s now just 3 waves of beasts (non-humaniods). The first two waves come from the first door and have 4-5 mobs each. There is a delay before the third wave and it’s only a single easy boss mob.
6. Golem Lord AngelmachHow to: Golem Lord Argelmach himself hits fairly hard. But hes a complete coward at the start, so focus ONLY on the 2 adds, do NOT hit the G’Lord with anything and he will run back into the rooms you just cleared, yelling for help. If you are fast enough you will be able to drop the two adds by the time the G’Lord runs back, the tank can then sunder/taunt etc to gain aggro, after that its a straight fight. After loot the quest info, and hopefully he drop one of the nice trinkets. Nearby is a nice engineer Repair Bot recipe on the ground.
Coffer RoomYou mentioned the coffer room (the vault) briefly, but didn’ explain what it involves. There is a boss in there that you can kill. I don’t remember if he drops anything good. However, after you kill him, you can go into the vault and loot the coffers. To open them, you have to have coffer keys. These keys drop of trash mobs all throughout the instance and stack on your key ring. Be careful though, because there is two golems in the room as well. I haven’t quite figured out what triggers them, but I have had to fight them a few times before. The first time I did BRD, my group was extremely worried about them, but they didn’t agro when we pulled the boss. Then we though they would agro if we looted one or all of the coffers…that didn’t happen either. So, we figured they were just there for display purposes. However, next time I ran BRD, they agro’d with the boss. And I’ve been on another BRD run where they agro’d while we were in the middle of looting the coffers. If someone could clear this up, it would be great. The coffers can be quite worth the effort, not so much for the drops (usually pretty crappy greens), but for the sacks of gems, which can sometimes contain pristine black diamonds or other rare gems. As well, there is one safe is the middle of the room which I have not been able to open. I’ve clicked on the portrait outside the room, but haven’t been able to find the mob who carries the key.
Thanks again for the great guide!
Twitcher
70 Pally
Aggramar
Lord IncendiusIncendius can be a problem for your tanks (and subsequently for your group) if you don’t realize the following:
He is surrounded by a pit of lava, and has a knockback/throw ability.
If you want to take him down without risk to the tanks being thrown unexpectedly into lava, first pull incendius out of his chamber into the hall (we used the entrance opposite the entry from the domicile), where the warrior (or our secondary tank druid) could play safely.
Hope this helps.